The new Android Things platform opens up a new way to build powerful Internet of Things systems using the ubiquitous Android platform. For those who already know Android development, this offers a very low barrier to entry. And for those building Bluetooth LE systems, the relatively robust BlueDroid bluetooth stack is a welcome change from the buggy, unstable and poorly-documented BlueZ bluetooth stack standard on non-Android Linux systems.
For all it’s power, Android Things has real drawbacks. It takes over a minute to boot, which is an eternity for an embedded system. It is designed for relatively high-powered devices with 512 Mb of RAM or more. And while tiny computers like the Edison board and the Raspberry Pi 3 support it, the ultra tiny and crazy cheap $10 Raspberry Pi Zero W is unfortunately off-limits for this platform. Its ARMv6 processor is not supported by Android at all.
But if you can live with these boot times and can work with the Raspberry Pi 3, this article will show you how to detect beacons with the Android Things platform.
Tutorial
This tutorial assumes you have basic Android development skills. If you haven’t developed an Android app before, you might want to go through a simple Android app tutorial first.
To get started detecting beacons with Android Things, you’ll need the following:
- Raspberry Pi 3 with Micro SD card (or other supported board)
- USB card reader for your workstation
- Ethernet cable(s)
- Access to a router on the same subnet as your workstation
- Android Studio 3 (You must have version 3+ to using the Android Things new project creation tool)
- A mobile phone with the Locate app for iOS or Android you can use to transmit a beacon signal
- Optional: A monitor with a HDMI cable (useful for troubleshooting boot problems)
Step 1: Download Android Things
First, locate the system image for your hardware board on the Android Developers site here.
Once it is downloaded, unzip it and prepare to flash the image to your board.
Step 2: Flash the system image
The instructions to flash the system image to the micro SD card depends on the workstation you are using. On my mac, I use the dd command, but equivalent instructions exist for Windows and Linux here: https://developer.android.com/things/hardware/raspberrypi.html
Once the flash completes, simply remove the micro SD card from your workstation, put it in your board.
Step 3. Set up a console connection
Android Things is an embedded system, so you don’t control the device from a user interface. You control it through a console (sometimes using the Android Debug Bridge (ADB) tool or GUI tools talking over ADB like Android Studio or Android Monitor.) You can use a special serial cable to connect your Raspberry Pi to your workstation via a USB port, but if you have access to an open ethernet port on the same subnet as your workstation, this is by far the easiest way.
Simply use an ethernet cable to connect your Raspberry Pi to the network, and power it on. If all goes well, you will see lights flash on the Pi board. Wait about 90 seconds for it to boot up, then type the following on your workstation where you have the Android development tools installed:
adb connect Android.local
If it works, you’ll see a response like connected to Android.local:5555. Running this command is the equivalent of connecting a USB cable to a development Android phone, when USB debugging is enabled. The ADB tool on your workstation now has a connection to your device.
Step 4. Set up WiFi (optional)
This is enough to Android Studio working with your board, but you might also want to set up a WiFi connection for your Raspberry Pi so it doesn’t have to stay connected to the ethernet cable. If you set it up with a WiFi network on the same subnet as your workstation, you’ll be able to perform the same command above without the Pi connected via an ethernet cable.
To do this, you first run the adb shell command on your workstation to get a console into the Pi. Then you run the following command to set up the wifi for your network:
am startservice com.google.wifisetup/.WifiSetupService -a WifiSetupService.Connect -e ssid MY_SSID_NAME -e MY_PASSPRHRASE
You’ll of course need to replace MY_SSID_NAME and MY_PASSPHRASE with the credentials for your wifi network.
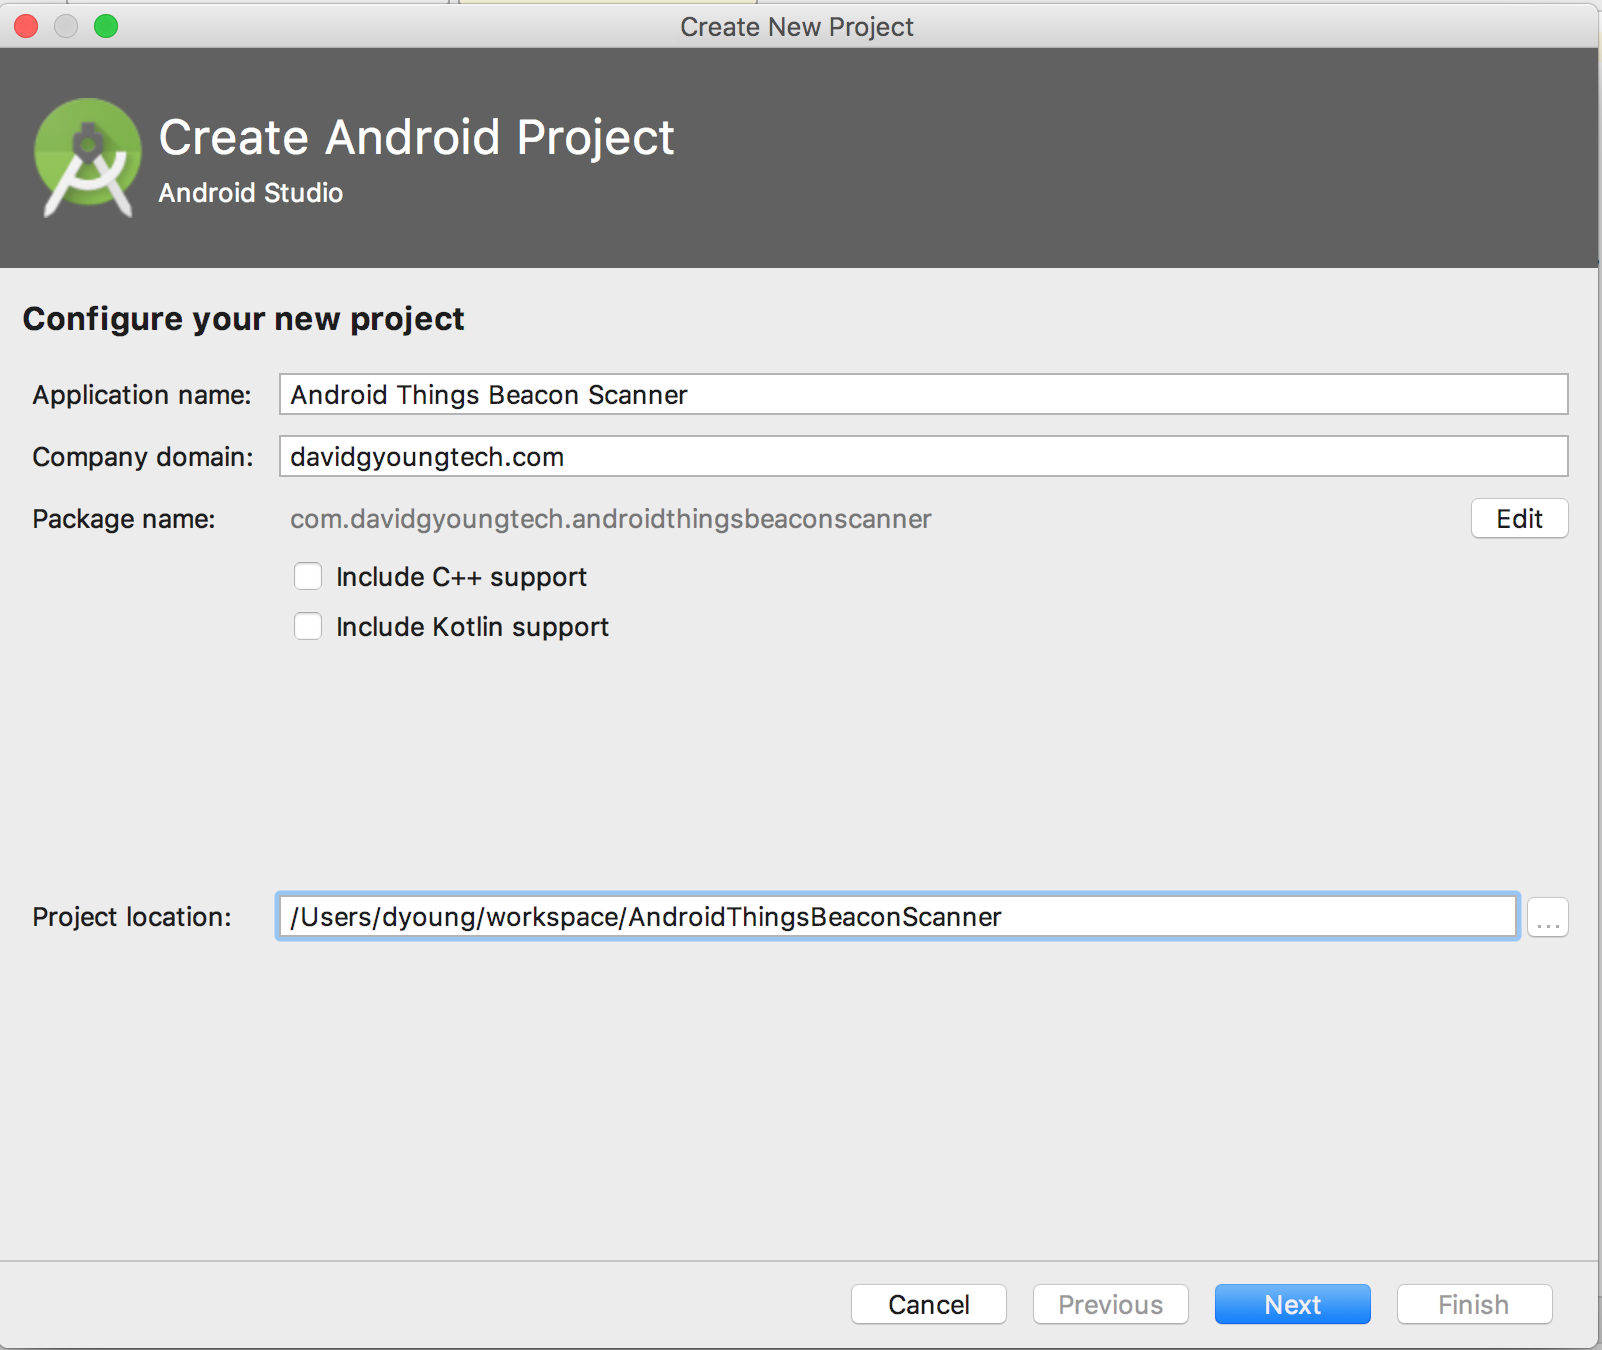
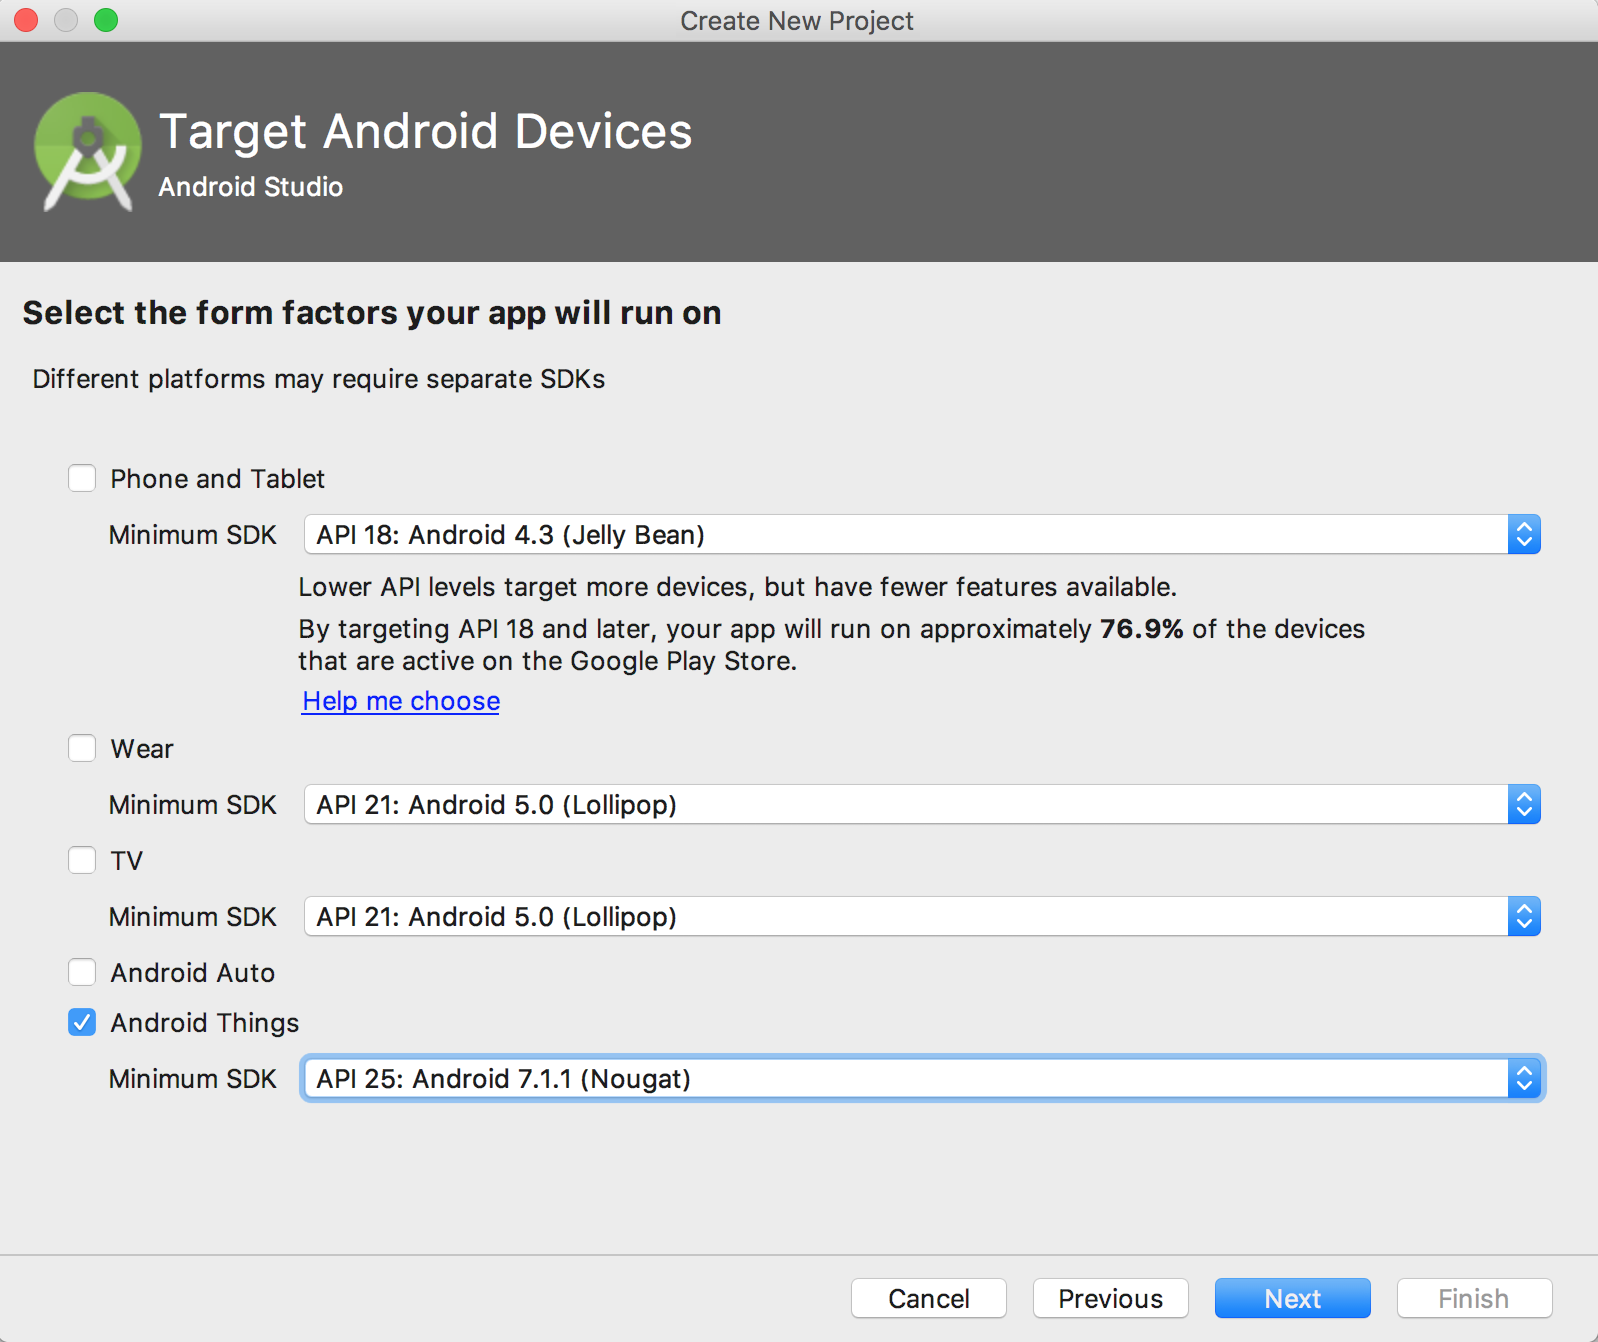
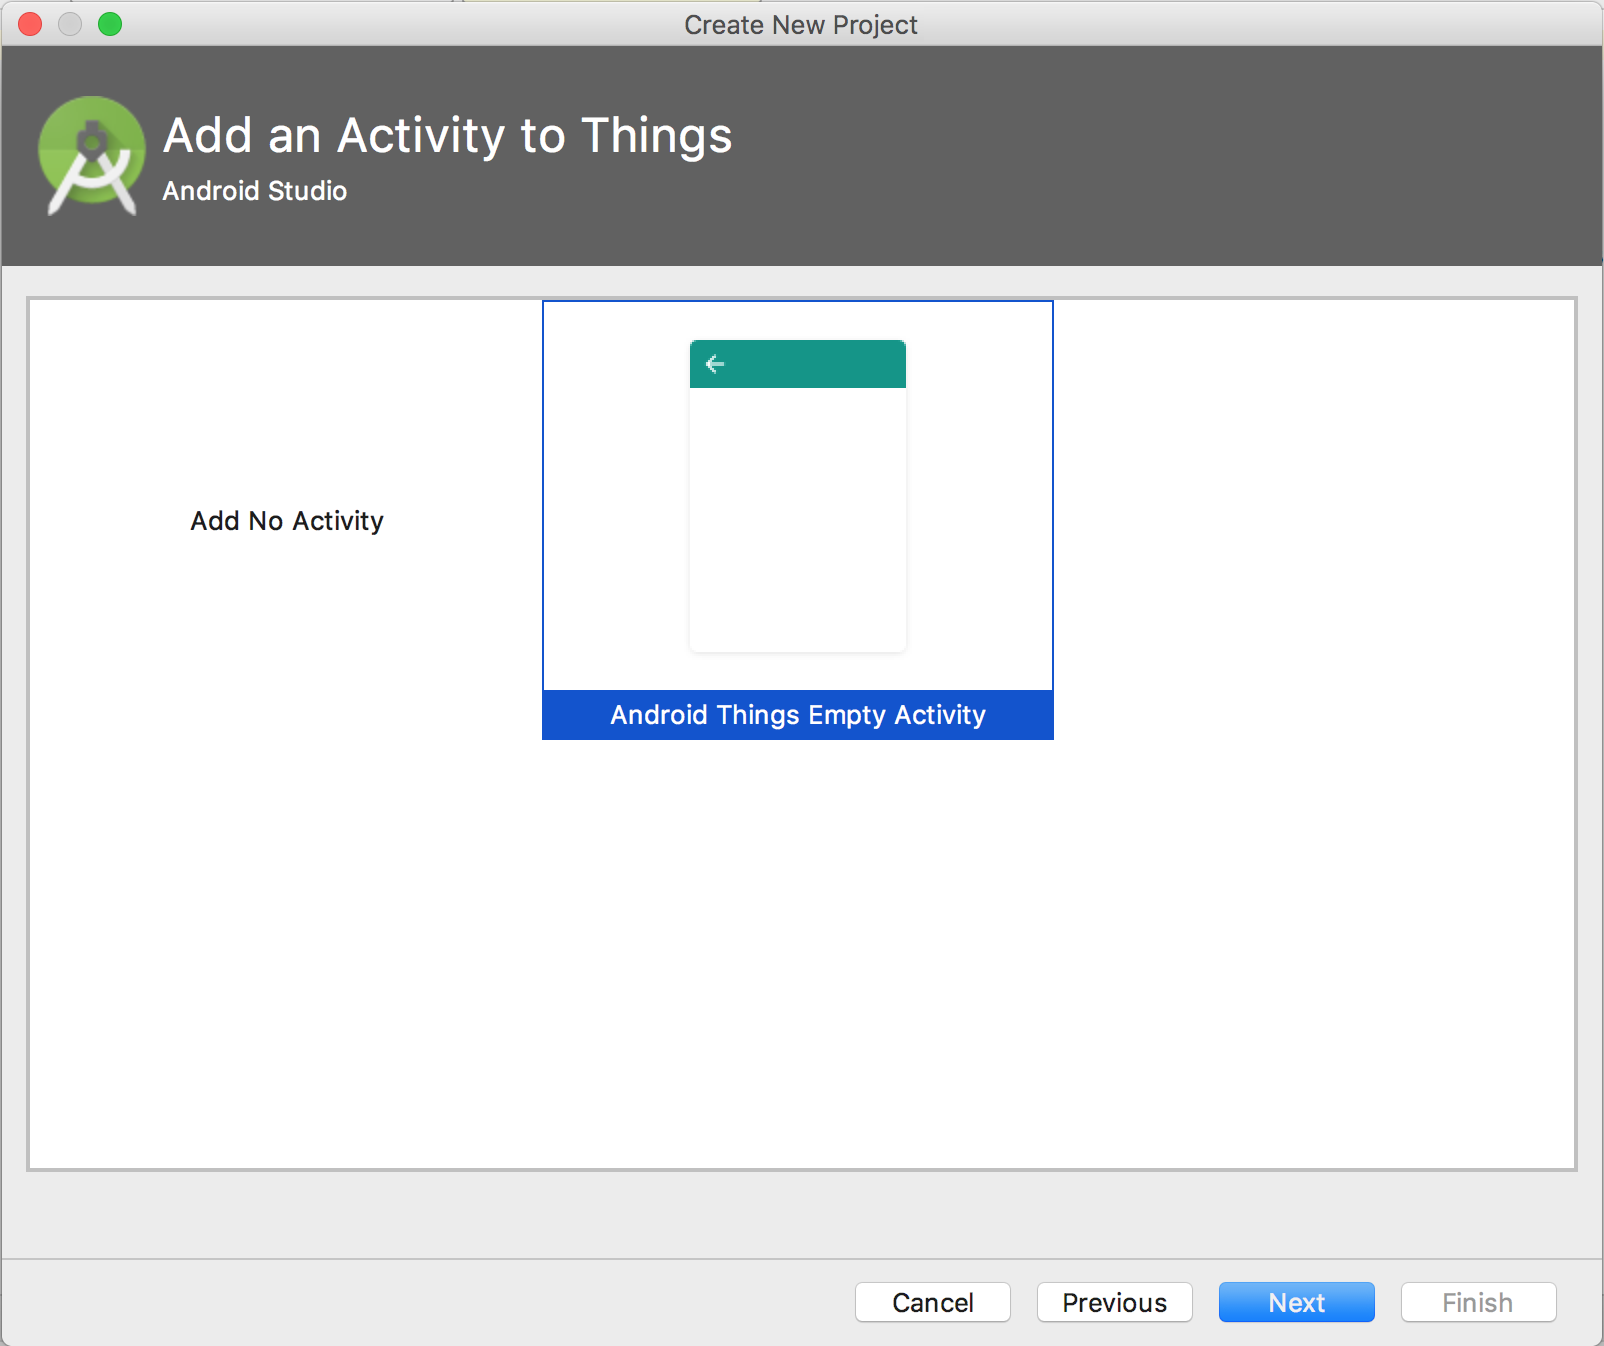
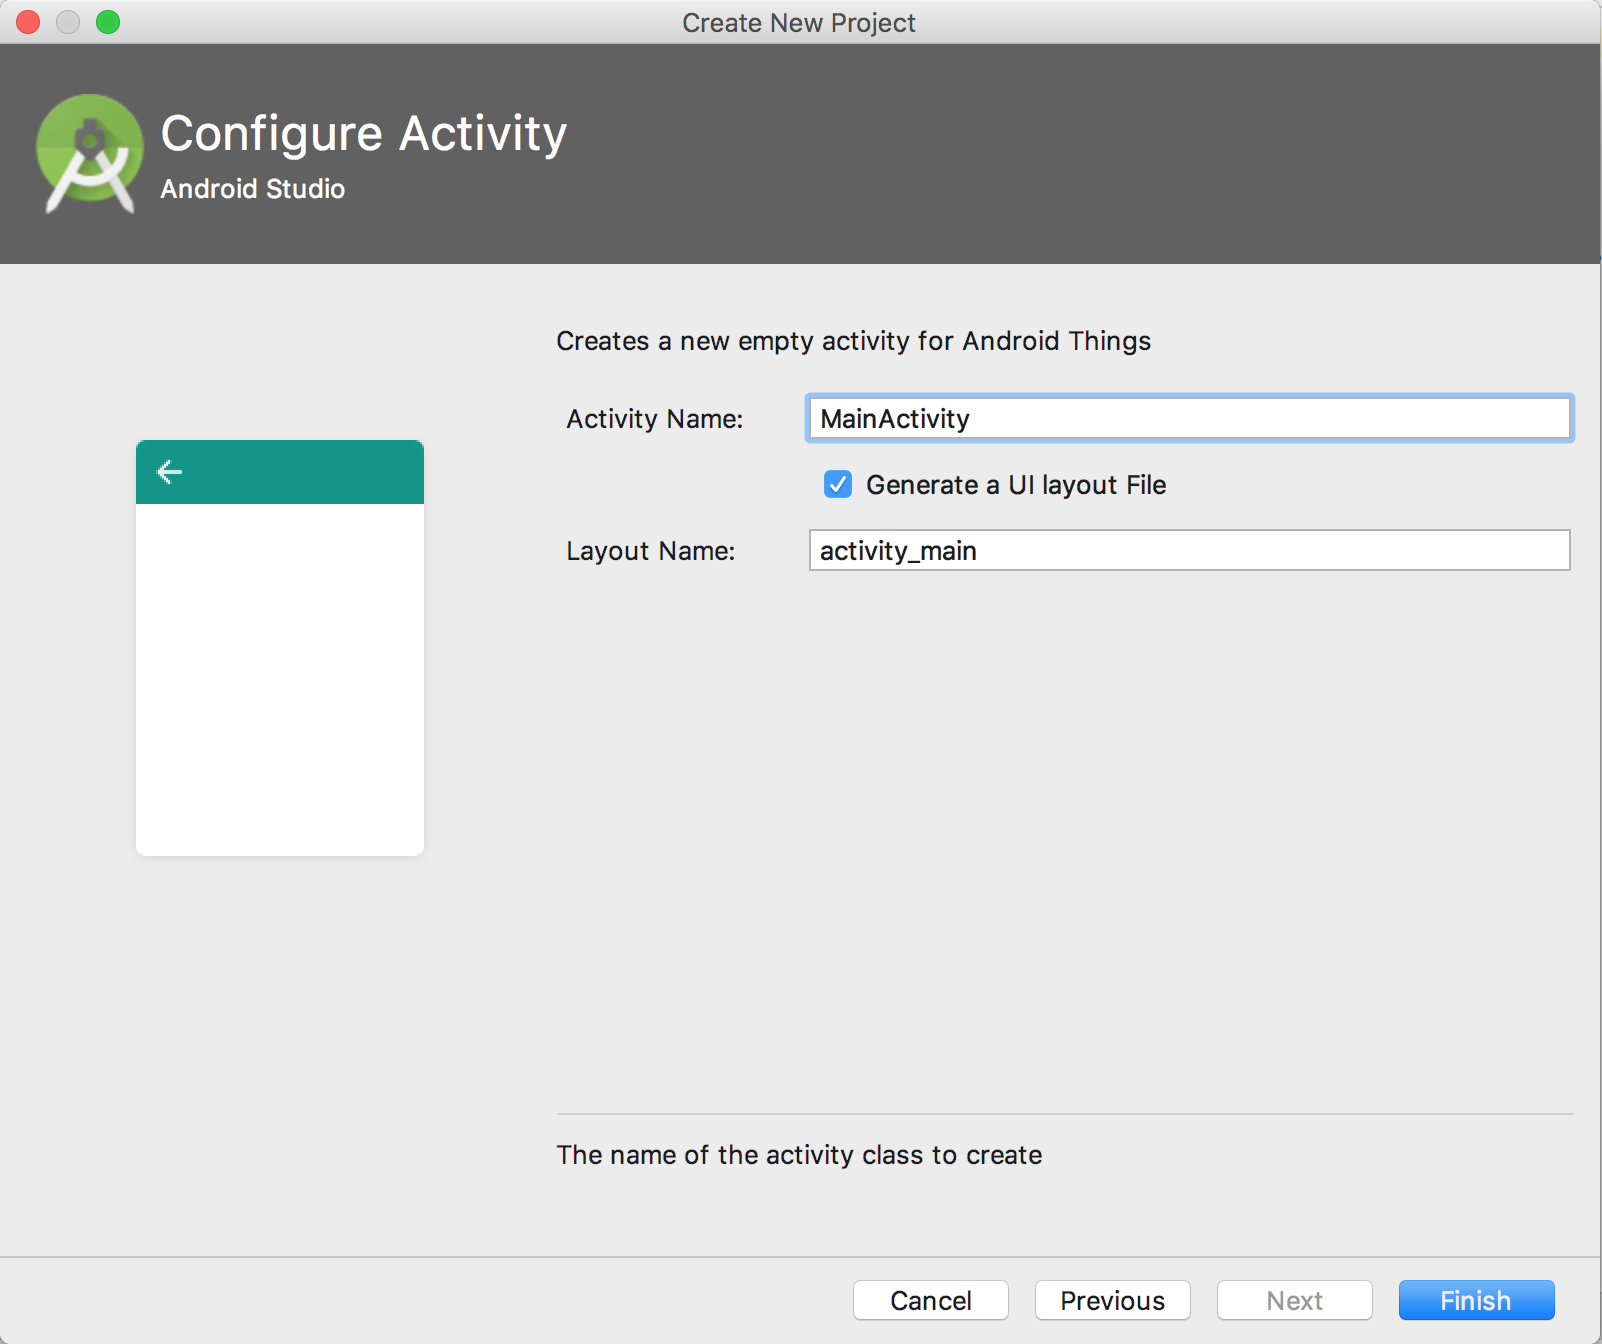
Step 5. Create a new Android Things app
Now that you have a connection to your Android Things board from your workstation, you are ready to use Android Studio to build your app. Making a new Android Things app is an awful lot like making a regular Android app. If you have Android Studio 3+, there is a tool for starting new Android Things projects by going to: File -> New -> New Project
Follow the screenshots like shown below.
Once the project template is created, take a look at the AndroidManifest.xml. You’ll see this:
<?xml version="1.0" encoding="utf-8"?>
<manifest package="com.davidgyoungtech.androidthingsbeaconscanner"
          xmlns:android="http://schemas.android.com/apk/res/android">

    <application>
        <uses-library android:name="com.google.android.things"/>

        <activity android:name=".MainActivity">
            <intent-filter>
                <action android:name="android.intent.action.MAIN"/>

                <category android:name="android.intent.category.LAUNCHER"/>
            </intent-filter>
            <intent-filter>
                <action android:name="android.intent.action.MAIN"/>

                <category android:name="android.intent.category.IOT_LAUNCHER"/>
                <category android:name="android.intent.category.DEFAULT"/>
            </intent-filter>
        </activity>
    </application>

</manifest>
This looks like a regular Android App manifest with a special
<intent-filter>
    <action android:name="android.intent.action.MAIN"/>
    <category android:name="android.intent.category.IOT_LAUNCHER"/>
    <category android:name="android.intent.category.DEFAULT"/>
</intent-filter>
This filter is what will launch our app automatically when the device boots up. Android Things apps are based on Activities just like regular Android apps. The big difference is that a user interface is optional (if a display is attached, you can show regular Android UI elements) and Activities can run at boot (and keep running forever) without user interaction.
Step 6. Code Beacon Detections
Edit the build.gradle (Module: app) file so it looks like this:
dependencies {
    compile 'org.altbeacon:android-beacon-library:2.9.1'
    ...
Then go to MainActivity.java and add these four lines to the end to the onCreate method:
BeaconManager beaconManager = BeaconManager.getInstanceForApplication(this);
beaconManager.getBeaconParsers().clear();
beaconManager.getBeaconParsers().add(new BeaconParser("iBeacon").setBeaconLayout("m:2-3=0215,i:4-19,i:20-21,i:22-23,p:24-24"));
beaconManager.bind(this);
These lines set the Android Beacon Library up to look for iBeacons.
You’ll get an error flagged on the last line, because we have not yet made our Activity implement the BeaconConsumer interface. Let’s fix that. Change the class definition to look like below. And while we’re at it, let’s add a TAG definition so we can log debug lines:
public class MainActivity extends Activity implements BeaconConsumer, RangeNotifier {
   private static final String TAG = MainActivity.class.getSimpleName();
The changes to the class definition above adds two interfaces to the Activity, one to connect to the Android Beacon Library and the other to get beacon ranging callbacks from it. You’ll see errors that not all the methods of the interfaces have been implemented. So you’ll need to add the following to the body of the class:
@Override

public void onBeaconServiceConnect() {

  Log.d(TAG, "Beacon service connected.  Starting ranging.");

  try {

    mBeaconManager.startRangingBeaconsInRegion(new Region("allbeacons", null, null, null));

    mBeaconManager.addRangeNotifier(this);

  } catch (RemoteException e) {

    e.printStackTrace();

  }

}


@Override

public void didRangeBeaconsInRegion(Collection<Beacon> beacons, Region region) {

    for (Beacon beacon: beacons) {

            Log.d(TAG, "Detected beacon: "+beacon);

    }

}
This code waits for the library to be initialized, at which point onBaconServiceConnect gets called. Inside that method, it starts beacon ranging, defining a “Region” of beacons to match that has all identifiers set to null – this effectively makes it match any beacon it sees. It also sets the RangeNotifier to be this same MainActivity class. That makes it so that the didRangeBeaconsInRegion method below will get called once per second with a list of all beacons that are detected. And that method definition simply loops through all of the detected beacons and logs them.
We can now build and run this app though Android Studio. Choose Run -> Run App, and Android Studio will build your application APK package, upload it to the Android Things board, and start running it. If you don’t have a display, you won’t see anything. But you’ll see log lines in LogCat window in Android Studio. You should see something like this:
06-12 13:11:37.691 31695 31695 D MainActivity: Beacon service connected. Starting ranging.
Step 7. Obtain Permissions
We haven’t detected any beacons yet. And in case you have jumped the gun and turned on a beacon transmitter, you’ll notice it doesn’t work to detect beacons. Why?
If you’ve ever worked with Bluetooth on Android before, you might know that Android requires you to request and get permission from the user to access the device’s location in order to scan for Bluetooth beacons. It does this because beacons are often used to figure out the user’s location, so the need to declare this permission int the AndroidManifest.xml as of Android 7. Because Android Things preview release is based on Android 7, the same requirement applies. What’s more, because Android classifies location as a “dangerous” permission, it must be dynamically requested from the user at runtime. But Android Things is designed to run without a user interface. So how can this work?
Android Things solves this by automatically granting dangerous permissions at boot time to any applications that declare the need for them in its AndroidManifest.xml. The Android Beacon Library automatically includes these in its manifest, and they get merged to your application’s manifest by Android Studio during the build. You can see the merged manifest in Android Studio 3 by bringing up AndroidManifest.xml and tapping the “Merged Manifest” tab at the bottom of the screen.
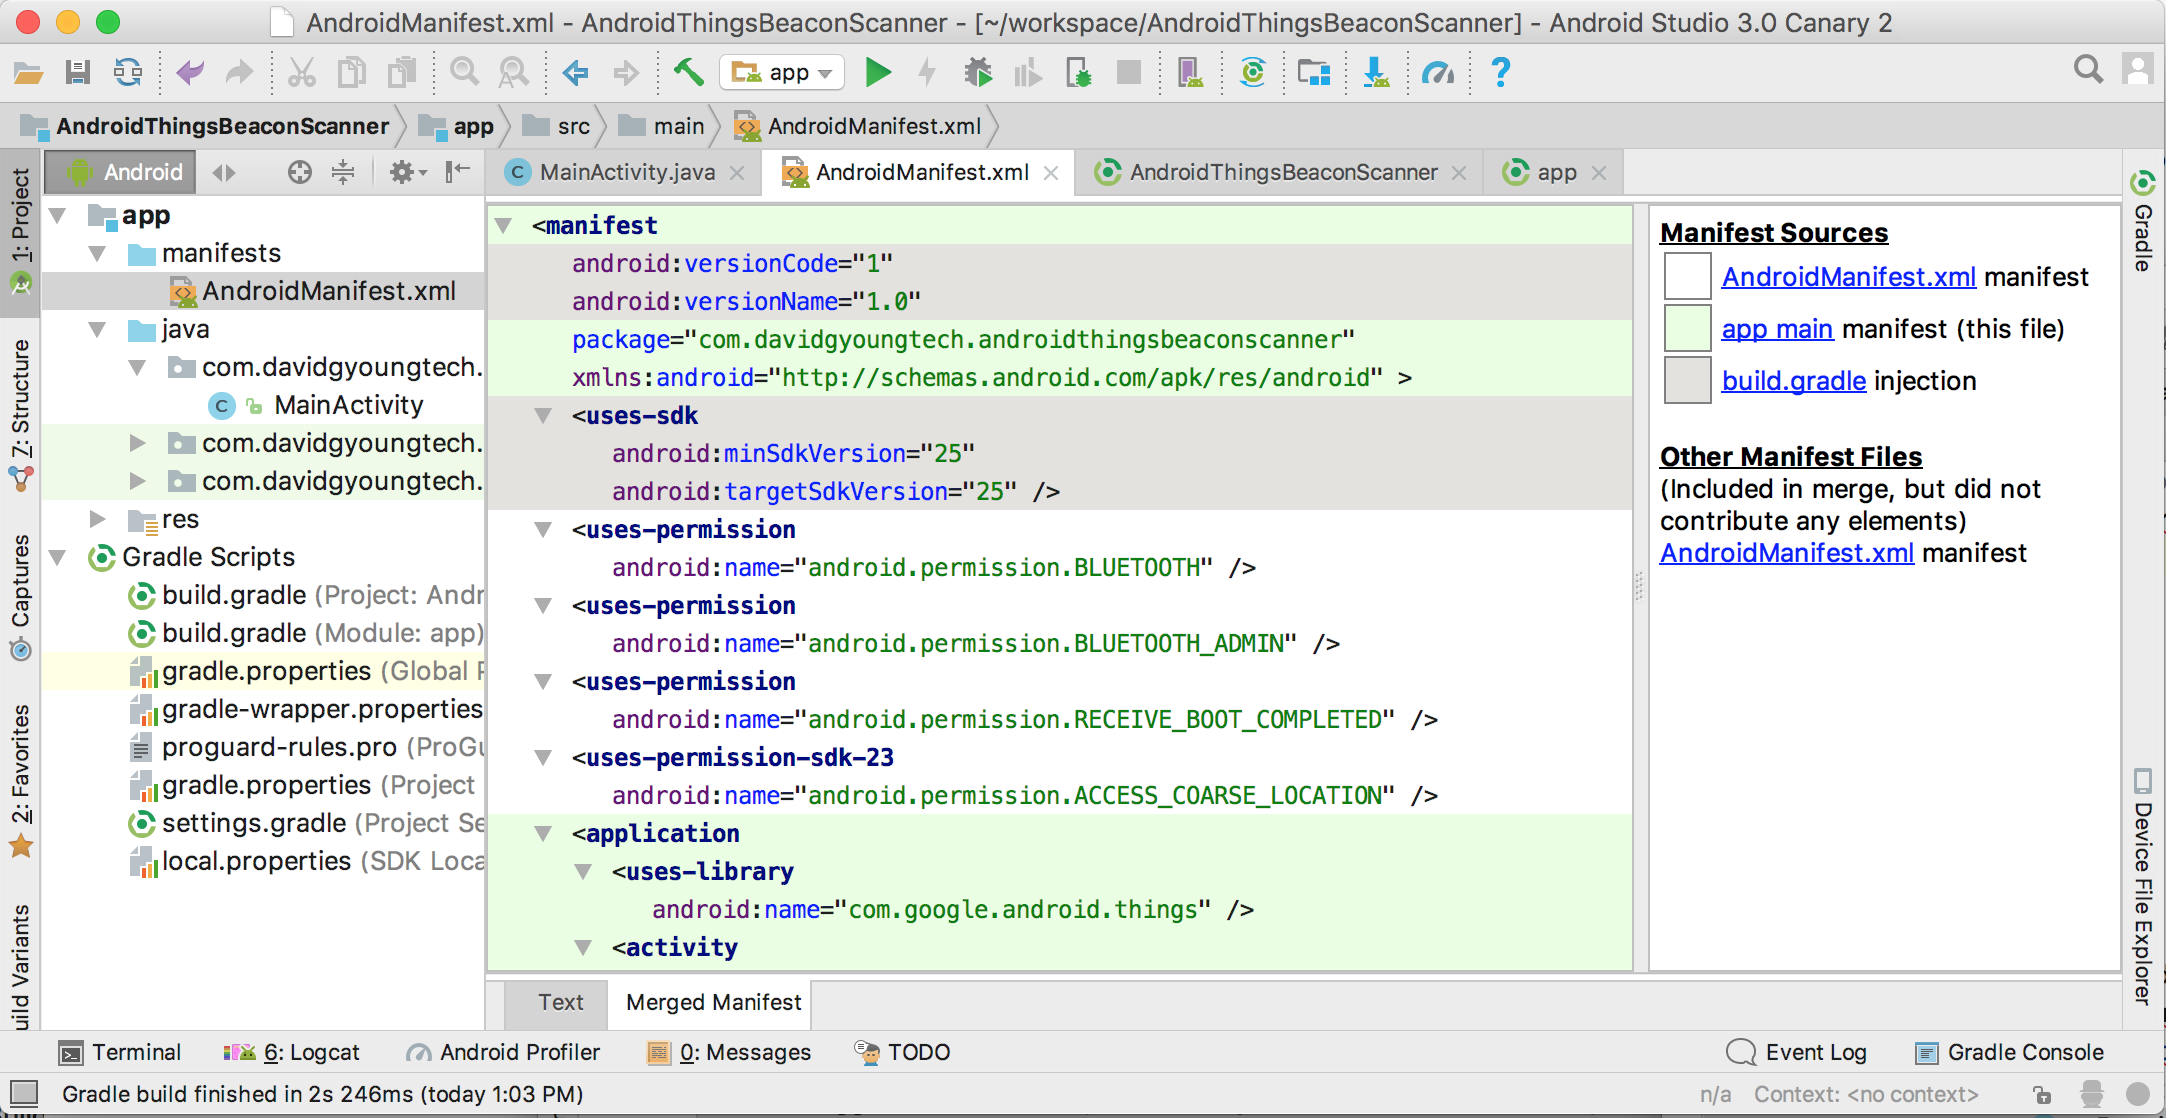
As you can see, the following permission was brought in automatically by the AndroidBeaconLibrary:
<uses-permission-sdk-23 android:name="android.permission.ACCESS_COARSE_LOCATION" />
This is enough to get us going, but it won’t work until we reboot the Android Things device after installing the app. Trying to detect bluetooth devices (or access other location APIs) will fail silently until you do this. If you write code to check if the permission has been granted, it will return false until after a reboot. And if you write code to dynamically request the permission from the user
So long story short: just reboot your Android Things device after installing your app the first time!
Turn off your Android Things device, turn it back on, and wait about 90 seconds for it to boot.
Step 8. Test
After you have rebooted your device, you’ll need to reconnect adb again:
adb connect Android.local
Once you’ve done that, you should see your log line in the LogCat pane in Android Studio like this:
06-12 13:11:37.691 31695 31695 D MainActivity: Beacon service connected. Starting ranging.
This indicates that your app started up automatically at boot, something we configured in the AndroidManifest.xml.
Now it’s time to turn on a beacon and see if we detect it. Go to the Locate app on your iOS or Android phone, and turn on a beacon with any identifier. The screenshot below shows the iOS version. The Android version looks different but does the same thing.
![]()
As soon as you turn on the beacon transmitter, you should see log lines in Android Studio show up like below:
06-12 13:12:44.671 31695 31695 D MainActivity: Detected beacon: id1: 2F234454-CF6D-4A0F-ADF2-F4911BA9FFA6 id2: 1 id3: 2 type iBeacon
Congratulations! You’ve just detected a beacon with Andorid Things.