Ever want to write an iOS app that determines the phone number of the device on which it is running? Well, it turns out you can’t, at least not with iOS APIs. But throw a cloud server into the mix and there is a way!
The Problem
The problem is that Apple disallows iOS apps from accessing the device phone number for privacy reasons.
Clearly, the idea is to block sketchy app developers from harvesting your phone number and selling it to
spammers. But in their typical heavy-handed approach, Apple blocks all access to the device phone number. An
app cannot get it even if they ask the user permission.
Frustratingly, this same restriction applies to enterprise devices, so corporate apps can’t even access the phone number of the device that the company itself owns! It used to be that enterprise apps could use private APIs to access this functionality (entrprise apps don’t need to go through App Store review, so they can get away with using private APIs) but as of iOS 11, Apple has locked down all known private APIs to access the phone number so these cannot be used anymore.
Like it or not, this blocks legitimate uses of phone number capture. A common workaround is to ask the user to type in their phone number, something that is tedious, error-prone, and subject to users intentionally providing false numbers. WhatsApp, for example, requires you to type in your phone number, then go through a process to verify the phone number by having their servers send you a SMS code that you are later required to enter to complete your registration.
The Solution
Fortunately, there is an alternative that requires no data entry by the user and does a pretty good job of ensuring that the phone number captured is for the iPhone – or at least for a mobile phone in the user’s possession. The idea is to have the app send a SMS message to a server with the app’s unique installation code. The app can then query the same server to see if it has recently received a SMS message from a device with this unique app installation code. If it has, it can read the phone number that sent it. Here’s a demo video showing the process.
The good news is that using tools at AWS, you can set up this whole process for free. Amazon will assign a “long code” phone number to your AWS account upon request. In theory these are limited to sending a maximum of 200 messages per day – but for this use case, we don’t send any messages – everything is inbound! So the whole process can work on a free-tier at Amazon. Of course, if you process a huge volume of SMS messages, you’ll start incurring costs on your AWS computing resources. But that would require an app with many millions of users to start incurring any significant charges.
The main disadvantage is that the user must still send the SMS. The iOS app can bring up a view with a pre-formatted message to send to the server, but it can’t actually end the SMS unless the user hits the send button. The user could, of course, choose not to send it. The user could edit the message so the app install identifier is changed. The user could also look at the message, and then send it from a different phone. So this solution can’t force users to give you their phone number. But it can make it super easy for users who do want to share it to do so.
AWS Architecture
The diagram below shows the AWS components that are needed do this for you.
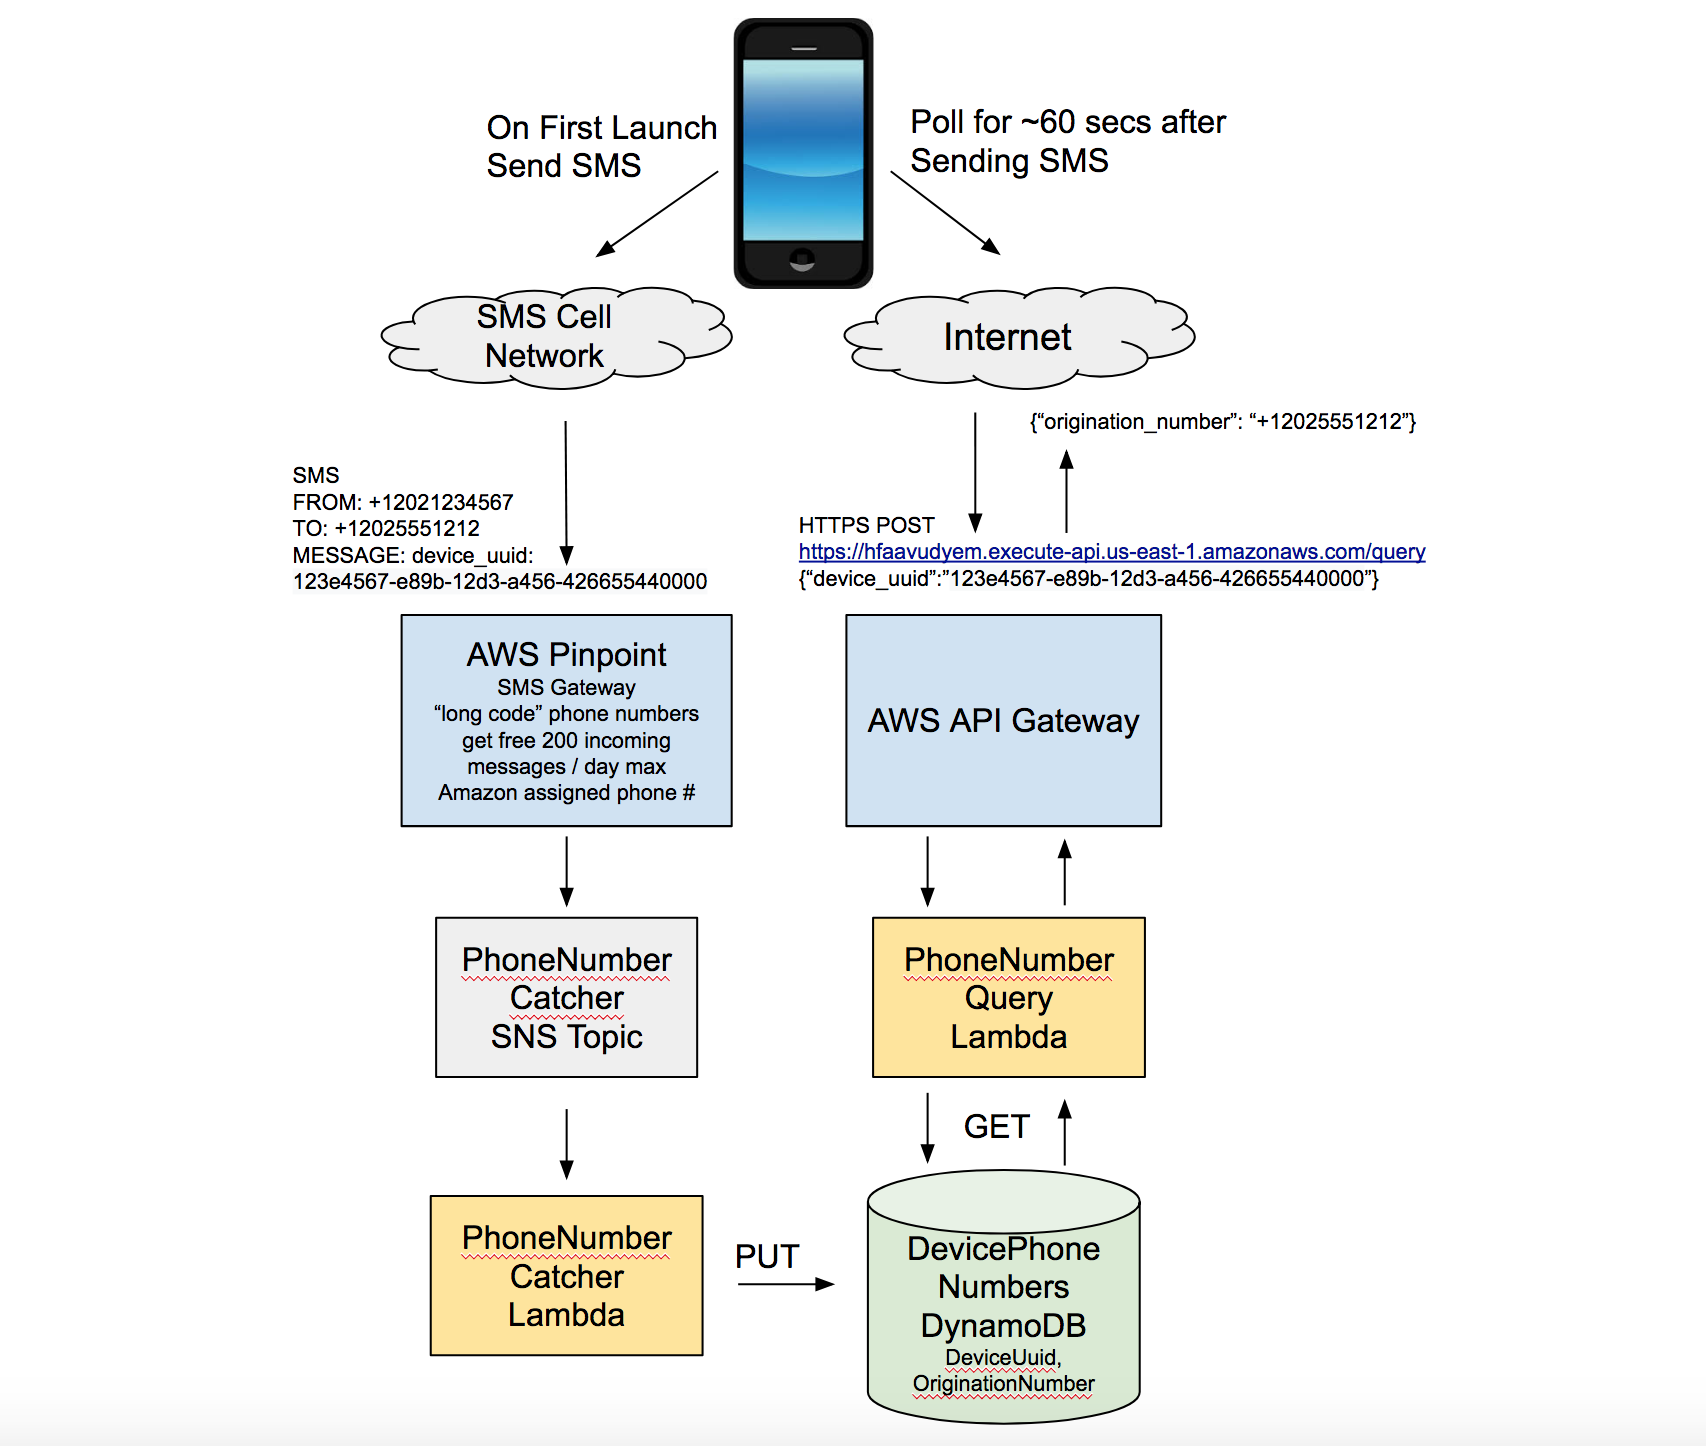
Using “AWS Pinpoint” you can request a free 10 digit US phone number to receive SMS messages. Amazon then lets you set up a Simple Notification Service (SNS) “Topic” and configure it to receive all of these incoming SMS messages. The messages can then be configured to flow into a AWS Lambda. That’s basically a tiny “serverless” cloud app that executes to do something with the SNS data whenever it comes in. We’ll have that Lambda insert the phone number and the installation identifier from the app that sent the SMS message into a Dynamo database.
The system also uses a second Lambda to query the phone number from the database, and front it with a AWS “API Gateway” so that our iOS app can ask our our Amazon cloud system to check if a SMS has come in for the device, and if so, what phone number it came from. By polling this endpoint for a brief time after we send the SMS, we will get back the phone number as soon as it arrives at the server. In my tests, this whole process takes about 5-10 seconds.
Setting this up on AWS
STEP 1: Request a phone number
First, we’ll need a phone number on AWS to receive our SMS messages. For traditional 10-digit US phone numbers (also known as a “long code”), this is absolutely free, but you are limited to sending 200 messages per day. If you want to go beyond this, you need a short code, for which you must pay. For our use case, we will not be sending any messages at all, so this works fine.
- Go to https://console.aws.amazon.com and log in or create an account
- Fill out a request to get a “long code”” phone number assigned to your AWS account as described here (Note that you can only have 5 long codes associated with your account.)
- Expect to receive a half dozen questions about your AWS ticket to request the long code. The agent assigned to your case will be trying to determine if you are a SMS spammer. Your job is to reply and convince them you are not.
- Wait to get a number assigned.
When I made my request, Amazon said, “Your Dedicated Long Code for US destinations has been moved to the implementation stage. This process can take 2 to 3 weeks. We will send another message when the implementation is complete.” Wow, that’s slow! Fortunately, they did better in practice. I requested a number on Friday evening and had it assigned by Tuesday evening. If you want to move forward before Amazon completes this assignment, and you have access to an Android device, you can use my free SMS to Amazon SNS forwarder app that will let you use your Android device’s phone number to forward SMS messages to AWS.
Step 2: Make a SNS Topic
We will use this Simple Notification Service topic to receive any messages from our SMS number. The SNS topic allows us to hook in to other AWS services from SMS. For details, see here
- Log in to https://console.aws.amazon.com
- Tap Application Integration -> Simple Notification Service
- Tap Create Topic
- Fill out the following fields: Topic: phonenumbercatcher, Display name: (blank)
-
Tap Create

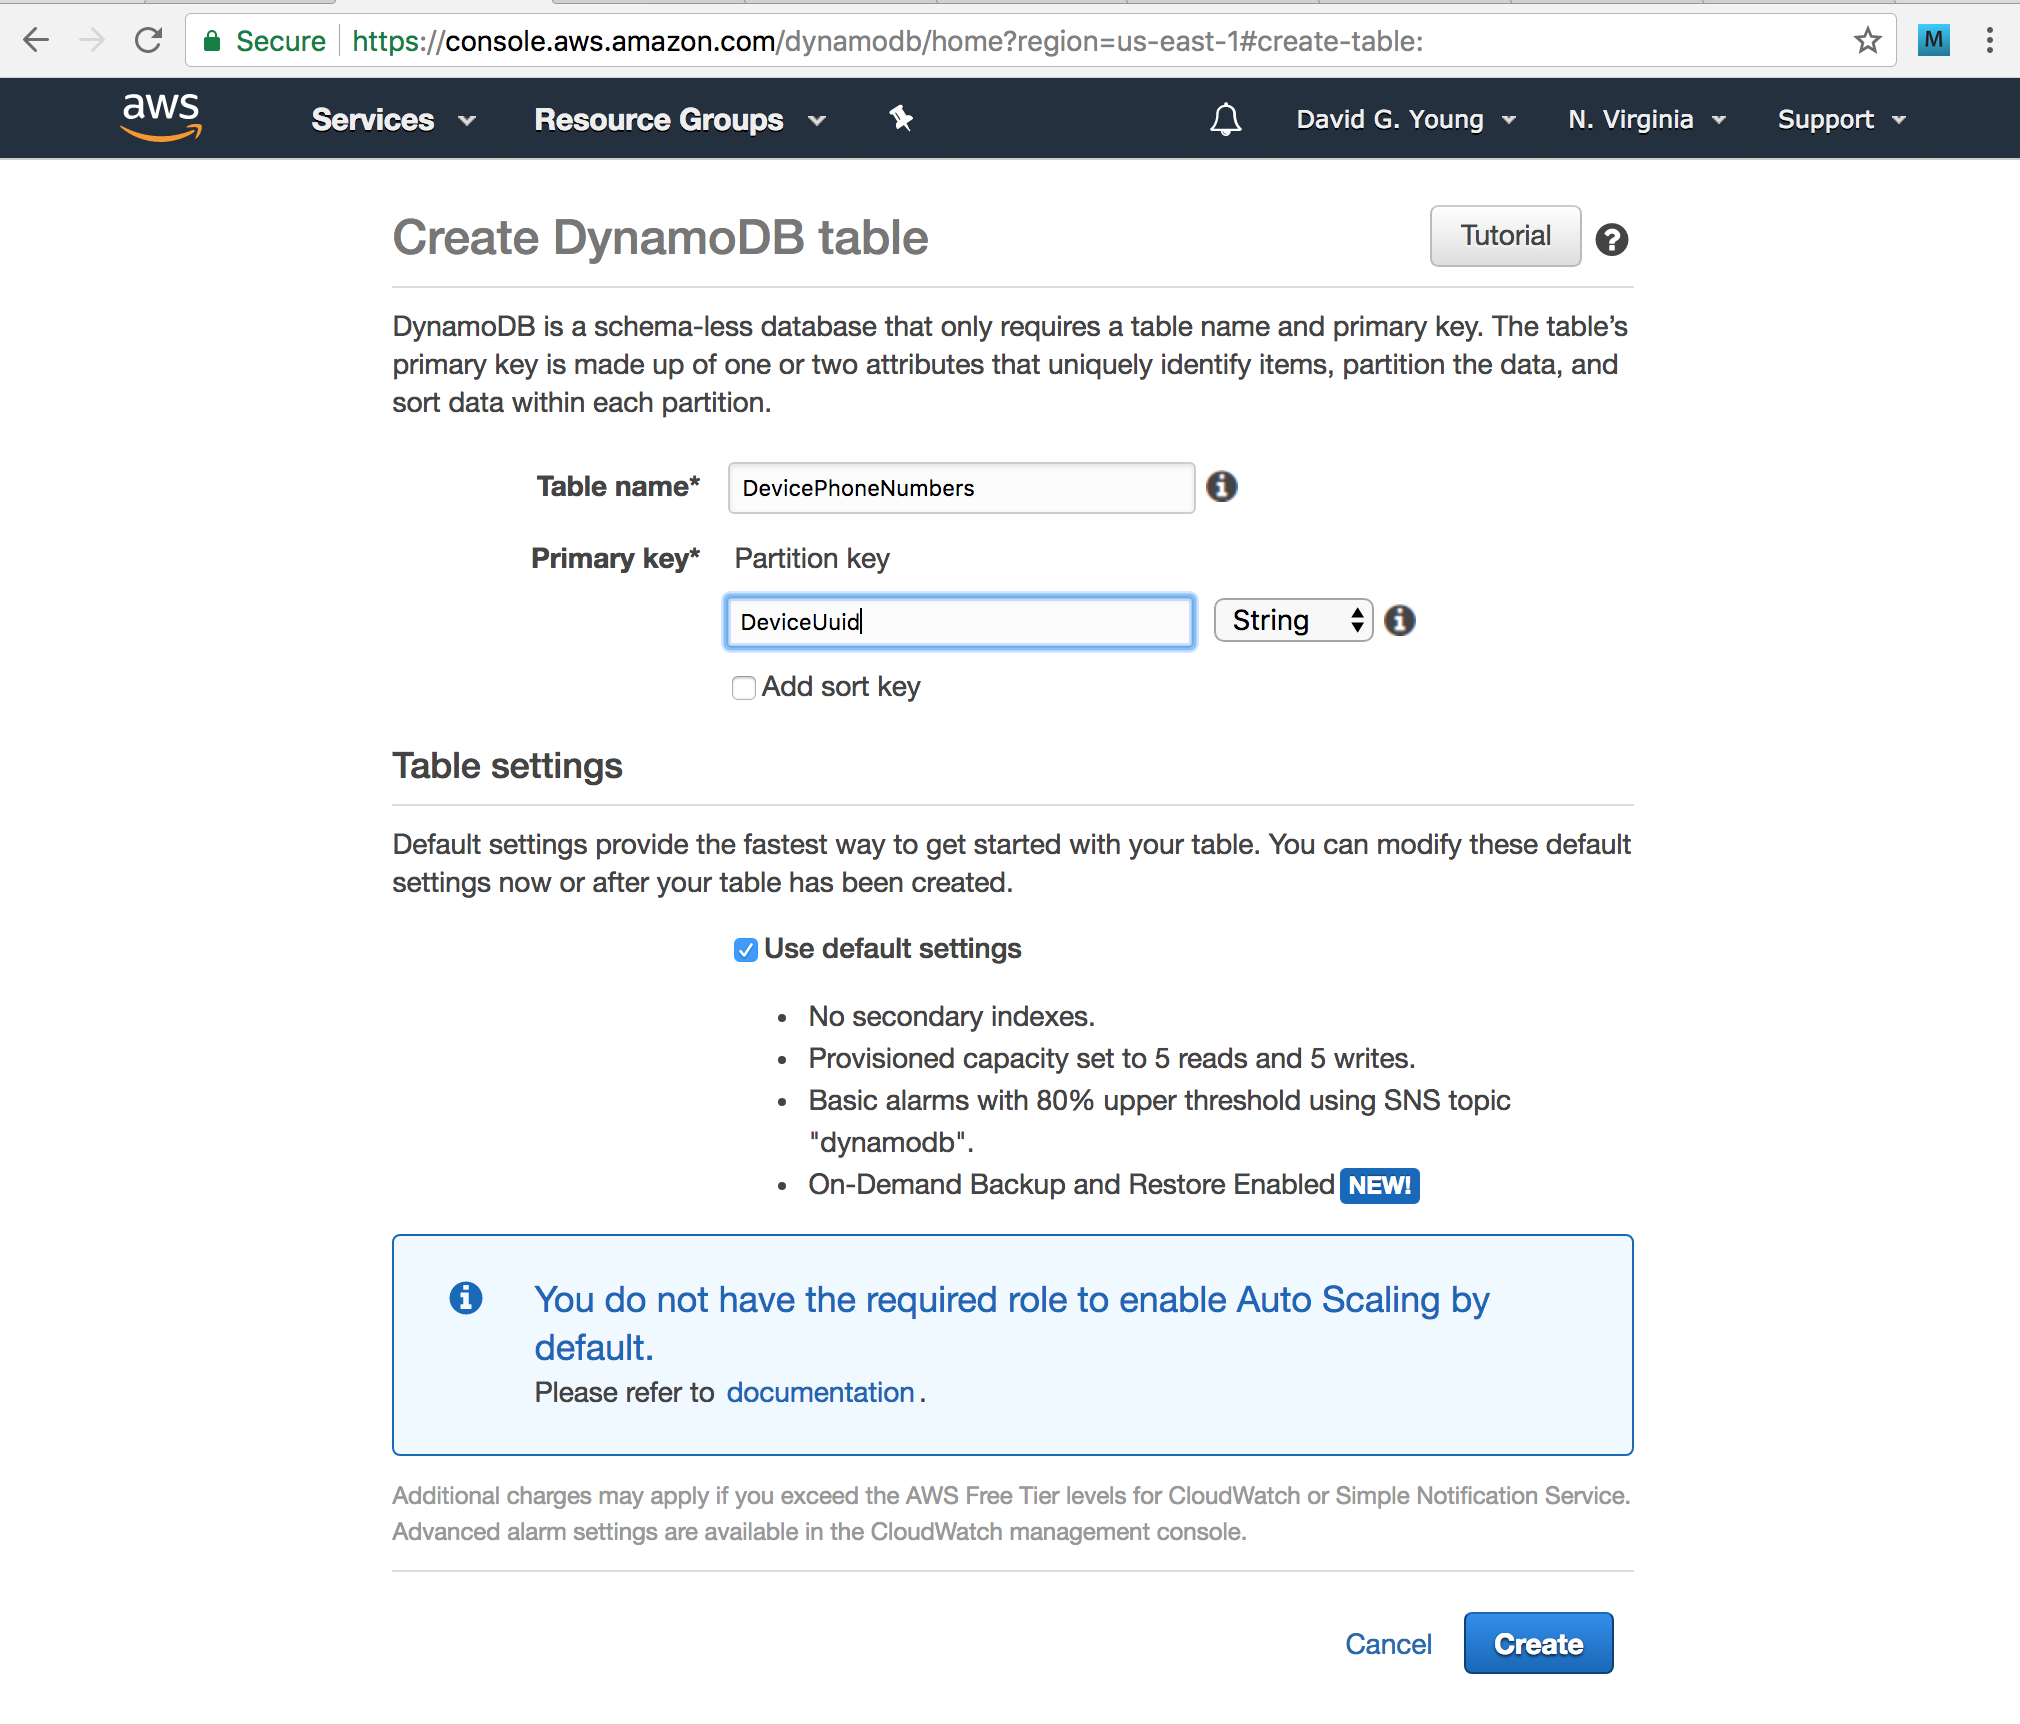
Step 3: Create a new DynamoDB Table
This database table will hold the phone numbers captured
- Log in to https://console.aws.amazon.com
- Tap Database -> DynamoDB -> Create Table
- Set the following values: table name: DevicePhoneNumbers primary_key: DeviceUuid
- Tap Create
-
Wait for the table creation to finish.
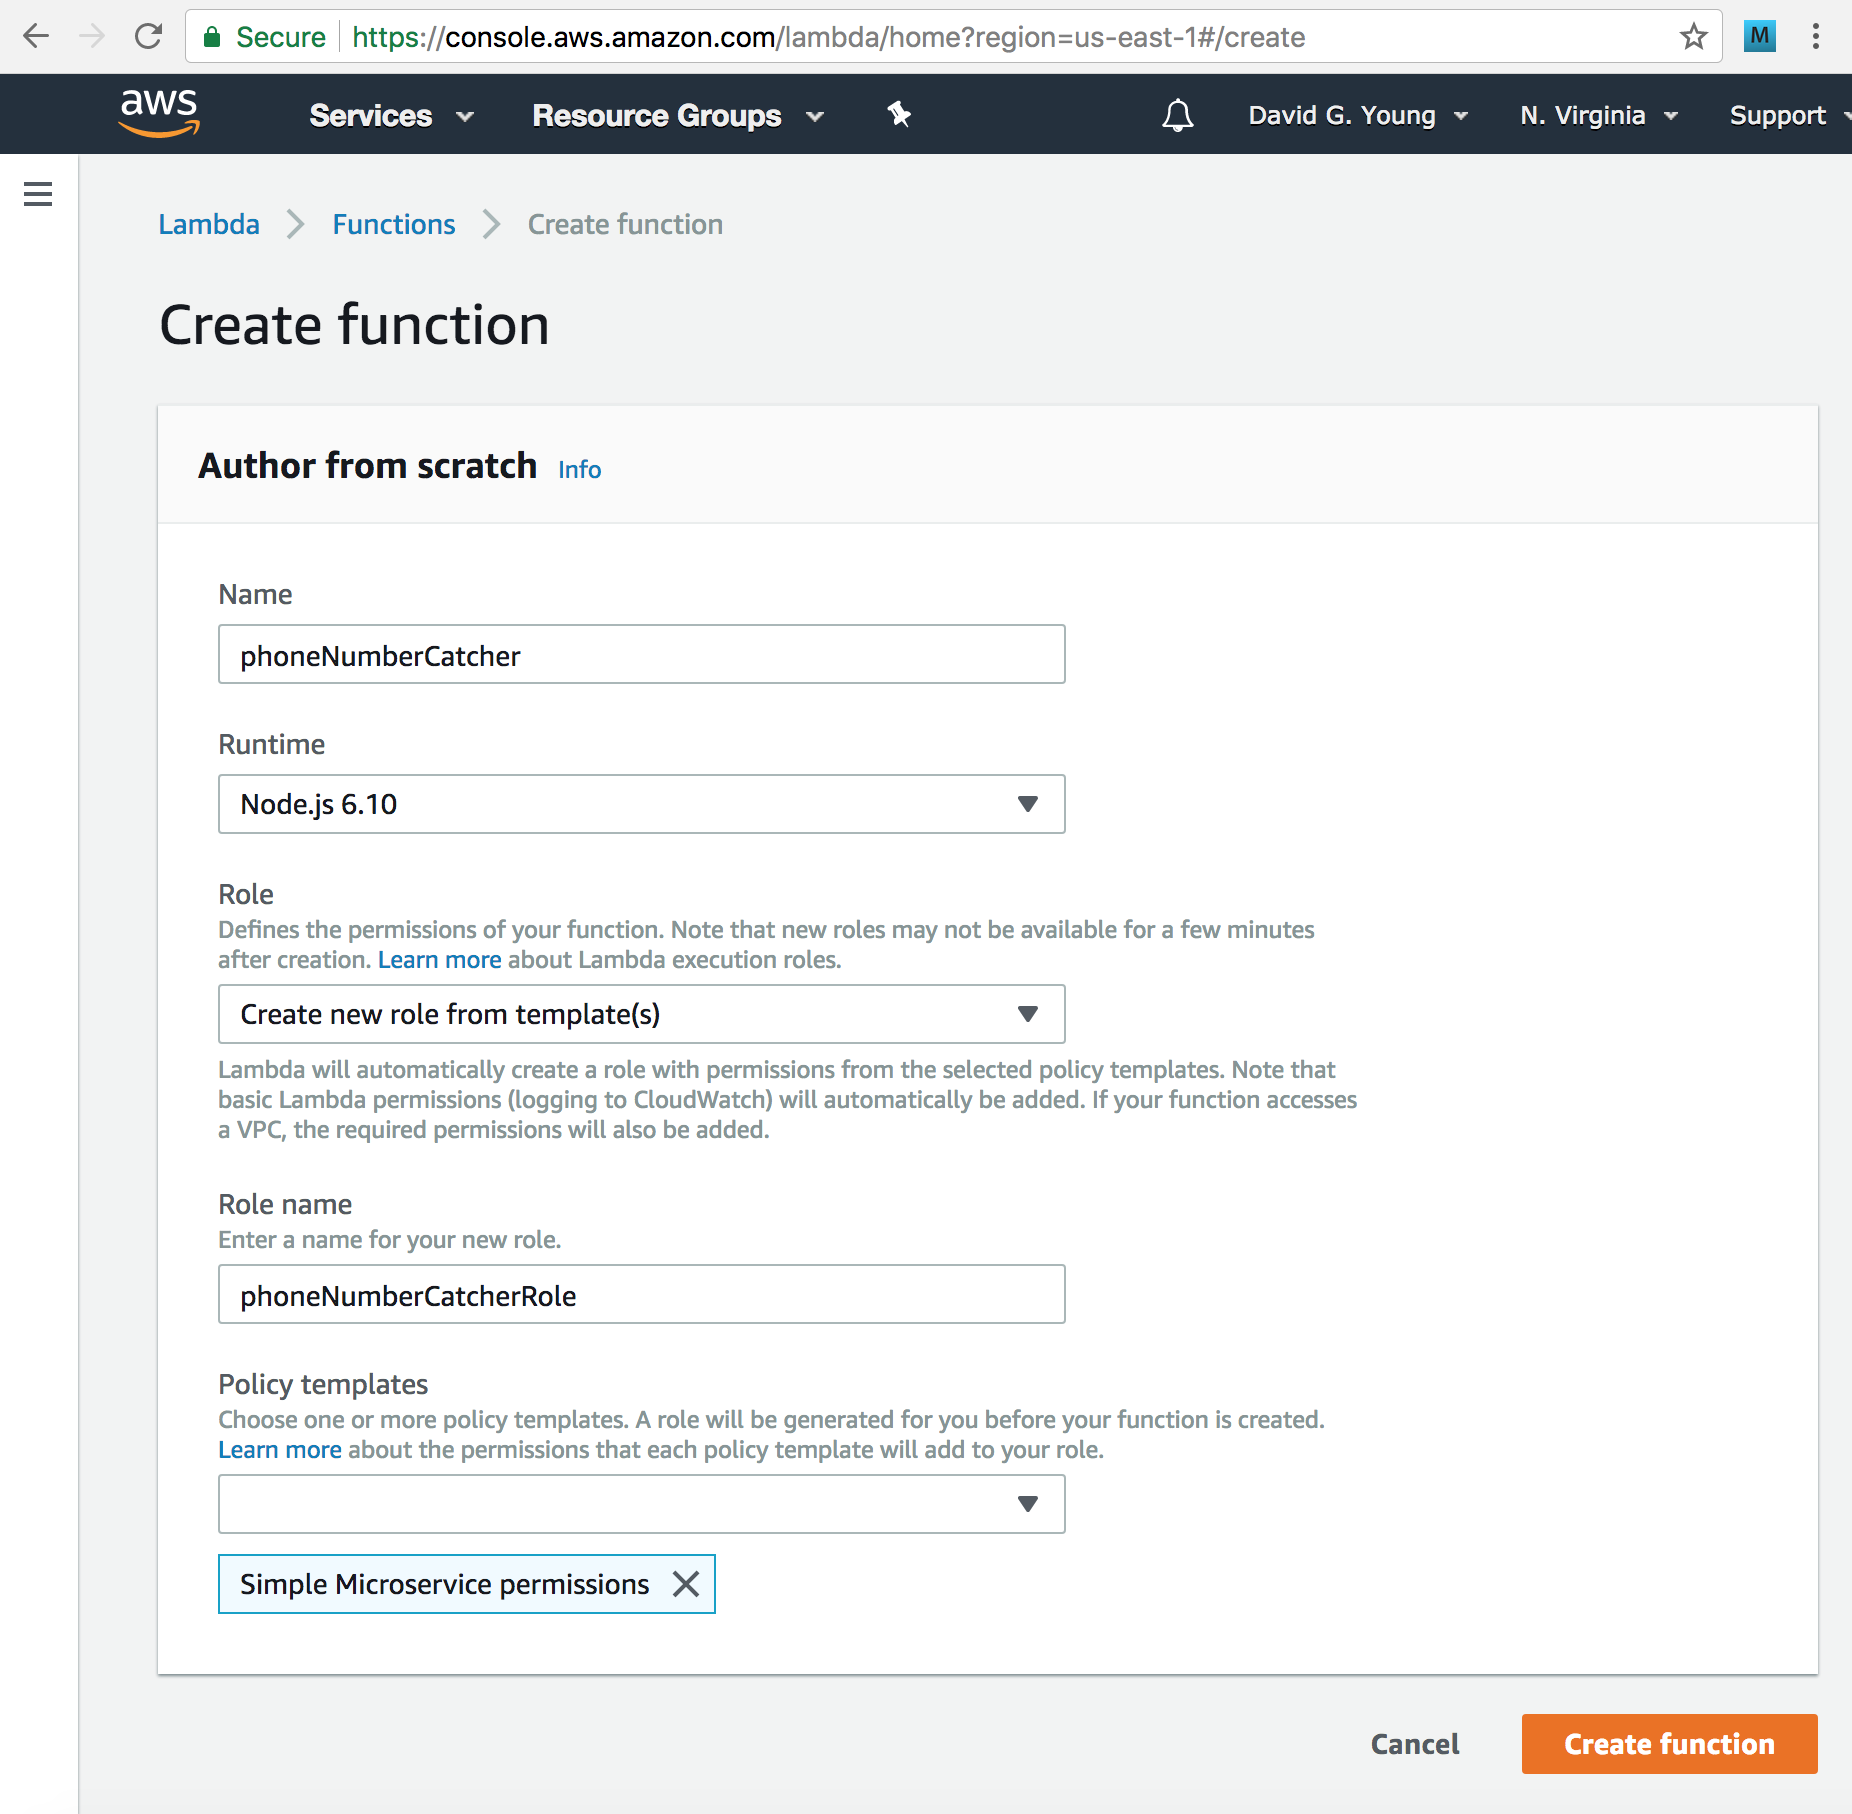
Step 4: Create a new Lambda
This lambda will be responsible for inserting new rows into the database whenever a new SMS message comes in. The database will hold the origination phone number, the device identifier and some timestamps about when the message came in. The Lambda code is in Node.js, because it is by far the easiest for integration – you can simply paste the code into a text block. The same functionality can be implemented with Java, Go, Python or other AWS supported languages.
- Log in to https://console.aws.amazon.com
- Tap Compute -> Lambda -> Create Function
-
Select “Author from scratch” then enter the following values:
Name: phoneNumberCatcher Runtime: Node.js 6.10 Role: Create new role from template(s) Role Name: phoneNumberCatcherRole - Under Policy Templates, choose “Simple Microservice Permissions”, and “Dynamo DB Full Access”
-
Tap Create function
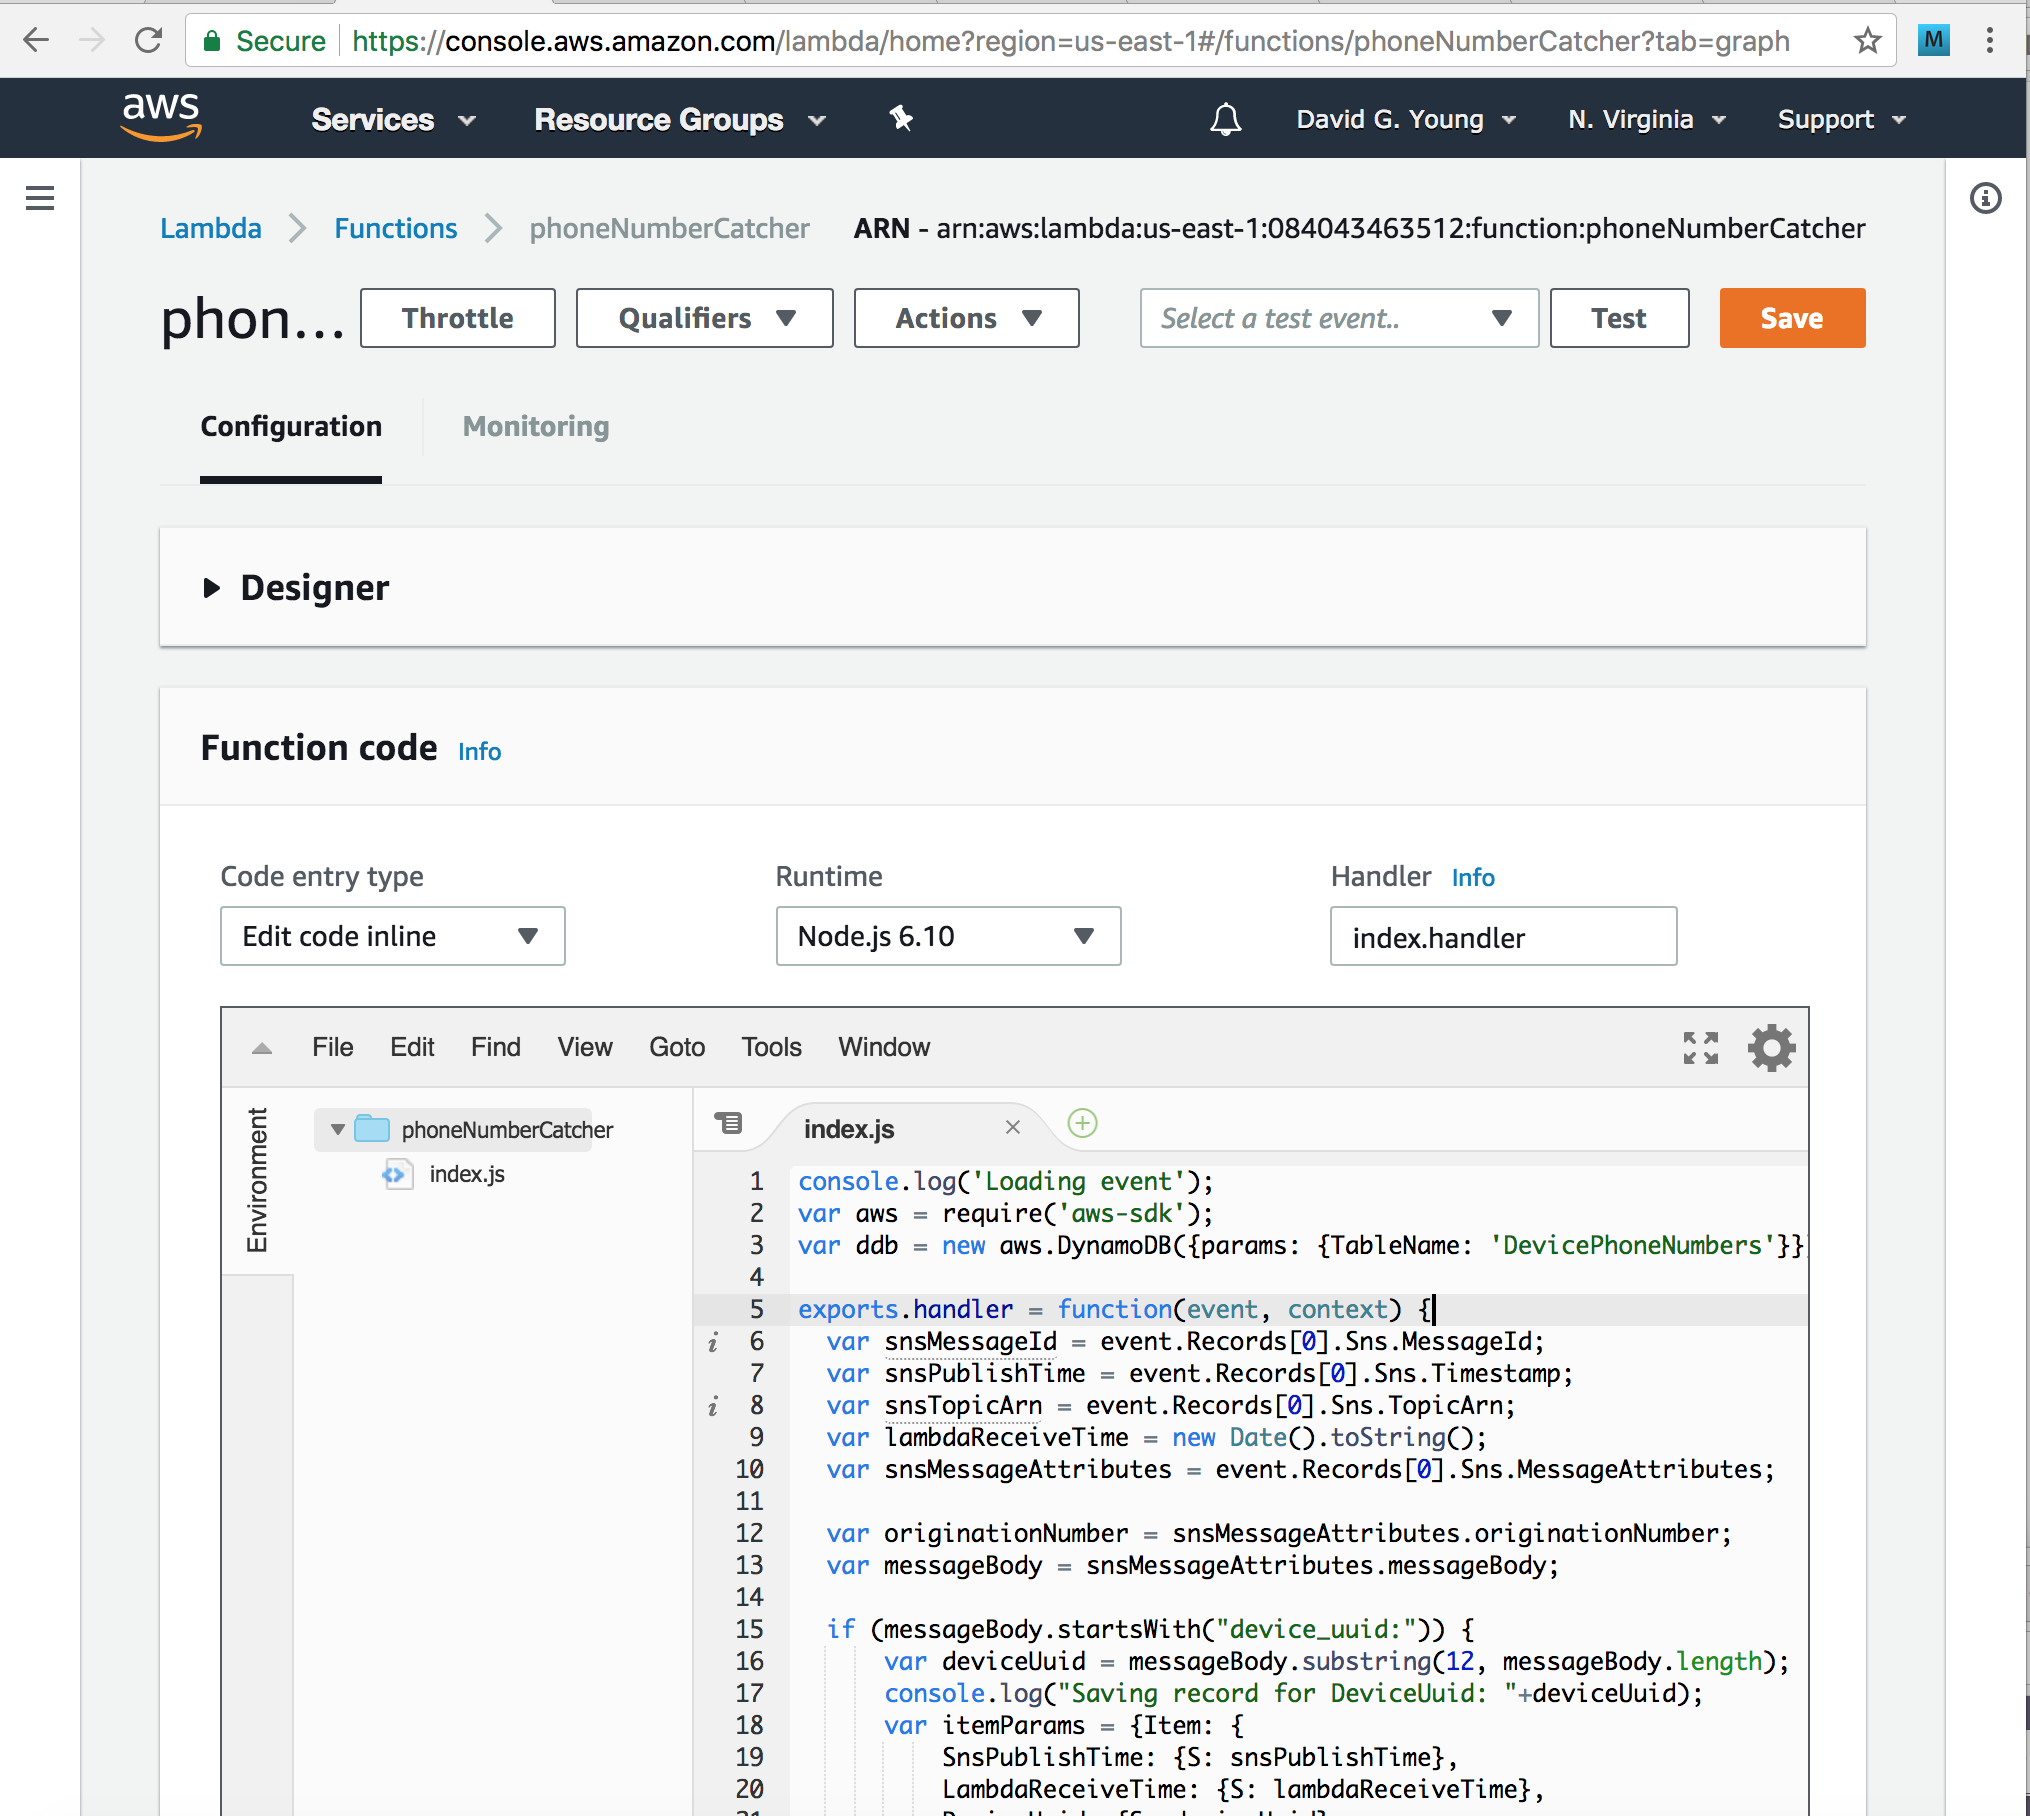
- Once the Lambda is created, you’ll be presented with a screen where you can actually paste in the code we want to execute. Since we have selected Node.js, we can paste a simple code snippet inline that will take the parameters from SNS and insert them into our DynamoDB table we made above.
Copy and paste the following code and put it into the code entry field: (Paste code from PhoneNumberCatcher.js) -
Once it is there, hit the orange Save button in the upper right.
Step 5: Hook up SNS to the Lambda
This configuration will make it so the Lambda above is executed each time a new SNS message is added (which comes from SMS.)
- Go to https://console.aws.amazon.com
- Tap app integration -> Simple Notification Service
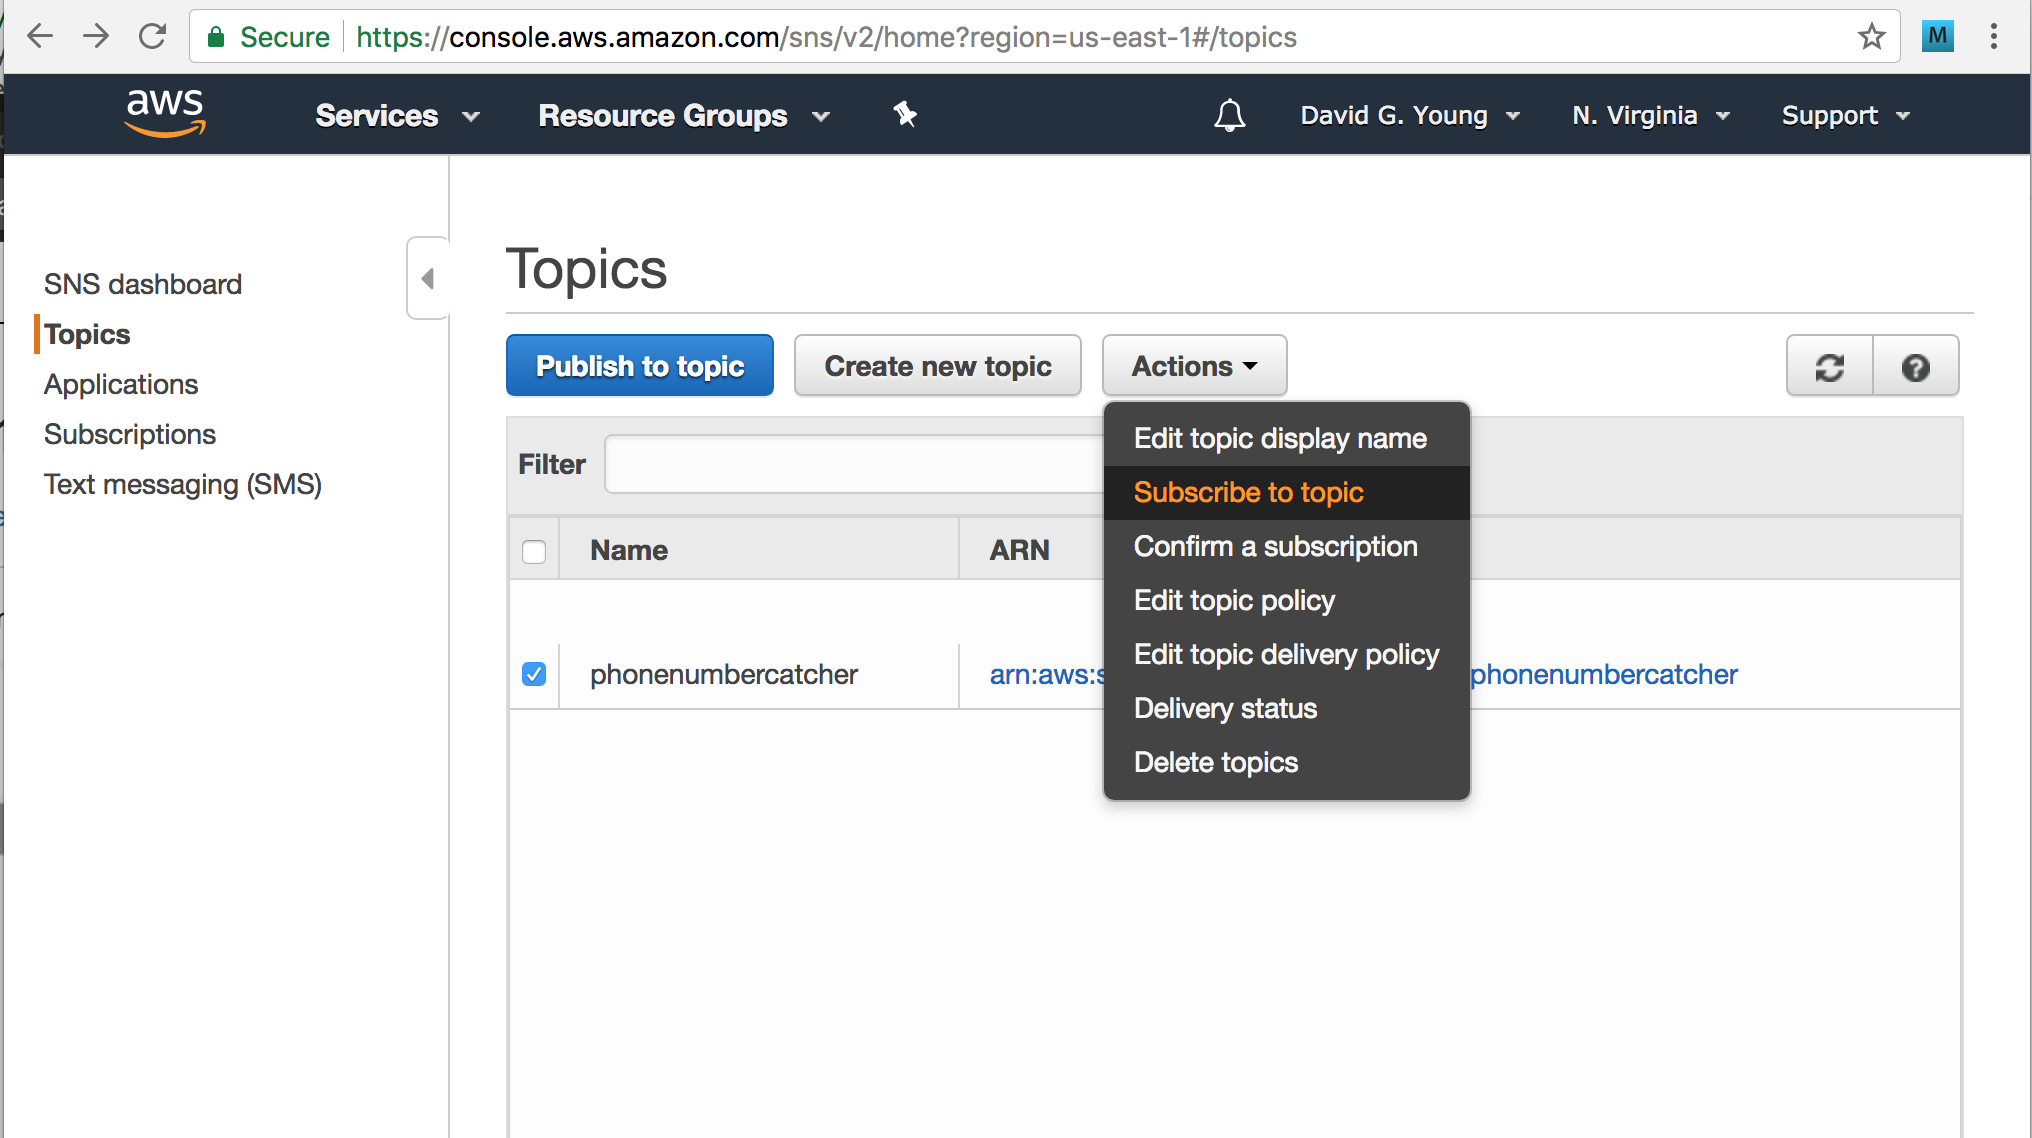
- Tap on topics
- Check the checkbox next to the phonenumbercatcher topic
-
Hit the Actions button and choose “Subscribe to topic”
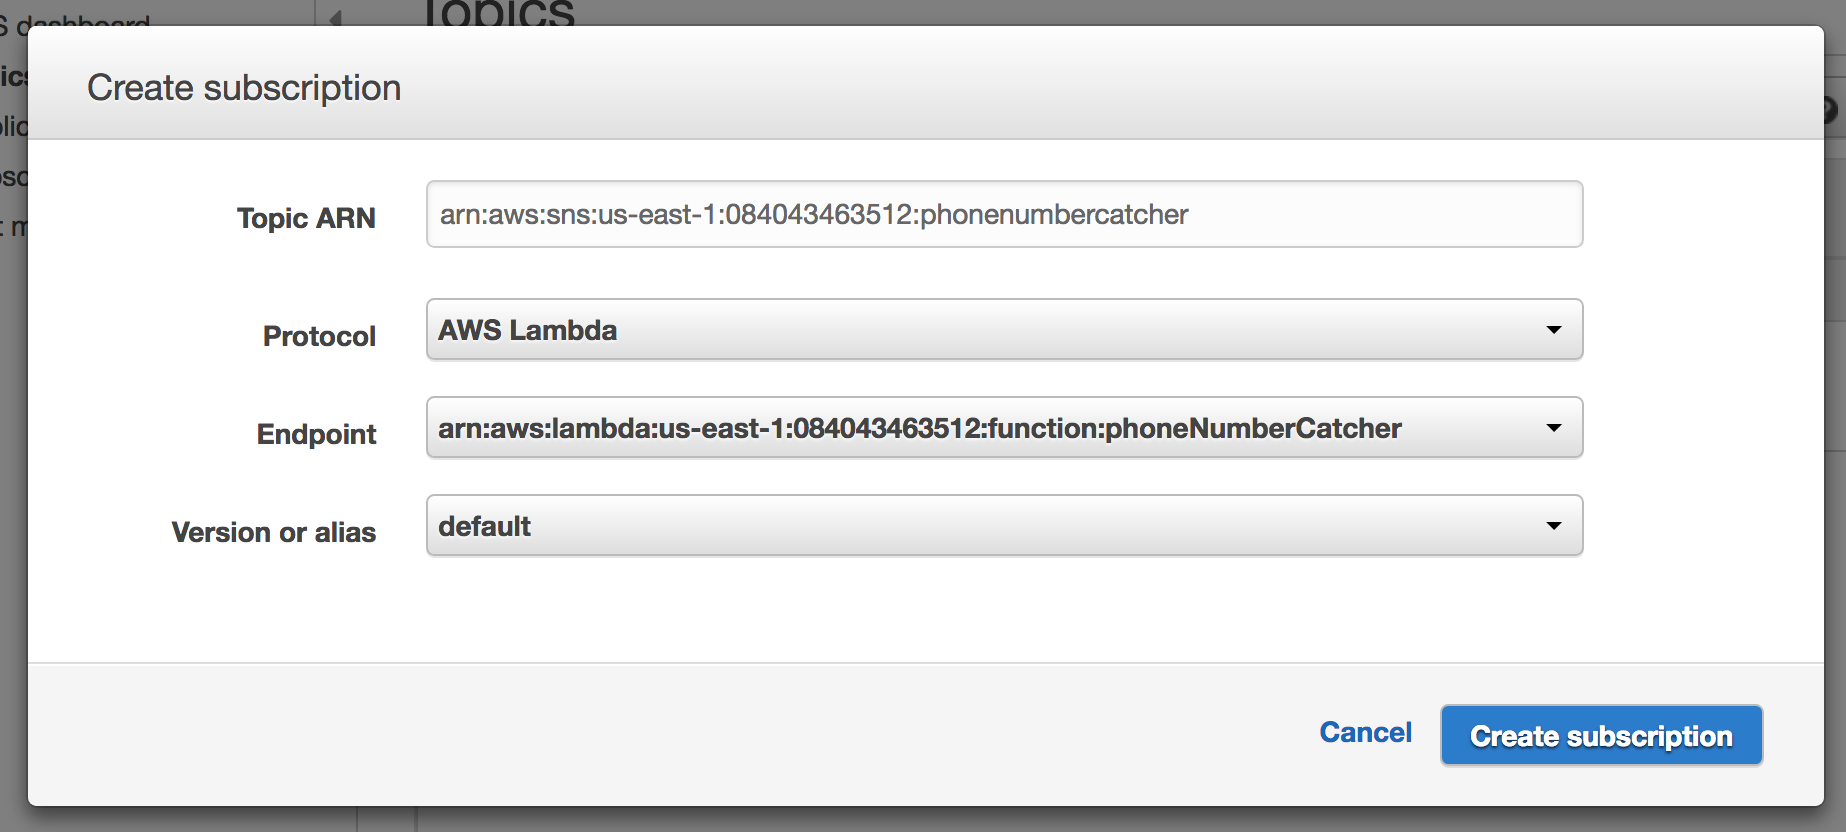
- In the dialog that pops up, choose the following:
Protocol: AWS Lambda Endpoint: phoneNumberCatcher (choose yours from the picklist) Version or Alias: default -
Tap “Create subscription”
Step 6: Test SNS integration with your database
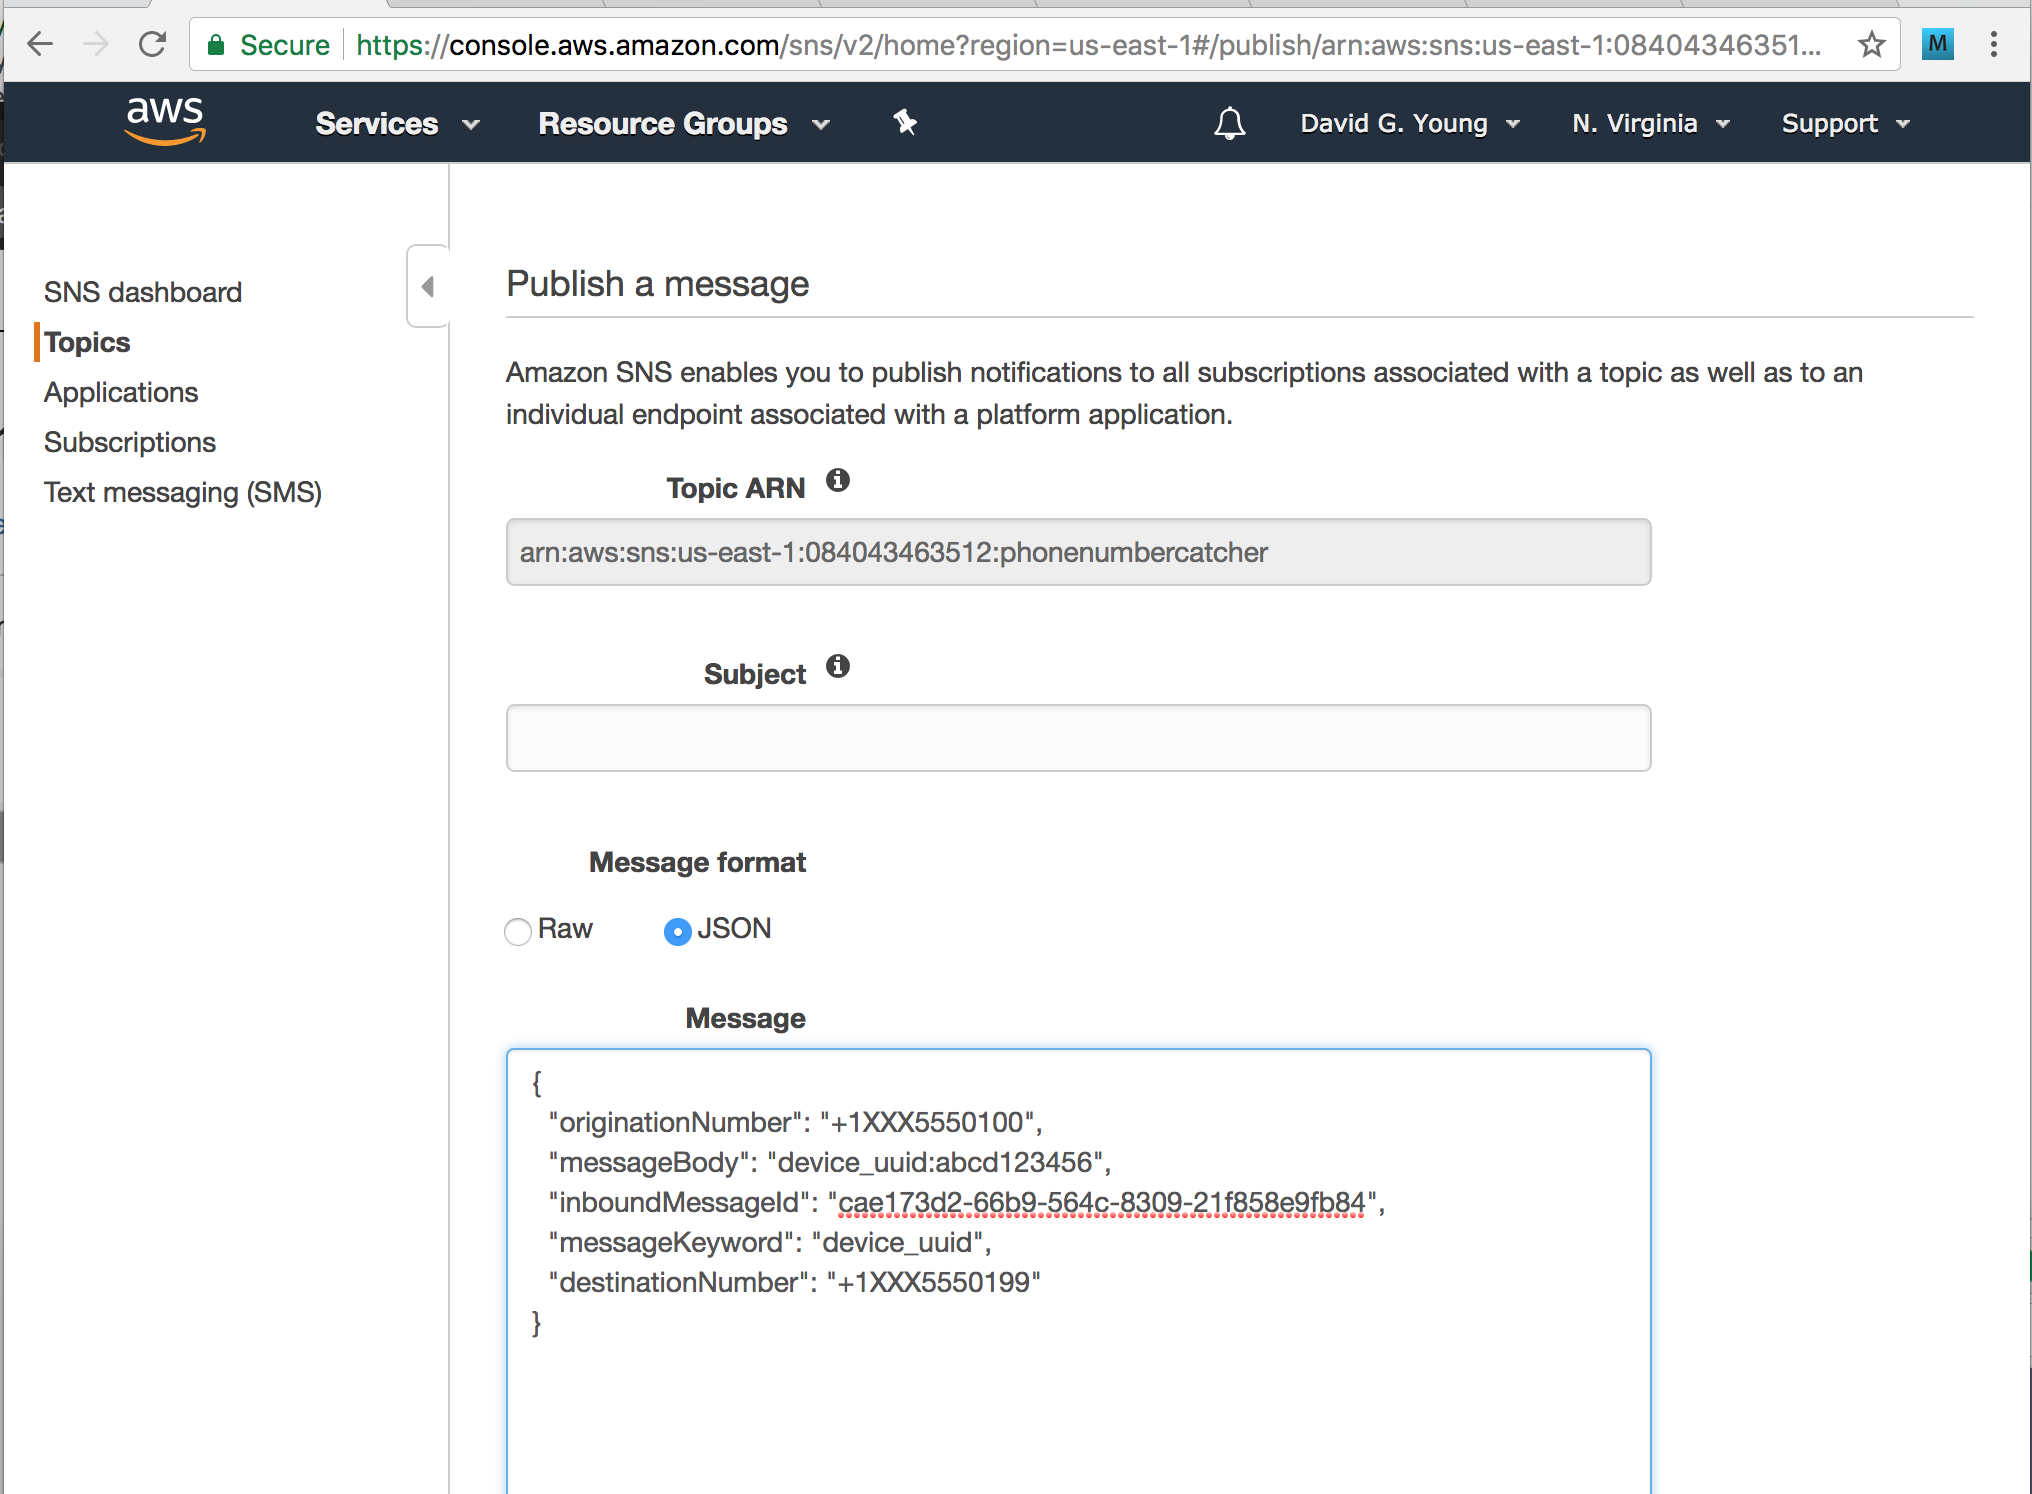
- Return to the SNS console as in the previous step, and tap on the phonenumbercatcher topic, then hit the “Publish to Topic” button at the top of the screen
-
Edit the following fields:
Subject: (leave this blank)
Message Format: JSON
Message:

{
 "default": "{\"originationNumber\": \"+1XXX5550100\",\"messageBody\": \"device_uuid:abcd123456\",\"inboundMessageId\":\"cae173d2-66b9-564c-8309-21f858e9fb84\",\"messageKeyword\": \"device_uuid\",\"destinationNumber\": \"+1XXX5550199\"}"
}
The message you see above has a bunch of backslashes in it because it is JSON encoded inside a string. The “default” key tells AWS what the SNS the message should be for default processors. The value must be a string. In order to send the same kind of JSON data inside this string that a SMS message would send, we have to put backslashes in front of all the strings in our JSON data. For now, don’t worry about this too much. Just trust that this is what the SNS message will look like when it gets converted from a SMS message sending the text message “device_uuid:abcd123456”.
-
Scroll to the bottom of the screen at tap “Publish Message”.
If all goes well, this should insert a new row into the DynamoDB. To check this:
- Go to https://console.aws.amazon.com
- Tap Database -> DynamoDB -> Tables, and select your table from the list
-
Tap the “Items” tab. If it worked, you should see one row in the table with the phone number and device uuid.

Troubleshooting
If you don’t see the expected results in the previous section, it’s time to troubleshoot. You can do this by checking the CloudWatch logs, which get generated whenever our lambda is invoked.
- Go to https://console.aws.amazon.com
- Tap Management Tools -> CloudWatch, then hit the Logs menu item in the left-hand column
- You should see a list that includes /aws/lambda/phoneNumberCatcher. If you do, tap on it. If you don’t, then this means your lambda is not being invoked. Go back to the “Hooking up SNS to the Lambda” section and verify everything is set up properly.
- You should see a list of log files by timsteamp. Tap on the one with the latest timestamp, and look at the entries for any clues about what went wrong. Once you fix any setup errors, go back to the previous section and test again until you have it working correctly.
STEP 7: Querying for the phone number
So far, we’ve built something that can take incoming phone numbers and device UUIDs and throw them into a database, but we have no way to get them out. What we now need is a web service that our app can call to get the phone number from our DynamoDB based on its device UUID. For that, we’ll make another lambda that simply queries the database.
- Log in to https://console.aws.amazon.com
- Tap Compute -> Lambda -> Create Function
-
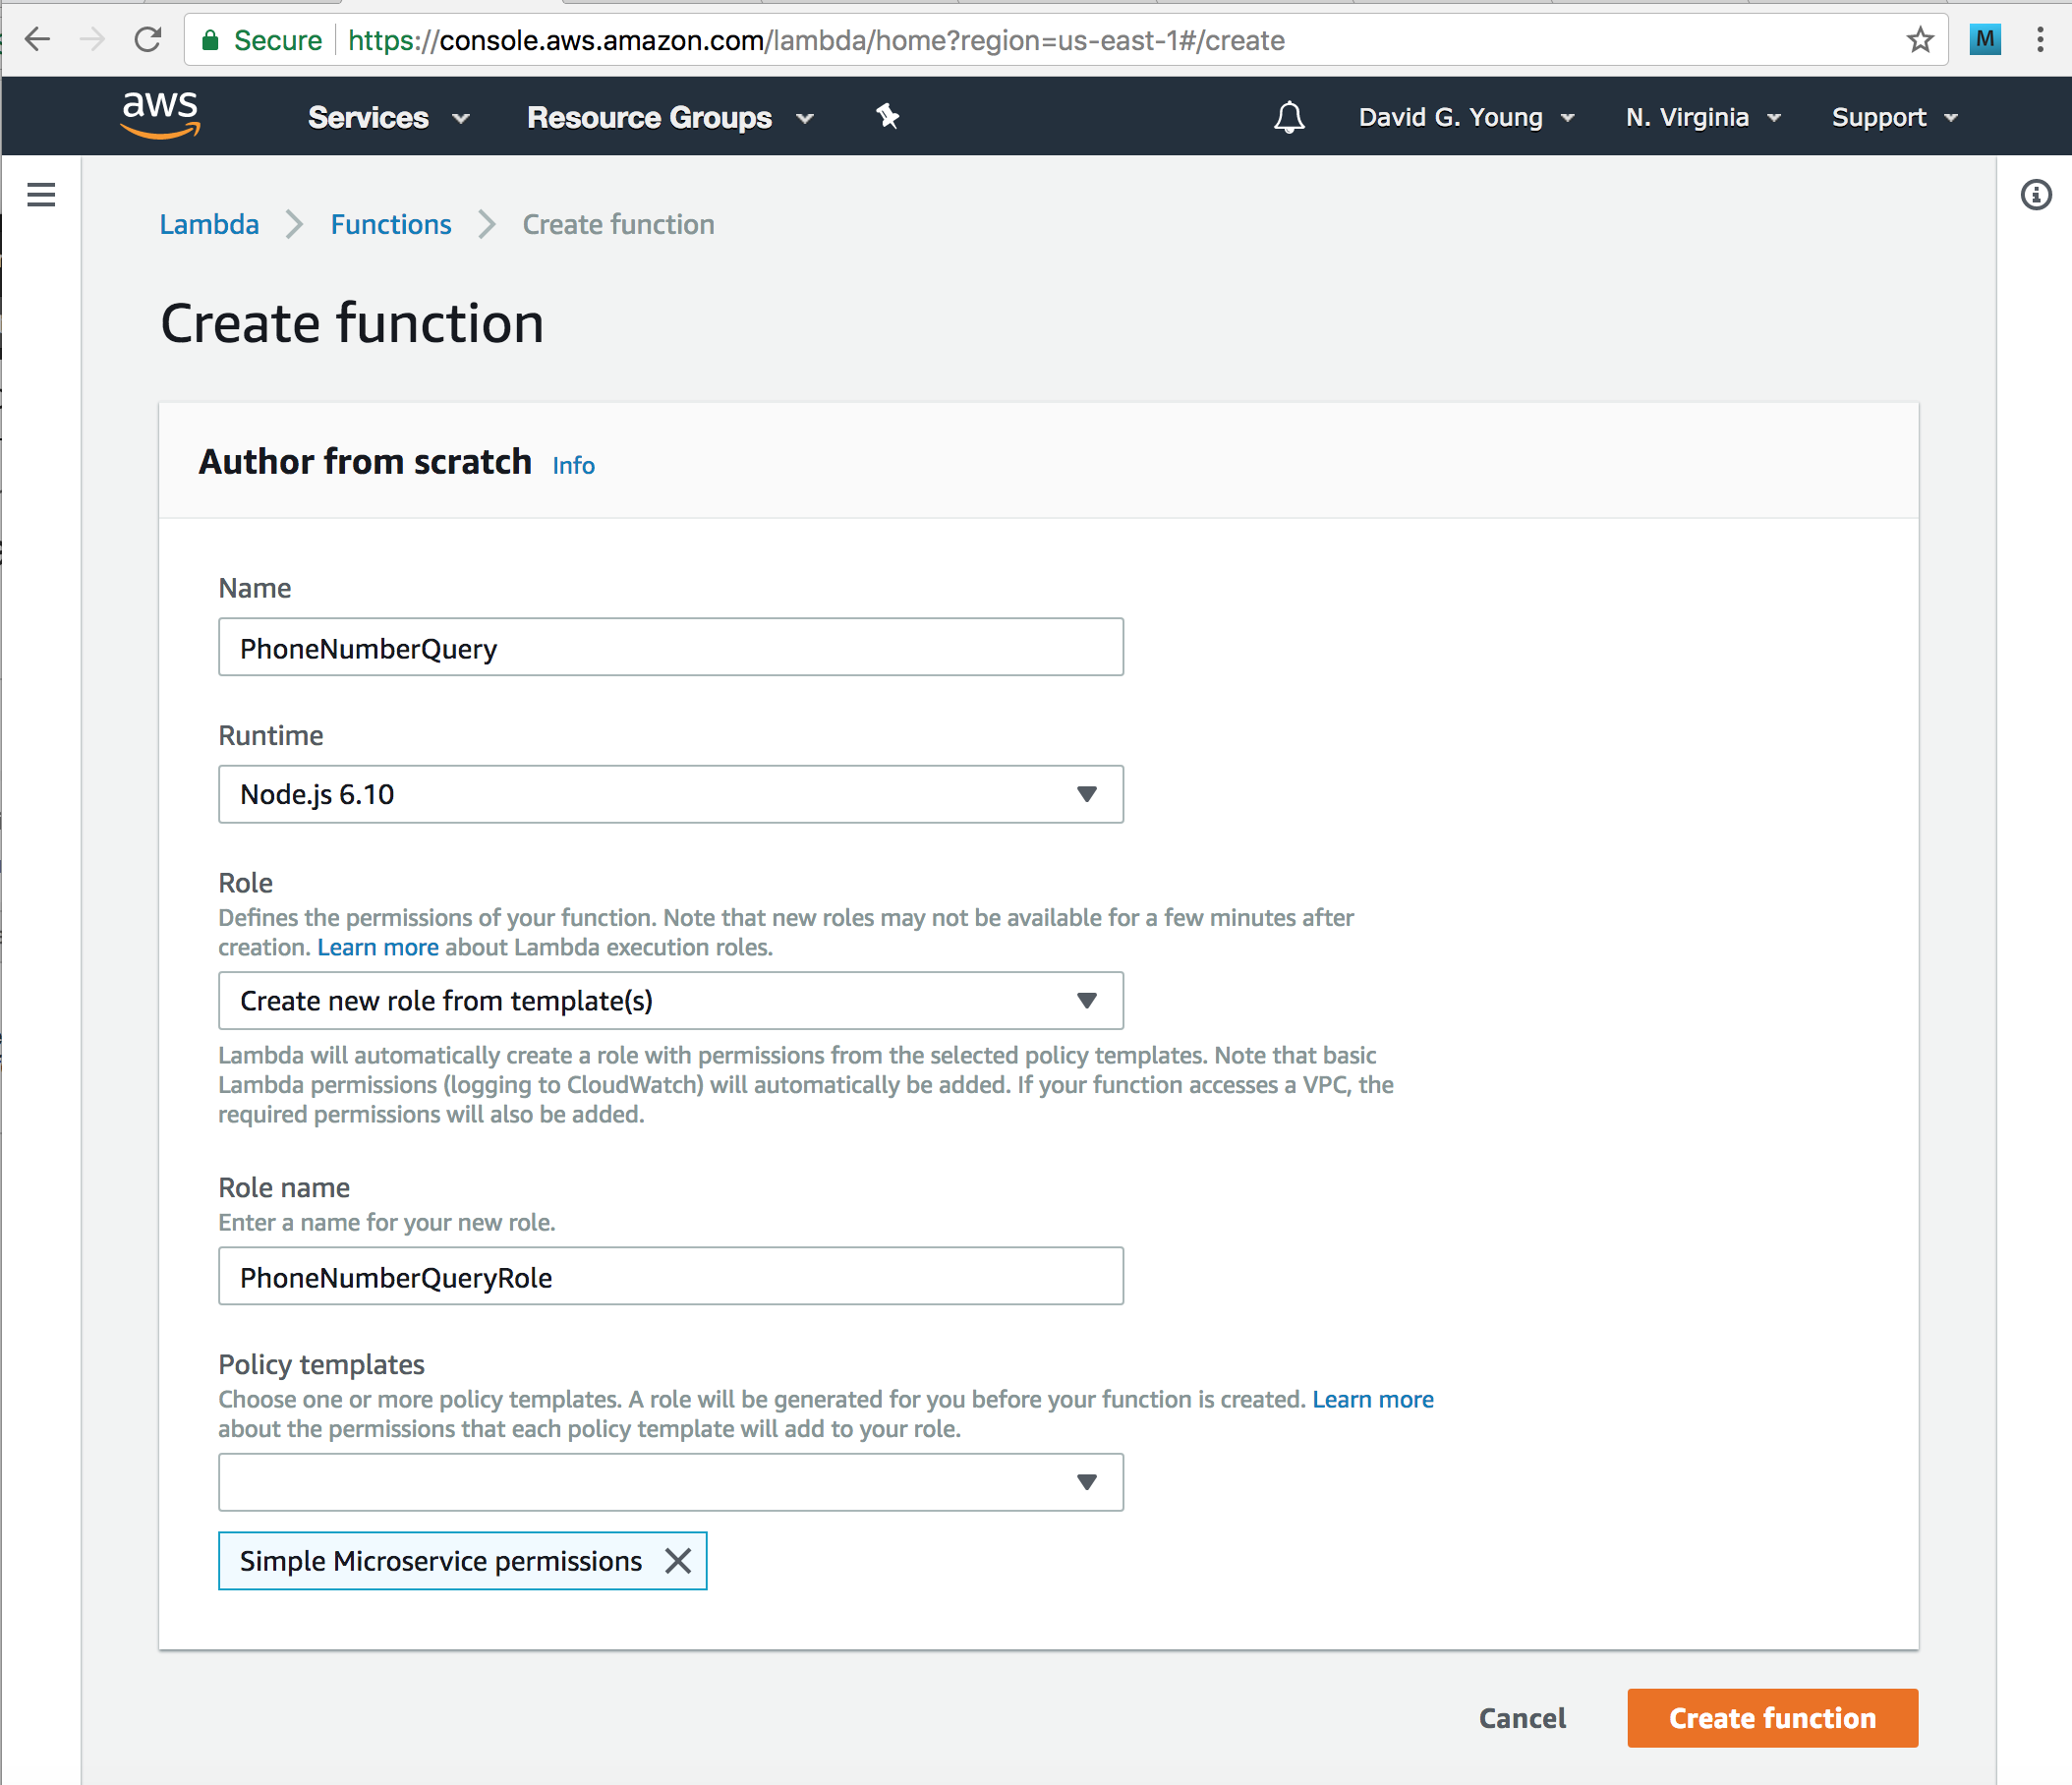
Select “Author from scratch” then enter the following values:
Name: PhoneNumberQuery Runtime: Node.js 6.10 Role: Create new role from template(s) Role Name: phoneNumberQueryRole - Under Policy Templates, choose “Simple Microservice Permissions”
- Tap Create function
- Just like before, once the Lambda is created, you can paste in this code: (Paste code from PhoneNumberQuery.js)
-
Tap Save
Step 8: Creating an API Gateway
An API gateway exposes your Lambda as a web service. Create one like this:
- Go to https://console.aws.amazon.com/
- Select Networking and Content Delivery -> API Gateway
- Choose to Create a New API.
-
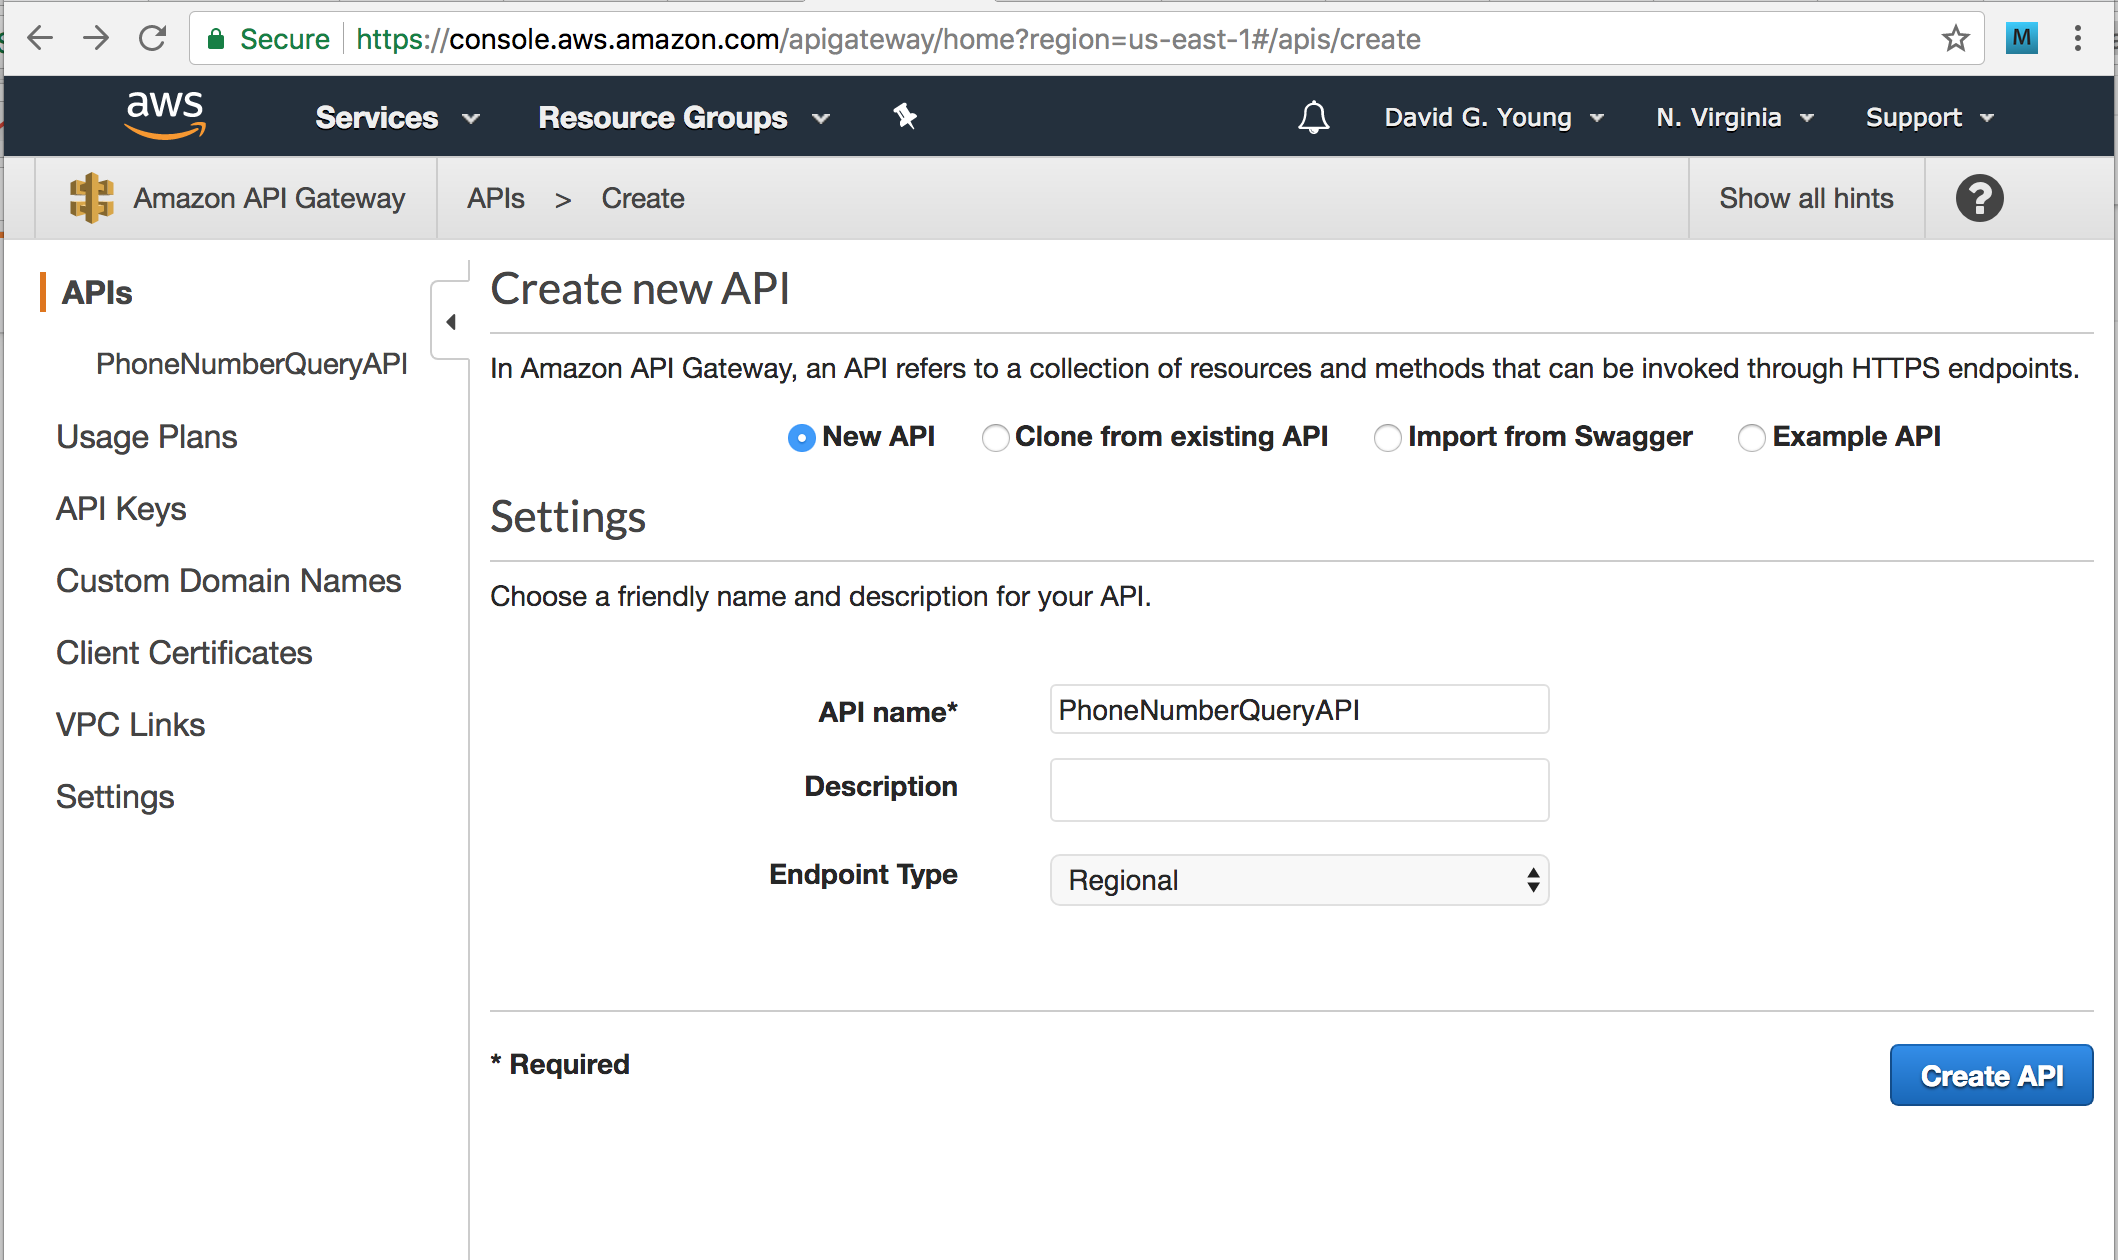
On the API creation screen fill out the following fields:
Type: New API API Name: PhoneNumberQueryAPI Description: (leave blank) Endpoint Type: Regional -
Tap “Create API”
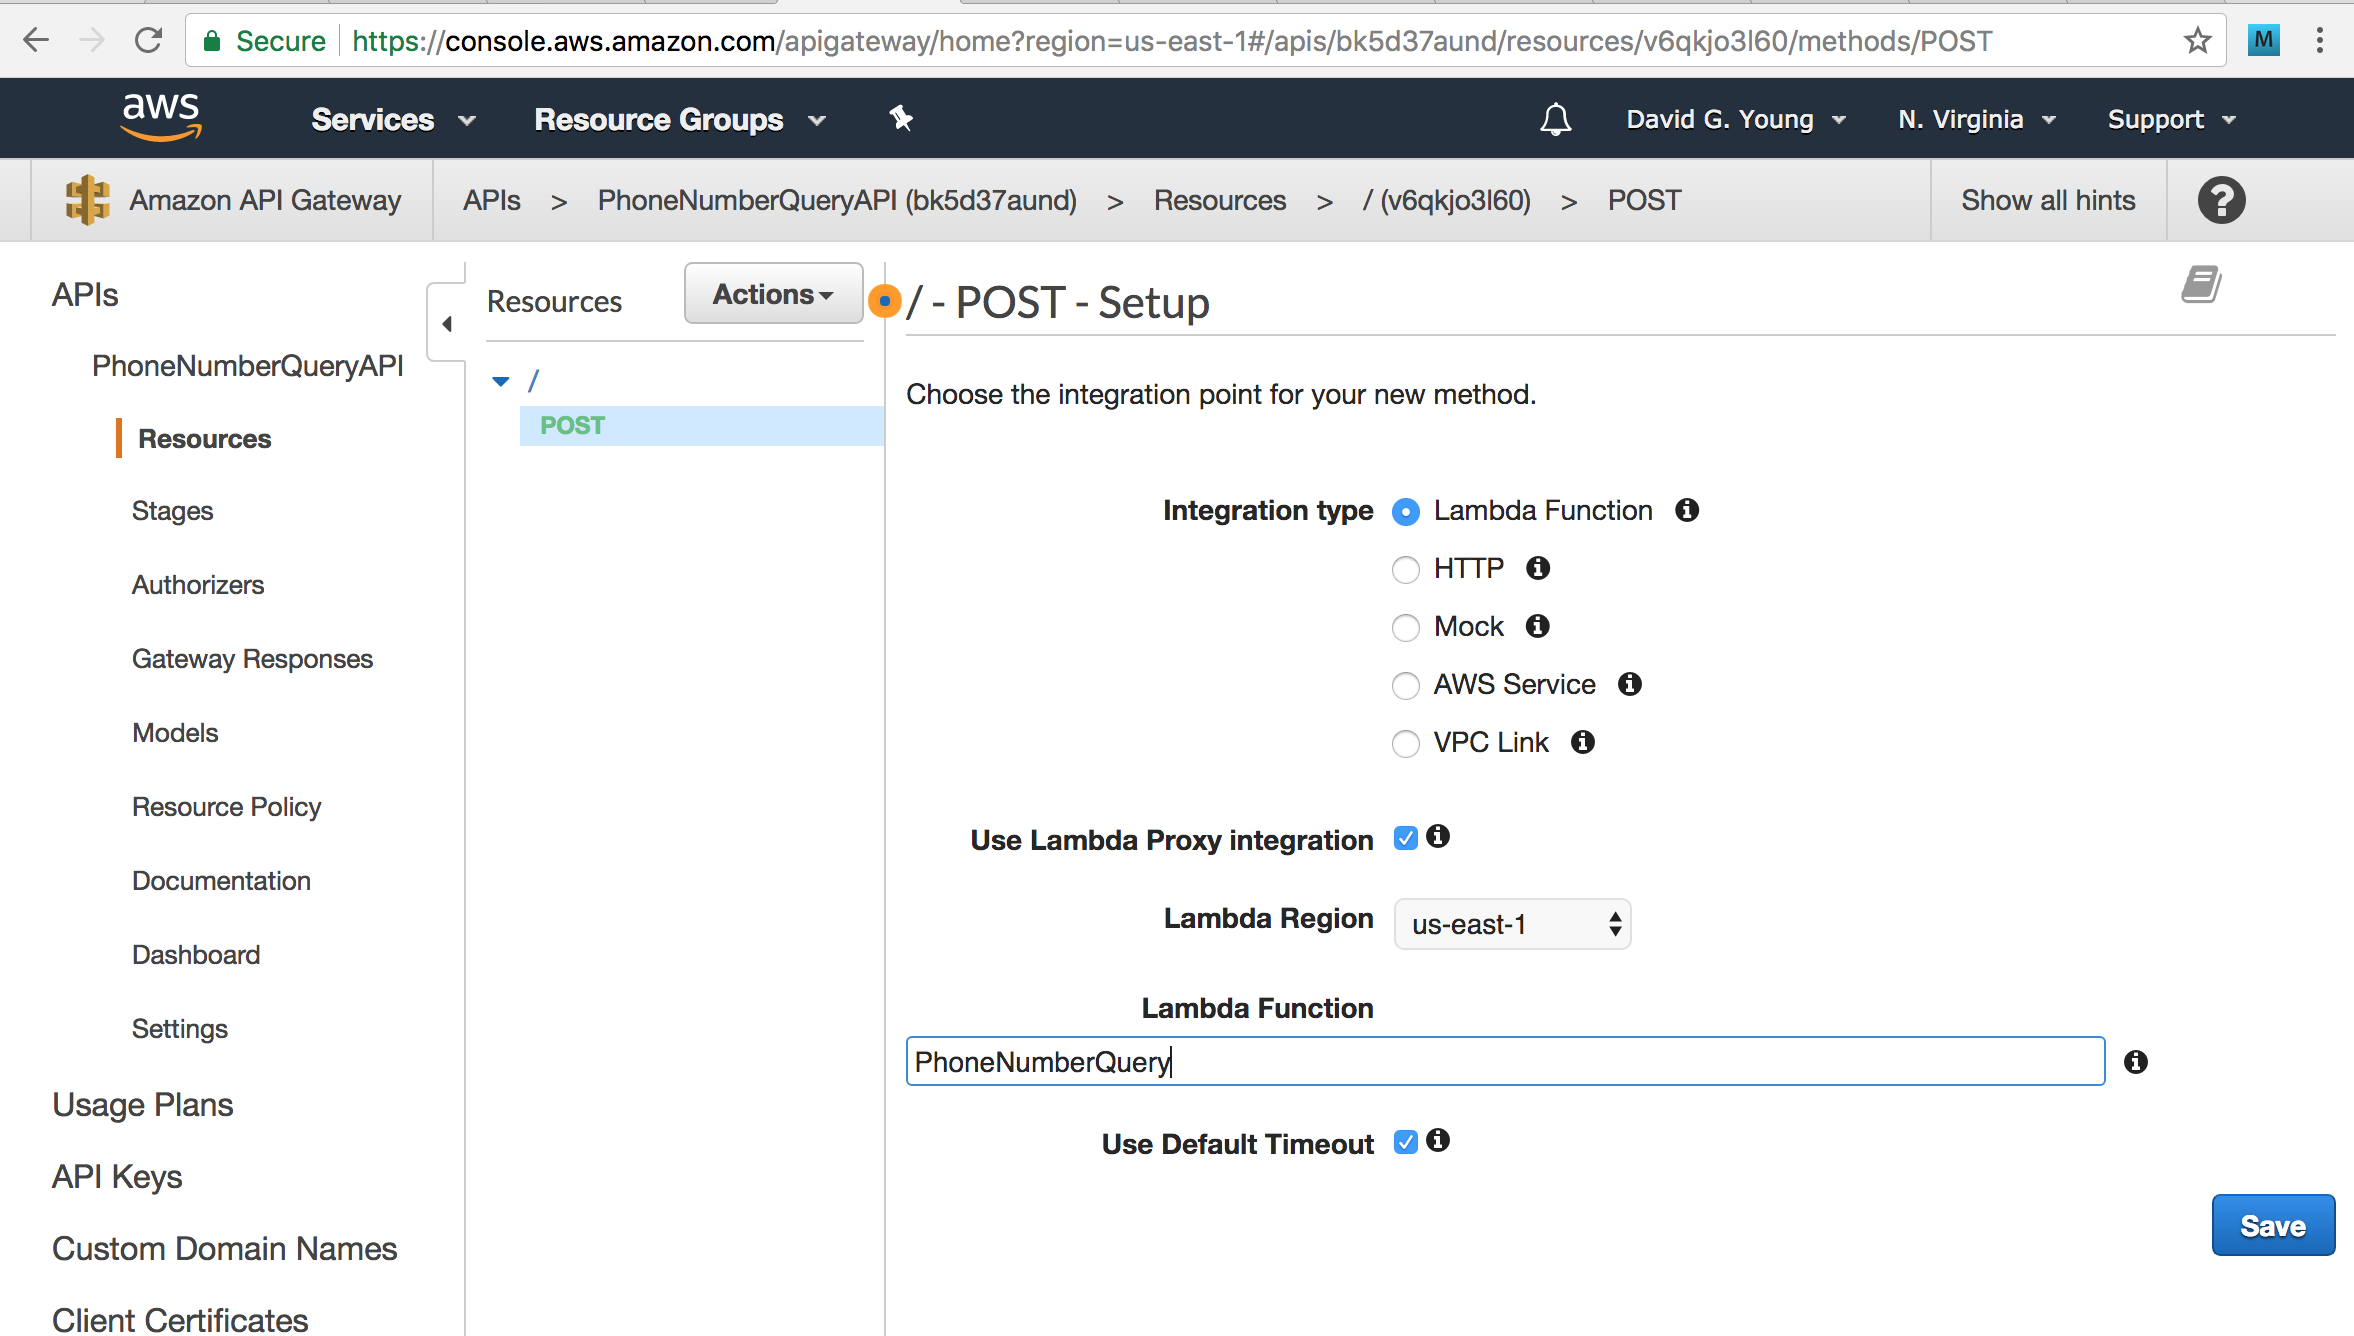
- You will see an API editor screen. Under the “Actions” pull down menu, choose “Create” Method, then in the picklist choose “POST”.
- Update the following fields:
Integration Type: Lambda Lambda: PhoneNumberQuery Lambda Proxy Integration: CHECKED -
Tap “Save”
-
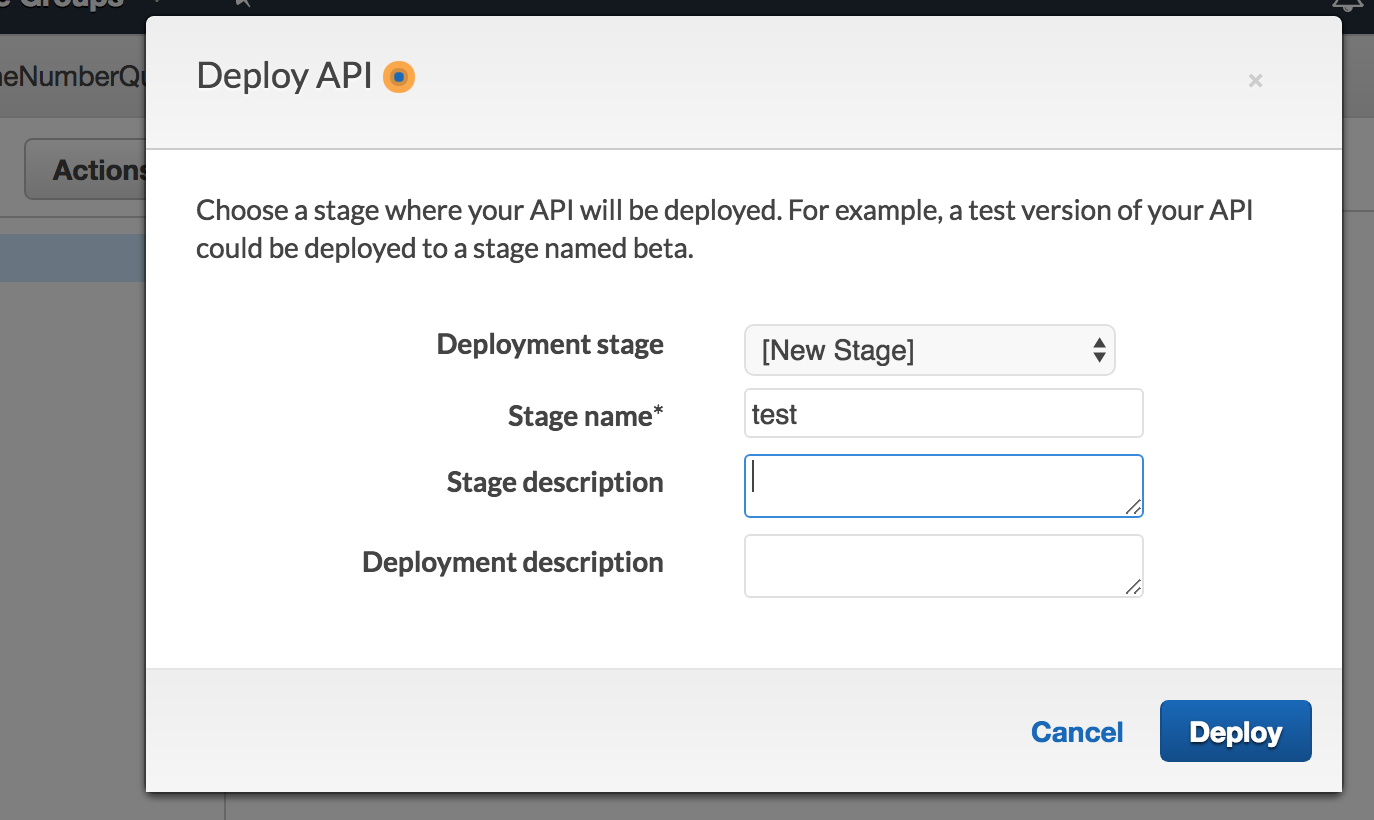
Using the “Actions” pull-down menu, select Deploy. In the dialog that pops up, enter:
Deployment stage: [New Stage] Stage name: test Stage description; (leave blank) Deployment description (leave blank) -
Tap Deploy
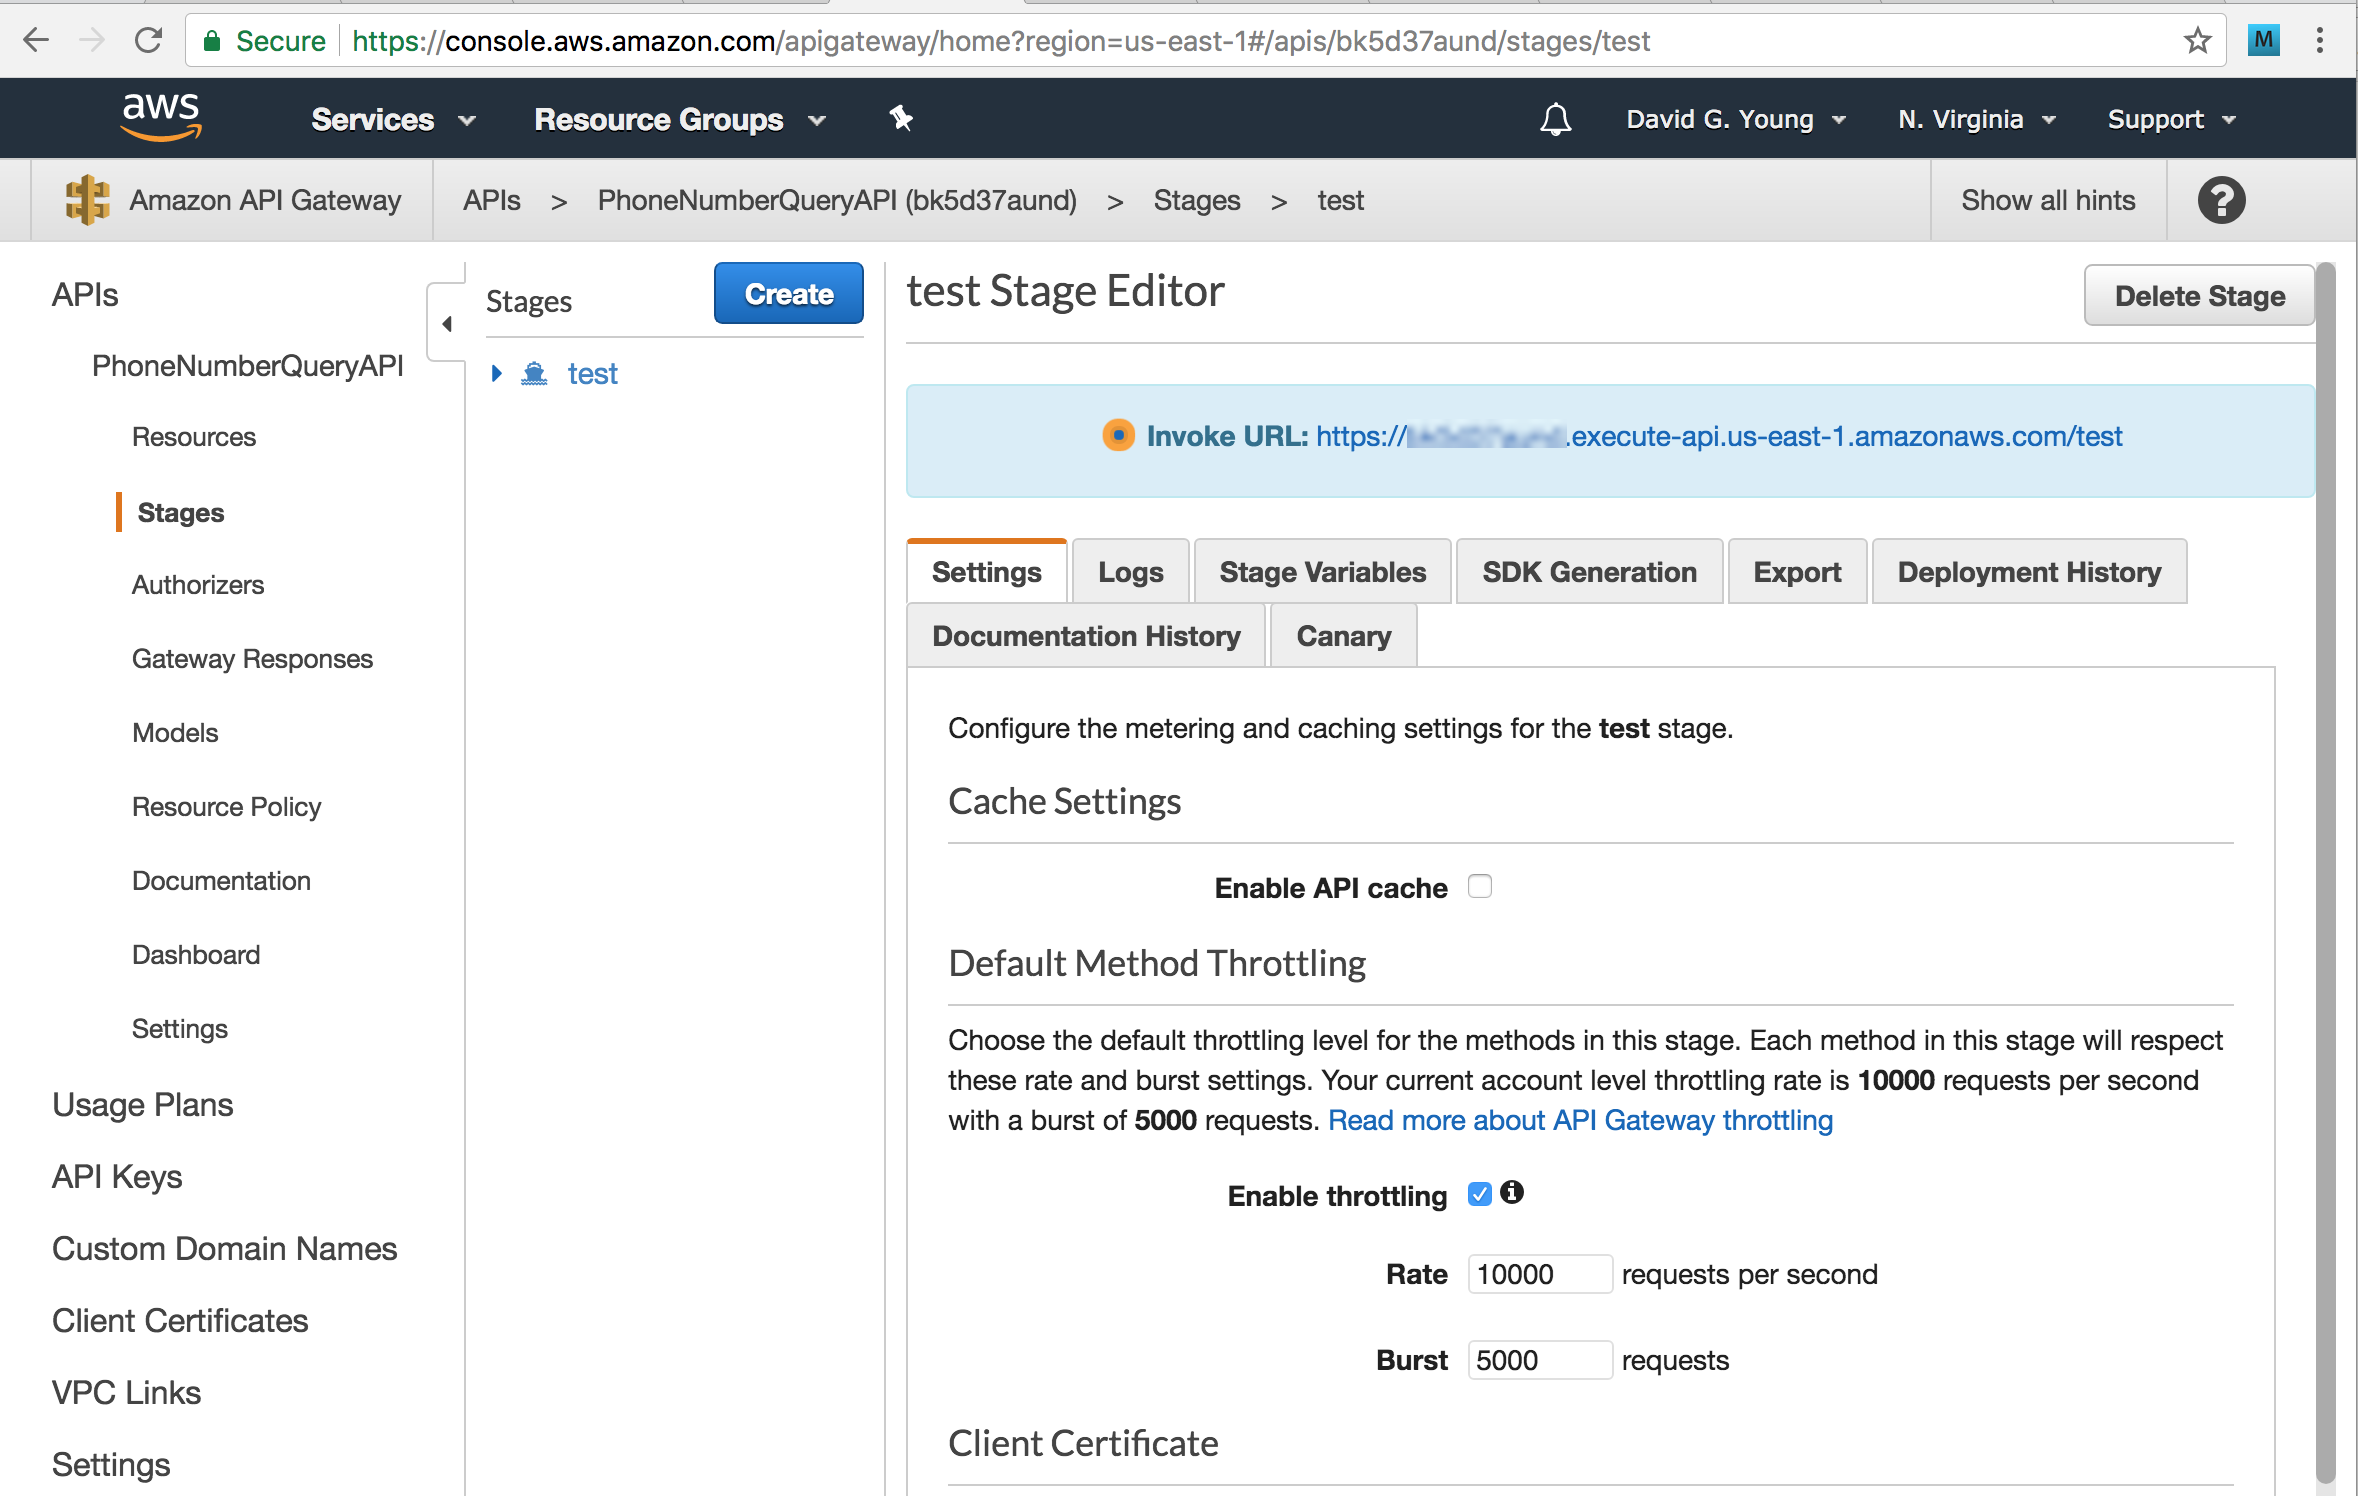
-
Wait for the spinner to complete. When done, you’ll see a new stage has been created, and the URL for your resource will be available. It should give you an invoke URL that looks something like this: https://asdfasdfaa.execute-api.us-east-1.amazonaws.com/test
Testing the Lookup API
You can use the curl command line tool (Mac or Linux, or in Cygwin on Windows) to test to see if the API works to look up a device by uuid. Before you try the command below, be sure to replace the URL with the URL received from the configuration in the last step.
$ curl -XPOST  https://REPLACEWITHYOURPREFIX.execute-api.us-east-1.amazonaws.com/test -d '{"device_uuid":"abcd123456"}'
{"device":{"lambda_receive_time":"Mon Apr 30 2018 18:12:16 GMT+0000 (UTC)","sns_publish_time":"2018-04-30T18:11:19.909Z","origination_number":"+1XXX5550100","device_uuid":"abcd123456"}}
The second line is an example of the output you might see if it works.
Connecting to this from iOS
On the iOS side, the code needed to do this is pretty simple. You basically need to do three things:
- Generate an app identifier
- Send an SMS message to a known phone number at Amazon, with the above identifier
- Repeatedly sent an HTTP request to try to read the captured phone number from Amazon
Generating an app identifier
While iOS does have unique identiers like the UDID (universal device ID) and and IDFA (ID for advertisers), the easiest way to get an app identifier is to use the iOS UUID generator and save it off to persistent storage. This way, the first time your app is run it will generate a UUID and then keep using it forever. The code below does this:
    var deviceUuid: String {
        get {
            if let val = UserDefaults.standard.string(forKey: "deviceUuid") {
                return val
            }
            let val = UUID().uuidString
            self.deviceUuid = val
            return val
        }
        set {
            UserDefaults.standard.set(newValue, forKey: "deviceUuid")
        }
    }
Sending a SMS message
Again, you cannot programmatically send a SMS message with iOS code. You can prepare a message body and a destination phone number and present it to a user for them to approve and then gesture to send. The code below does prepares this message with the device id in the message body, populates the destination phone number, then presents the view.
    self.composeVC = MFMessageComposeViewController()
    self.composeVC.messageComposeDelegate = self

    // Configure the fields of the interface.
    self.composeVC.recipients = [self.AWSPhoneNumber]
    self.composeVC.body = "device_uuid:\(self.deviceUuid)"
    self.composeVC.disableUserAttachments()

    // Present the view controller modally.
    self.present(self.composeVC, animated: true, completion: nil)
Polling for SMS message receipt
We can use a URLSession and a URLSessionDataTask to asynchronously call the server to see if it has gotten the SMS. Here is code that will do that:
    let session = URLSession(configuration: URLSessionConfiguration.default)
    var dataTask: URLSessionDataTask?


    var request = URLRequest(url: URL(string: "\(server)\(DeviceApi.ServicePath)")!, cachePolicy: NSURLRequest.CachePolicy.reloadIgnoringCacheData, timeoutInterval: TimeInterval(10))
    request.httpMethod = "POST"
    var responseError: String? = nil
    var bodyData: Data! = nil
    do {
       bodyData = try JSONSerialization.data(withJSONObject: ["device_uuid": deviceUuid],
                                             options: JSONSerialization.WritingOptions.prettyPrinted)
    }
    catch {
      NSLog("Can't serialize post data")
    }
    request.httpBody = bodyData

    dataTask = session.dataTask(with: request) {
      data, response, error in
      NSLog("Back from request")

      let response = response as? HTTPURLResponse

      var jsonDict: [String:Any]? = nil
      if let data = data {
        do {
          if let str = String(data: data, encoding: String.Encoding.utf8) {
            NSLog("JSON from server: \(str)")
          }
          if let result = try JSONSerialization.jsonObject(with: data, options: JSONSerialization.ReadingOptions.mutableContainers) as? [String:Any] {
            jsonDict = result
          }
          else {
            let message = "Cannot decode json due to nil deserilization result"
            NSLog(message)
            jsonDict = ["error": message]
          }
        }
        catch {
          responseError = "Cannot decode json due to exception"
        }
      }
      else {
        responseError = "Response body is unexpectedly nil"
      }
    }
If the above works, then jsonDict will contain our json response from the server that will be populated inside jsonDict, and you can access it with jsonDict[“device”][“phone_number”] (after appropriate nil checking and typecasting). If we read this phone number, then everything worked!
You can see a full iOS demo app that accomplishes that in this repository.
Trouble with this tutorial? Please open an Github issue in the repo above.