This tutorial gives you an introduction to Amazon’s voice bot technologies which include Amazon Alexa and Amazon Web Services Lex. We’ll discuss the differences between the two with a primary focus on Alexa. To illustrate how the technologies work, we’ll actually show how you how to build a custom Alexa skill. Basic programming knowledge is helpful, although if you’re not a coder, the conceptual sections will still be useful to understanding how voice bot technologies work.
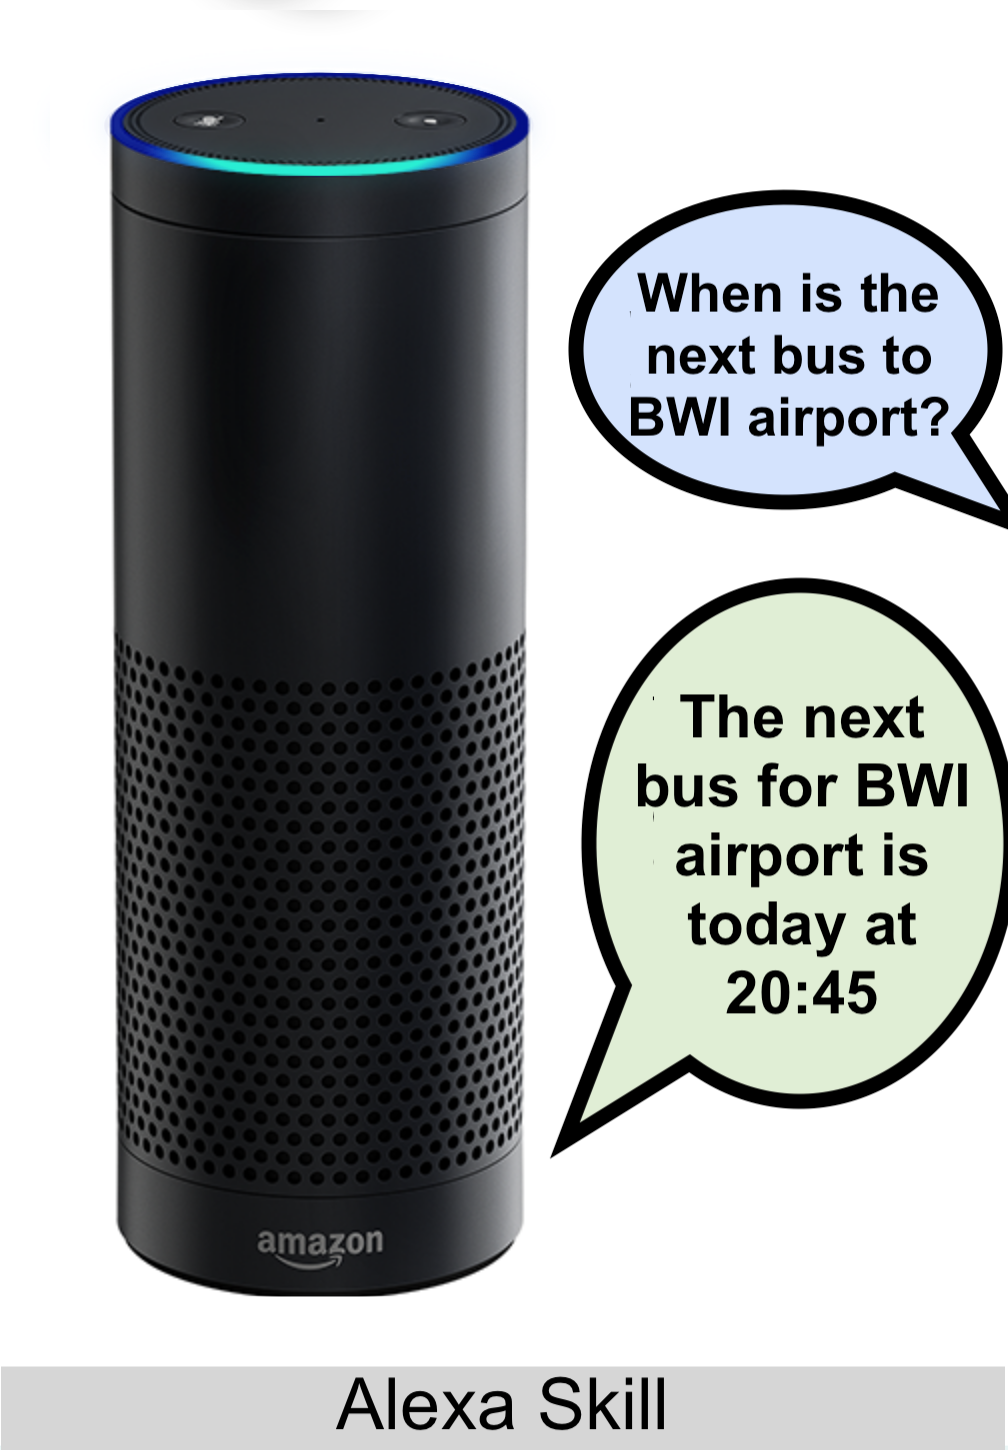
Alexa Skills Overview
Building an Alexa skill allows you to add new functionality to Amazon’s Alexa voice assistants, allowing Alexa users around the world to access your new functionality. Building a skill for Alexa is kind of like building an app for a mobile phone. When you make an app, you put it in Apple’s App Store so consumers can install it on their iPhones, or into the Google Play Store so consumers can install it on their Android phones. With Alexa skills, you put the skill into Amazon’s skill catalog, then any owner of Amazon Echo and other Alexa devices can enable the skill through the companion mobile app or the Alexa skills web page.
Alexa Skills vs. Amazon Lex
Alexa Skills are similar to Amazon Lex voice bots. Both let you create voice-activated digital assistants. Alexa is a consumer service available to the general public, and making a custom Alexa skill basically lets you bolt on your voice assistant features to the same Alexa that millions of people use around the world.
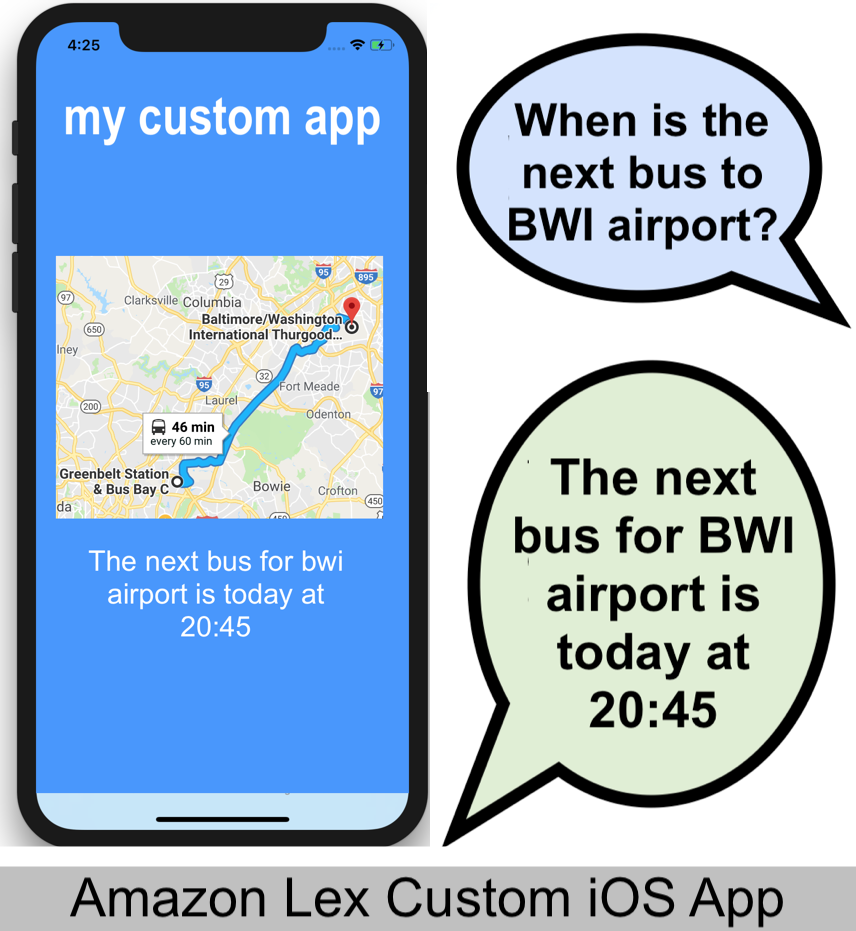
Amazon Lex, on the other hand, is an Amazon web service that you can use to build your own private specialized voice assistant that acts much like Alexa, without its default behavior or even necessarily being publicly available. Using Amazon Lex, for example, you could build a voice assistant just for employees of your company, and only answering your own custom voice commands (so you don’t have to worry about your colleagues using it to order a new toaster from Amazon on the company account.) Lex voice bots are typically used with the iOS or Android Amazon SDKs, so you can add voice assistant features into your own mobile app.
Both Alexa Skills and Amazon Lex use the same basic voice recognition technology and artificial intelligence to convert human speech into something a computer can process. They use the same Amazon Web Service building blocks to make both kinds of voice assistants. The sections below are specific to Alexa, but the same concepts apply. When you hear the terms “Intent”, “Slot” and “Lambda” with respect to Alexa, know that the same concepts apply if building Lex bots.
Ways to Test Your Alexa Skill
Alexa skills are consumer products. Much like a mobile app, you have to submit an Alexa skill for certification to Amazon before consumers can find and enable it on their Echo voice assistants.
You’ll need to do plenty of testing of your skill before you get to that point, so Amazon has a couple of web-based tools for developers that let you try out your skill in the browser to get it working before submitting it for review. These tools can be a bit limiting. They cannot access the consumer’s location and are not always listening – you have to type in text or hit a button to get them listening to your voice before they’ll process voice commands. Fortunately you can also use hardware devices for testing including a real Amazon Echo speaker, or the iOS and Android Alexa apps. These hardware devices provide a much more realistic conversation flow. To use hardware devices during development, you simply start a beta test, and send invites to the Amazon account email addresses of the users you want to give it a try on their Echo speakers or Android Alexa apps.
Finally, there is also a more sophisticated browser-based simulator called EchoSim at https://echosim.io/. This more closely simulates an Echo speaker with fancy graphics, but you still have to hold down a button on the web page to get the virtual speaker to listen (there is no “hey, Alexa” trigger). And it doesn’t maintain sessions, so you have to verbally re-activate your skill with each command. To use it to test a custom skill, you have to log in to it with your Amazon account, get invited to the beta test for the skill, and enable the skill on your the EchoSim virtual speaker using the iOS or Android Alexa companion app.
Here’s a summary of the options:
| Option | Language parsing? | Voice testing? | Access Location? | Maintains Session? | Hey Alexa Trigger? |
|---|---|---|---|---|---|
| AWS Lambda Tester | no | no | no | no | no |
| Alexa Simulator | yes | yes | no | poorly | no |
| EchoSim Webpage | yes | yes | yes | no | no |
| Alexa Mobile Apps | yes | yes | yes | yes | no |
| Echo Speaker | yes | yes | yes | yes | yes |
Creating a New Alexa Skill
The sections below will walk you through setting up the building blocks needed to create your own custom Alexa skill.
Initial Setup
Go to https://developer.amazon.com and sign up for a free Amazon developer account. This is distinct from your login to the Amazon Web Services console (which you’ll also need later), so even if you have built Amazon cloud services before and have an AWS account, you’ll also need an Amazon Developer account.
Think of the AWS console as the back-end tool suite that you use to build any Amazon cloud system. The Amazon Developer Console, on the other hand, is where you go to put a consumer-facing interface on something you’ve built in the Amazon cloud. In this case, we’ll be building an Alexa voice interface.
A big part of the setup process involves filling out a web form on Amazon, rather than writing code in some kind of programming language. This makes it easier for beginners to set up, but it is harder to explain the process and if Amazon decides to rework their website (like they did in April of 2018), the screens may change somewhat. The basic concepts, however, remain the same.
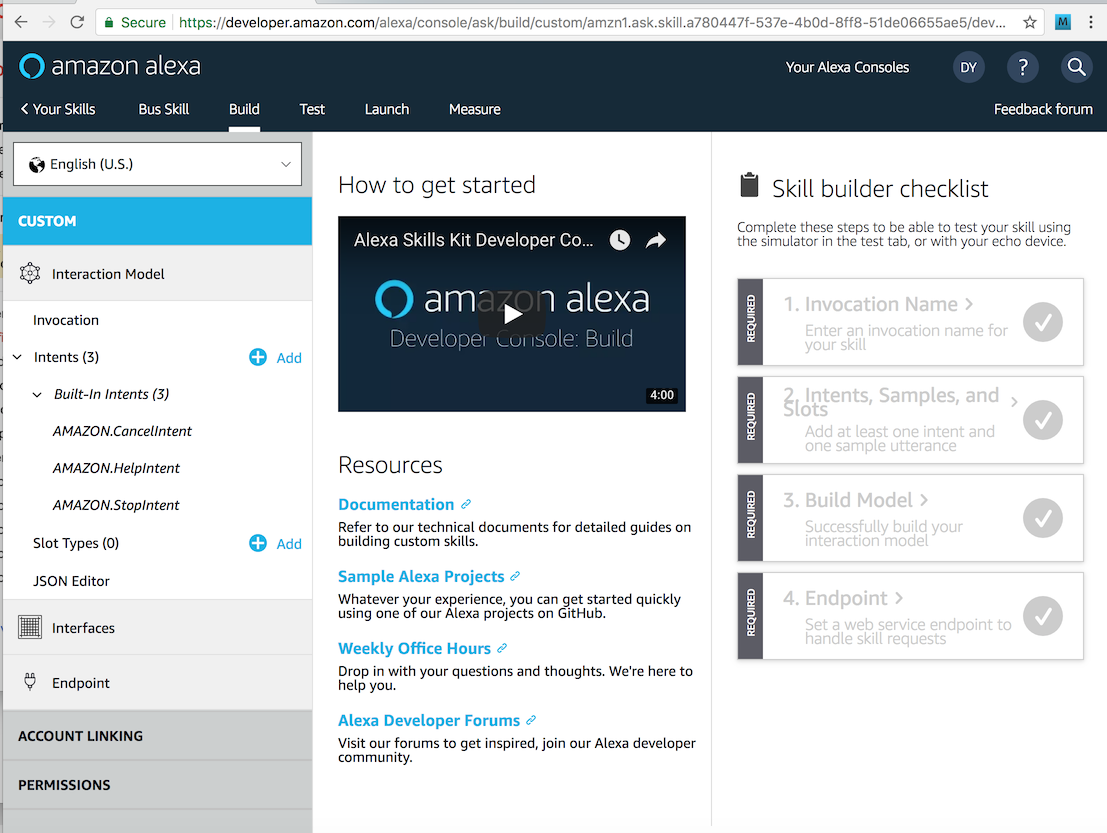
Once you are logged in to the Amazon Developer console, you can go to this URL to create a new Alexa skill: https://developer.amazon.com/alexa/console/ask, then click the Create Skill button. You’ll be taken to a screen that allows you to name your skill.
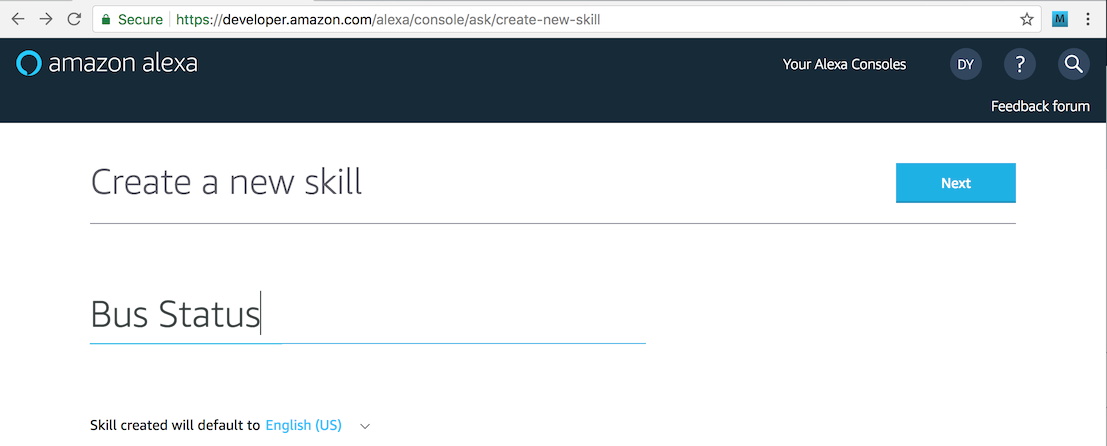
Give the skill the name “Bus Status” then submit the form. You’ll then be asked if you want to use a predefined template to create your skill. We want to create a custom one.
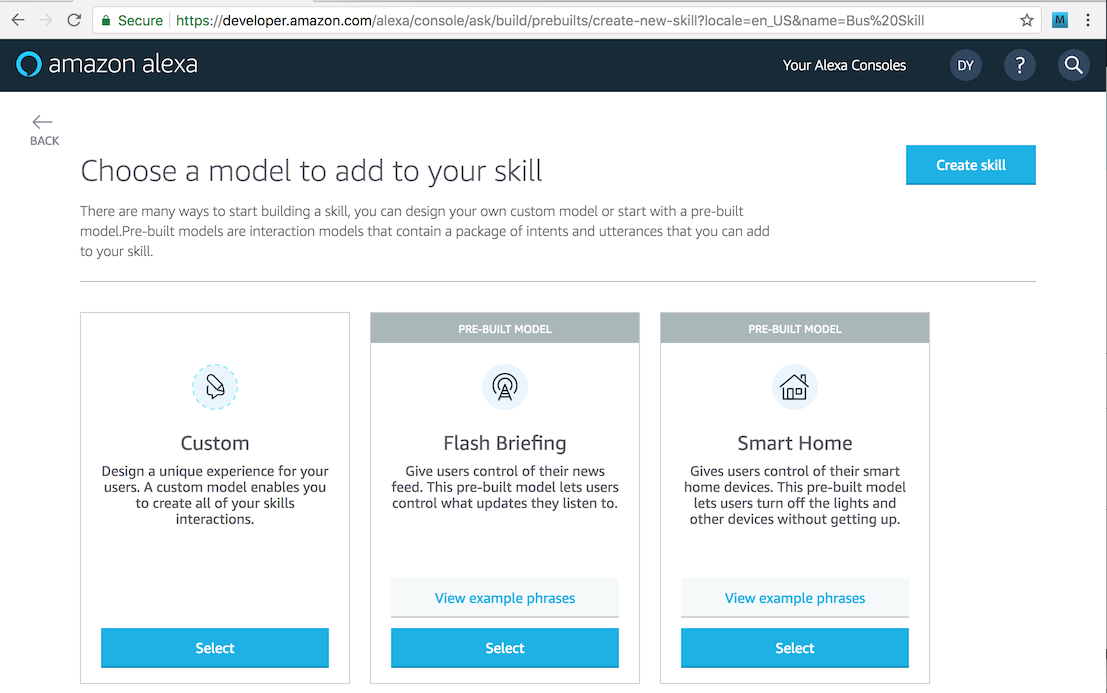
Choose “Custom”, then hit the create Skill button. This will create a skeleton skill. To set it up so it will do anything, we need to fill out information in four areas of the checklist shown on the screen:
- Invocation Name
- Intents, Samples and Slots
- Build Model
- Endpoint
Invocation Name
Tap the invocation section to bring up a screen like below.
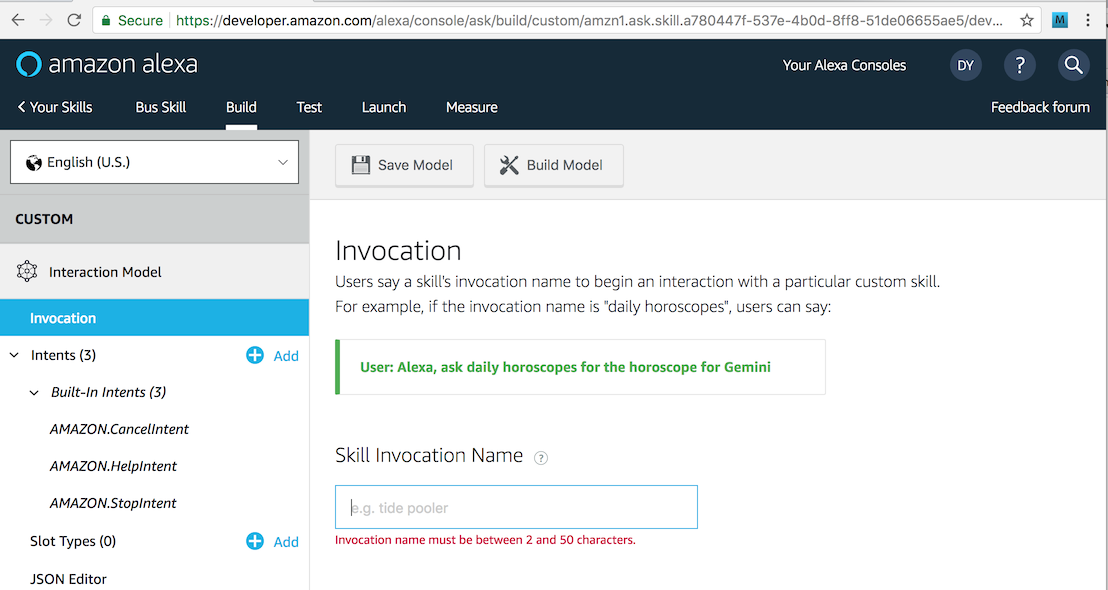
The invocation name is a short set of words that activates your skill. Think of it like a web site’s domain name. Choosing a good invocation name is an important marketing decision, because consumers will have to say “Alexa, ask [invocation name] …” to use your skill.
Fortunately, for demo purposes, we don’t have to worry about marketing. In the Skill Invocation Name, type “david’s bus status”, then hit the Save Model button at the top of the screen.
Intents
Now is where we get into defining the type of questions our skill will answer. The basic idea of our example skill is that it will tell us when the next bus is going for a specific destination. So we might ask:
Alexa, ask David’s bus status when is the next bus to Washington Union Station?
or
Alexa, ask David’s bus status when the next bus leaves for BWI Airport?
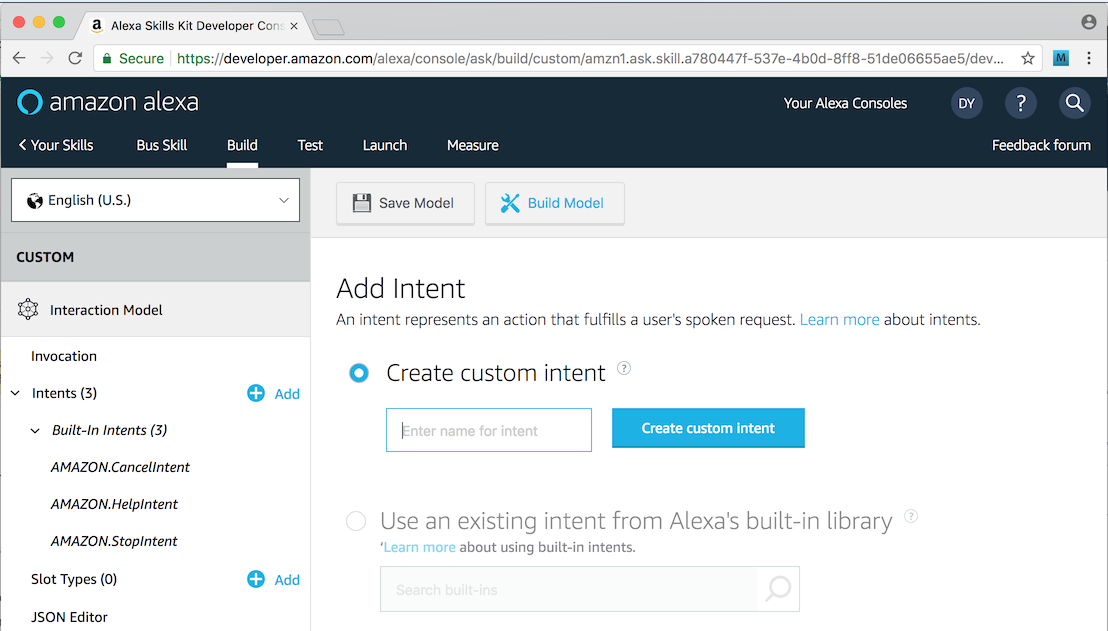
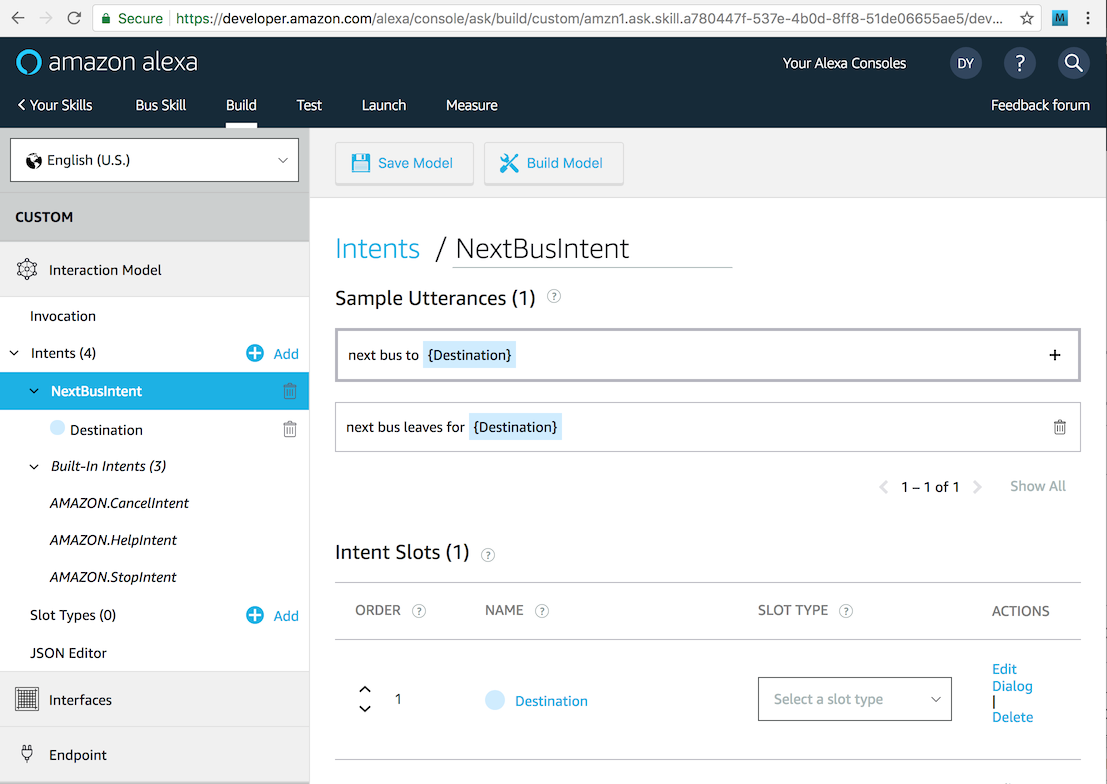
Collectively, all questions of this type are asking the same thing. We refer to this as an “intent”. We can create a new intent to answer this type of question in the Intent section of the web portal. Click on that section, and enter the intent name of “NextBusIntent”, then click “Create Custom Intent”.
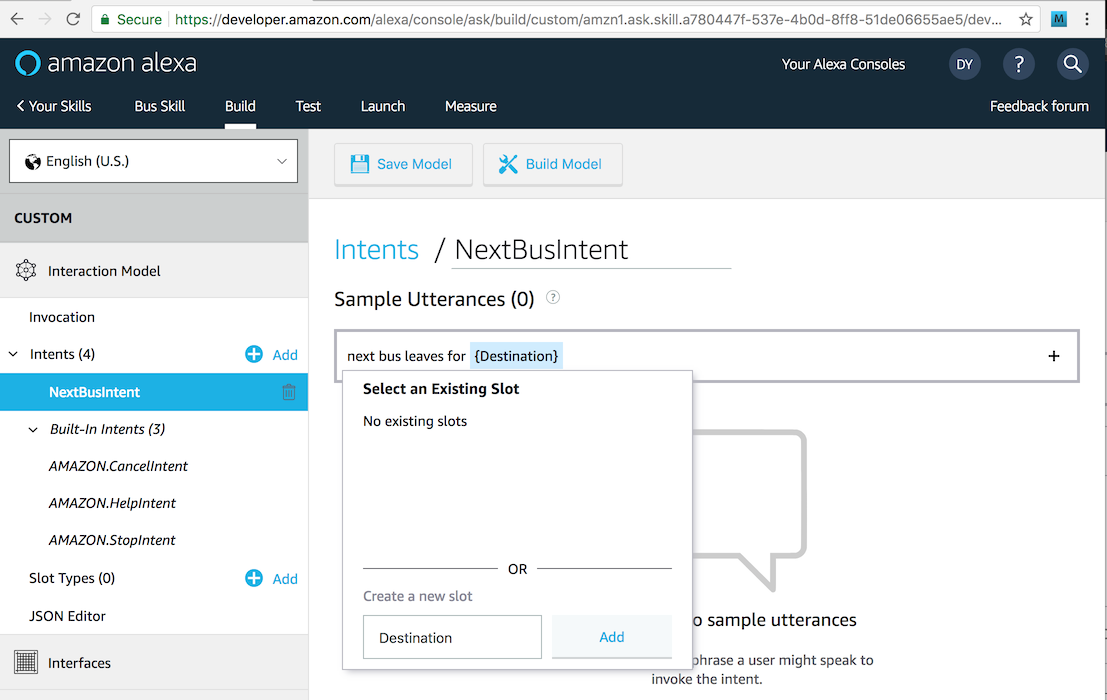
Samples
A sample is a set of words with placeholders that define the actual natural language that Alexa will map to this intent. When supplying samples, you should give as many examples as you can think of, as these will be used to train Alexa’s neural network to recognize the phrases people might speak when they want this kind of information.
Following our examples above, we will enter two samples:
next bus to {Destination}
next bus leaves for {Destination}
The curly braces enclose a placeholder called a “Slot”. In the case of this intent, there is only one slot called Destination. We’ll define the possible values for this slot later.
Notice that the sample utterances do not start with Alexa, do not have question words like “when is the”. Leaving these out generally gives better results as it will match a wider variety of phrasings. If you have several intents, however, you may need to add more words so that Alexa can easily discern one type of intent from the other.
In this case, we’ve only defined two samples. For a real skill, you probably want to have several more, to cover as many possible phrasings as you can think of.
Slots
As you type in the above samples, the console will detect your slot name in the curly braces and prompt you to confirm an existing Slot Type or define a new one. Choose to create a new one as shown here:
When you’ve added all your sample utterances, the screen should look like this:
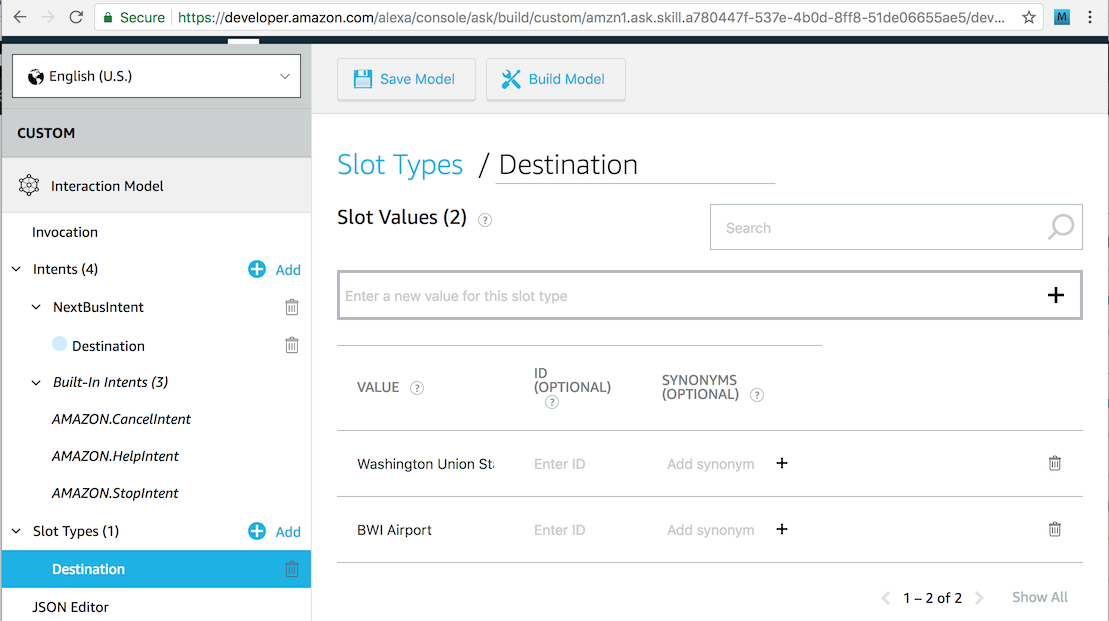
You may notice that the slot type has not been defined for Destination. We’re going to define a custom slot type to hold all our favorite destinations. In the left-hand bar, you’ll see “Slot Types (0)” with a blue + Add button by it. Press that add button to create a new Slot Type.
We’ll define out slot type to be named Destination, and for now we’ll assign two values to it:
Washington Union Station
BWI Airport
A real custom slot might have dozens or hundreds of values. But let’s just keep it to these two so that things are simple. Here’s what the screen should look like:
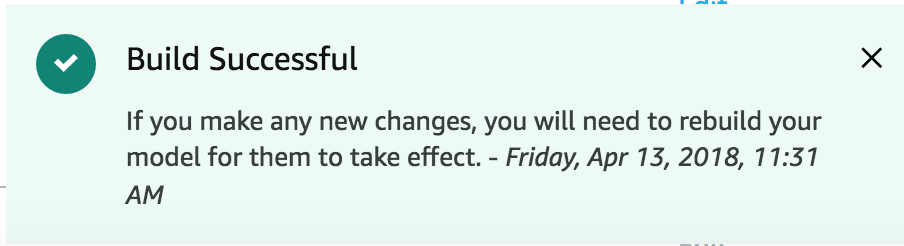
With these steps done, you should now be able to build your Alexa model. Click the button that says Build Model. After a few seconds, you should see a successful result as indicated by a dialog like this:
Processing Questions
While we have built a skill model, it does not do anything. To make it actually answer questions, we must write the code that processes them. The software that does this is called an Endpoint. Amazon provides two ways to write the code that processes questions:
- An HTTPS web service
- An AWS Lambda
Whichever way you choose, the Endpoint will receive the Alexa request (broken up by intents, slots and slot values), then process it to formulate a proper response. The first option requires you to build your own web service, which can be hosted at AWS or another cloud provider, or can be running on a server sitting in your basement – all that is required is that the server have a publicly available URL.
The second option is to use an AWS Lambda. If you haven’t used these before, they are a surprisingly simple way of building code that runs on the internet. The basic idea is that you don’t have a web application server that is running all the time. Instead, you deploy your software function to Amazon as a lambda, and whenever somebody wants to use it, Amazon starts on instance of it on its cloud servers just to handle that single request. Once the request is handled, the lambda instance goes away. This is sometimes called “serverless” computing.
Creating a Lambda
For this example, we’ll set up an Amazon Lambda to process the Alexa queries. This requires going into the AWS console, which is a separate login from the Amazon developer console as described before. If you don’t have an account already, you’ll have to set one up. And Amazon requires that you have a credit card on file for any generated charges. Fortunately, testing a basic Alexa skill can be done entirely with free-tier resources.
Now is the time we need to choose the language we will use for our Lambda. Options include various flavors of Java, Node, Python, C# and Go. The simplest Lambdas may be built by pasting a short snippet of JavaScript/Node source code into the web form. But this won’t work for Alexa skill endpoints, because these require that the Alexa Skills Kit library be bundled with the lambda source code. As a result, we actually have to set up a local build environment to generate the package to be used for the Lambda.
Making a Java/Maven Lambda Build Environment
I can almost hear you groaning as I write this. Don’t worry, for this example, we will keep things as simple as we possibly can so as to focus on Alexa programming and not on Java or lambda programming. We’ll build the lambda using Java 8 and package it with the Alexa Skills Kit using Maven. To proceed, you will need to install two things on your workstation: Java 8, and Apache Maven. Don’t worry if you are not a Java programmer – we will keep this very simple, and the same concepts apply to the other languages as well.
Once you have Java and Maven installed, download a very simple project template from here. You’ll need to unzip the downloaded file. You can then verify it builds, by going into the project folder on the command line and running mvn assembly:assembly -DdescriptorId=jar-with-dependencies package. If it works, you will see the target/busstatus-1.0-jar-with-dependencies.jar get generated. If this does not work, you may need to troubleshoot your Java and Maven installation. Google is your friend.
Before we can actually build our lambda, you need to modify the source code to set the Alexa skill id so the lambda has permission to serve it. To do this, simply open the included BusStatusSpeechletRequestStreamHandler.java file, and change the line below to reference the proper skill identifier that you find at the developer console (https://developer.amazon.com/alexa/console/ask) by drilling down into your skill’s Endpoint section.
supportedApplicationIds.add("amzn1.ask.skill.a780447f-537e-4b0d-8ff8-51de06655ae5");
Once you have edited this and saved the file, rebuild the target with mvn assembly:assembly -DdescriptorId=jar-with-dependencies package so we have a jar file that is ready to upload to Amazon.
Configuring the Lambda on AWS
Log in to https://console.aws.amazon.com, and create a new account if needed.
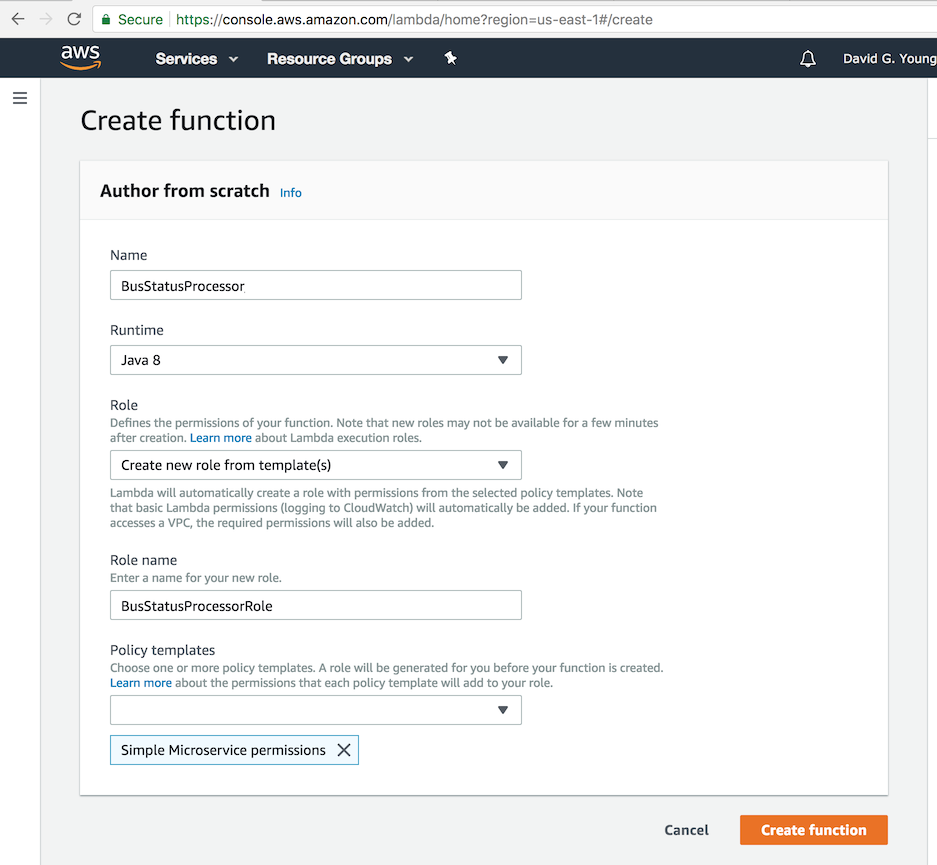
When you get to the main menu, click on “Lambda” under the “Compute” section. This brings up the “Lambda Management Console”. You’ll see a button in the upper-right corner that says “Create function”. Click on it.
We will be authoring our Lambda from scratch so you can see how it works. Fortunately, that is the default option. We’ll name our Lambda “BusStatusProcessor”.
When defining the Lambda, we also have to select an AWS Role for it to execute under. This gets into complex AWS permission and security issues, so we’ll keep it as simple as possible so as not to go off on a huge tangent. We will choose the option to “Create new role from template(s)”, then under the Policy Templates section we’ll choose “Simple Microservice permissions”. This will provide the Lambda enough permissions to serve our question responses. If you need to make the Lambda more sophisticated later (e.g. by accessing an AWS Dynamo DB), then you may need to add more permissions.
We’ll name our new role “BusStatusProcessorRole” for consistency.
If you make all these changes to the screen, it should look like this:
Hit the Create Function button, and you’ll be taken to the next screen which shows the “ARN” for your lambda at the top right of the screen. This is a unique identifier you can use to hook it up to your Alexa skill. Write this number down. Yours will be different, but mine looks something like this:
ARN - arn:aws:lambda:us-east-1:084043463512:function:BusStatusProcessor
Linking the Lambda and Alexa Skill Together
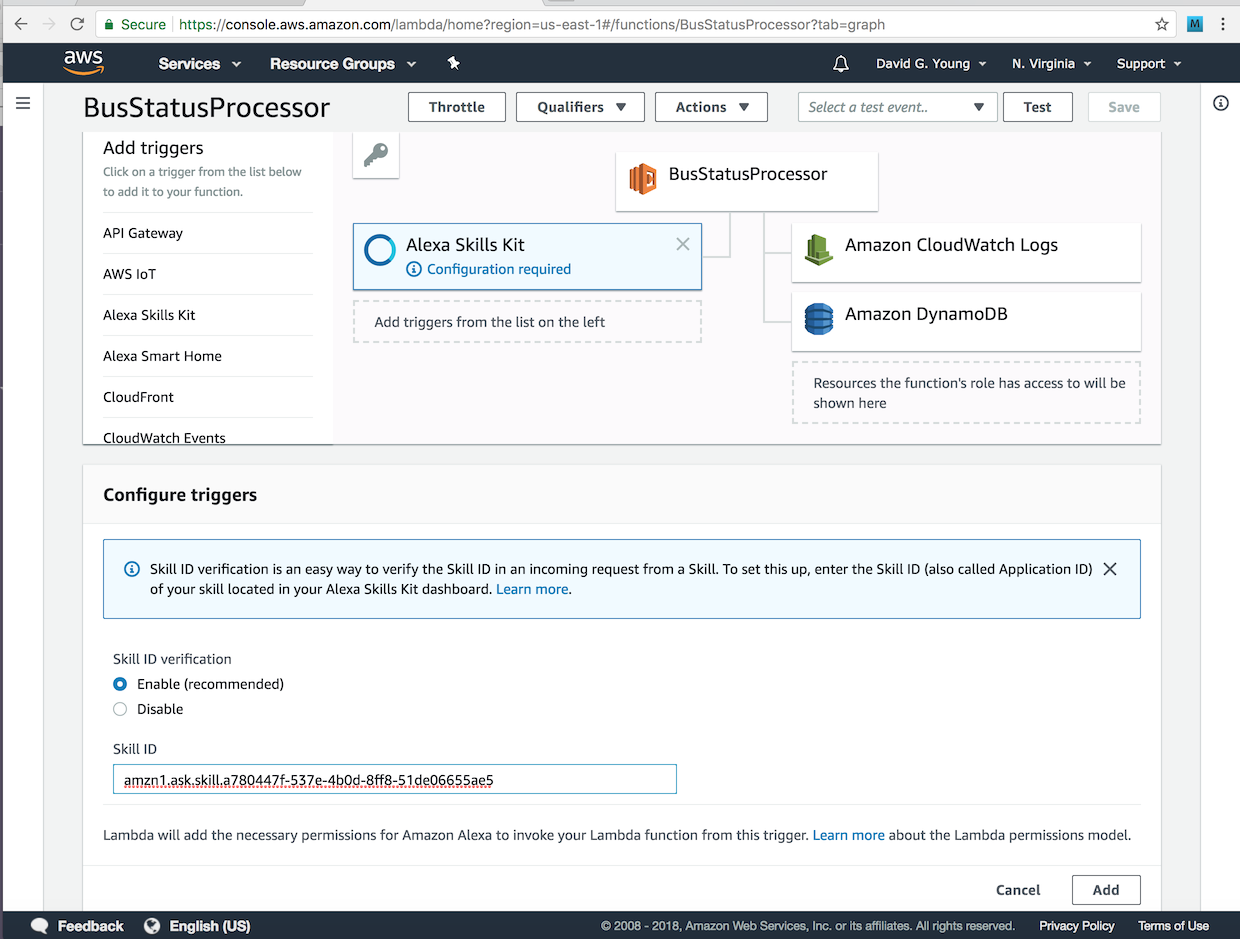
Now go back in to the lambda configuration and look at the “Designer Section”. Tap the “Alexa Skills Kit” from the “Add triggers” section in the Designer section’s top left. This will open up a “Configure triggers” section on the bottom of the page to configure this trigger. You need to set the “Skill ID” to the identifier of your skill from the developer console. Yours will be different, but mine looks like this:
amzn1.ask.skill.a780447f-537e-4b0d-8ff8-51de06655ae5
Again, paste YOUR value (not mine above) into the Skill ID blank on this screen, then tap Add and Save. The screenshot below shows what you should see before you hit Add and Save.
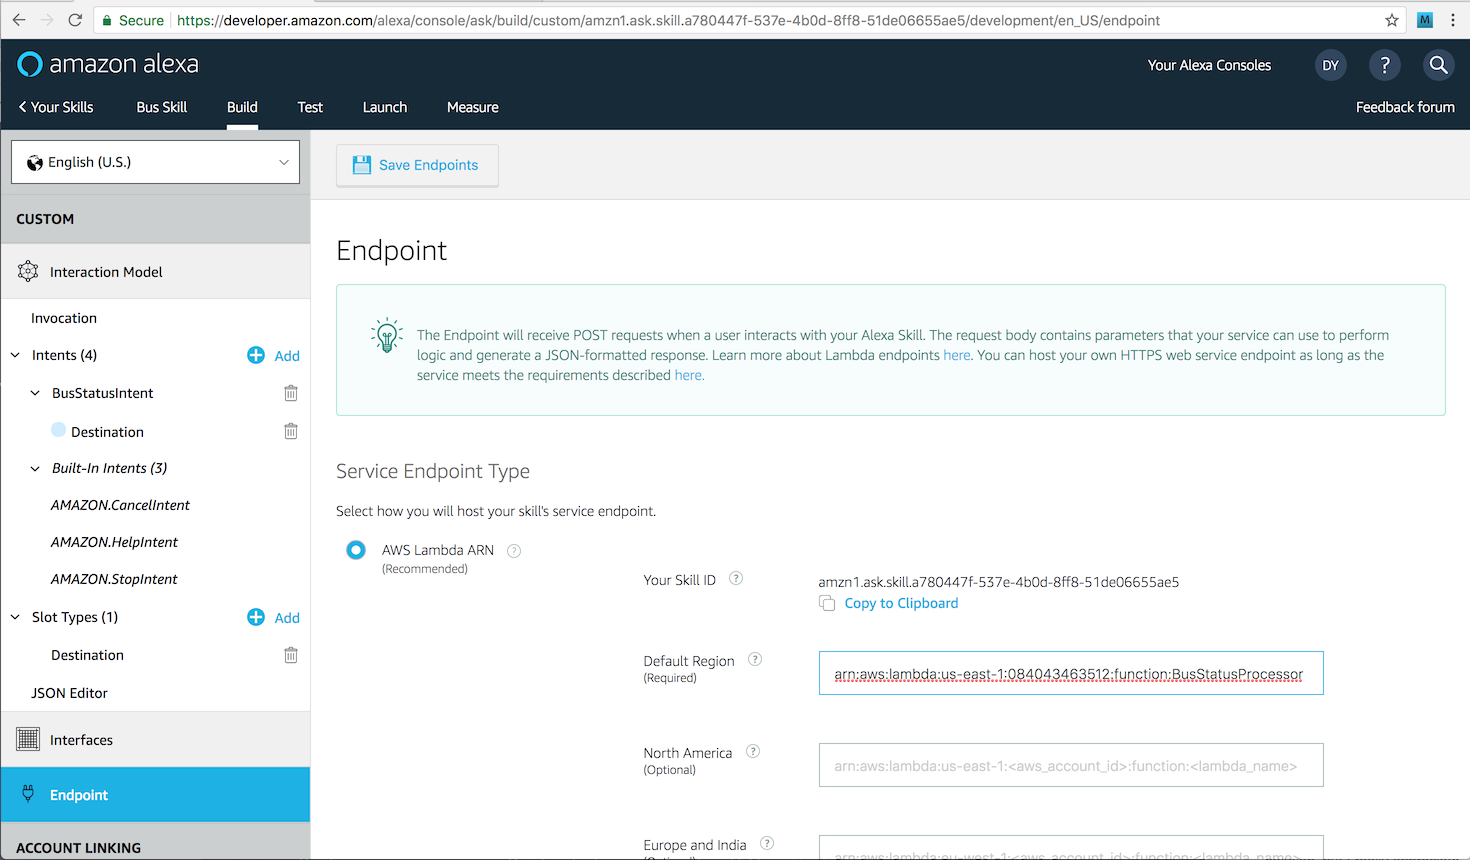
Now we need to do tell the Skill where to find our Lambda. Go back to the Amazon developer portal skill configuration page, and click the Endpoint entry section on your Alexa Skill. Choose the Lambda endpoint option, then paste in the ARN of your Lambda from the previous section. Again, paste YOUR Lambda ARN, not mine shown above. Yours will have a different number but otherwise look similar. Before you submit your form, it should look something like this:
Adding Code to the Lambda
Remember that Java code we wrote? Now it’s time to add this to the Lambda. Go back to the edit lambda page on the AWS console.
Look under the “Function code” section. Make sure that Code entry type is “Upload a .ZIP or JAR file”, the Runtime is set to “Java 8”. In the Handler blank, enter “com.davidgyoungtech.alexa.busstatus.BusStatusSpeechletRequestStreamHandler”. The latter entry tells the lambda which Java class inside the JAR file we are about to upload is where it finds the entry point for executing the Lambda.
Click the “Upload” button, and browse to the location of the busstatus-1.0-jar-with-dependencies.jar file you generated above. Hit the SAVE button at the top of the screen, and it will upload and deploy this file. Note that the JAR file is pretty big (about 7Mb) because it is bundled with the Alexa Skills Kit binary SDK which inflates its size. This file size can slow down the code/build/upload/test cycle, so it would be nice if Amazon would some day offer an option to add this SDK automatically, so we don’t have to waste bandwidth uploading it over and over again. If you know anybody at Amazon, please bug them about fixing this.
Extending the Lambda Timeout and Memory
By default, lambdas can only run for 3 seconds before they get terminated. In practice, this is way too short to do anything since it takes a few seconds just to spin up the Lambda the first time, and it can be super frustrating in development to troubleshoot timeouts. Scroll down on the page to where it ways “Timeout Info” and change the timeout from 3 seconds to 5 minutes. Also change the memory to 512 Mb – the Alexa Skills Kit is memory hungry. Tap save to persist these changes.
Testing the Skill
We can now do a first test of our skill. On the Amazon developer console skill configuration page, click the test tab on the top bar of the screen. When the test screen opens, you’ll see there is a switch at the top that lets you enable and disable testing for the skill. This will be disabled, by default, so change it to be enabled.
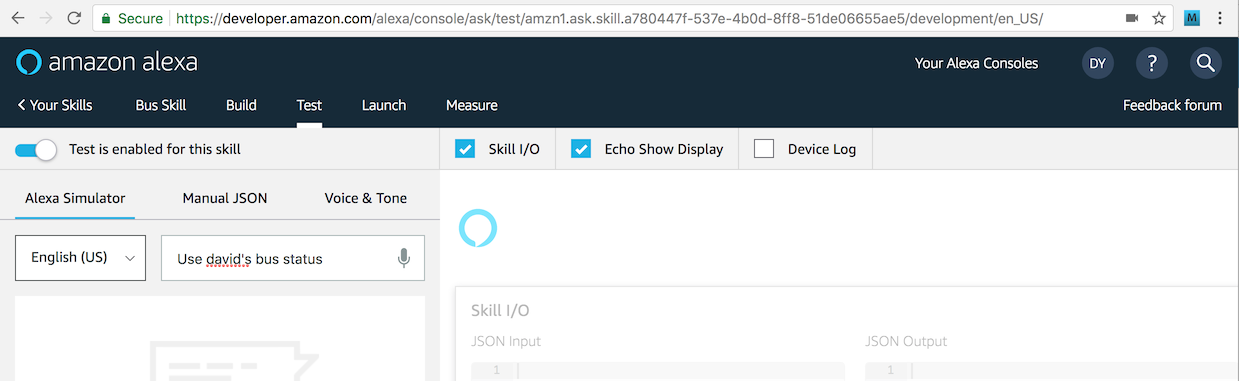
Next type in “use david’s bus status” into the blank at the top of the page (or if you are feeling ambitious, hit the microphone button and very clearly say the same thing.) If all goes well, you’ll see the skill respond with “Welcome to the bus status skill.” like in the screenshot below:
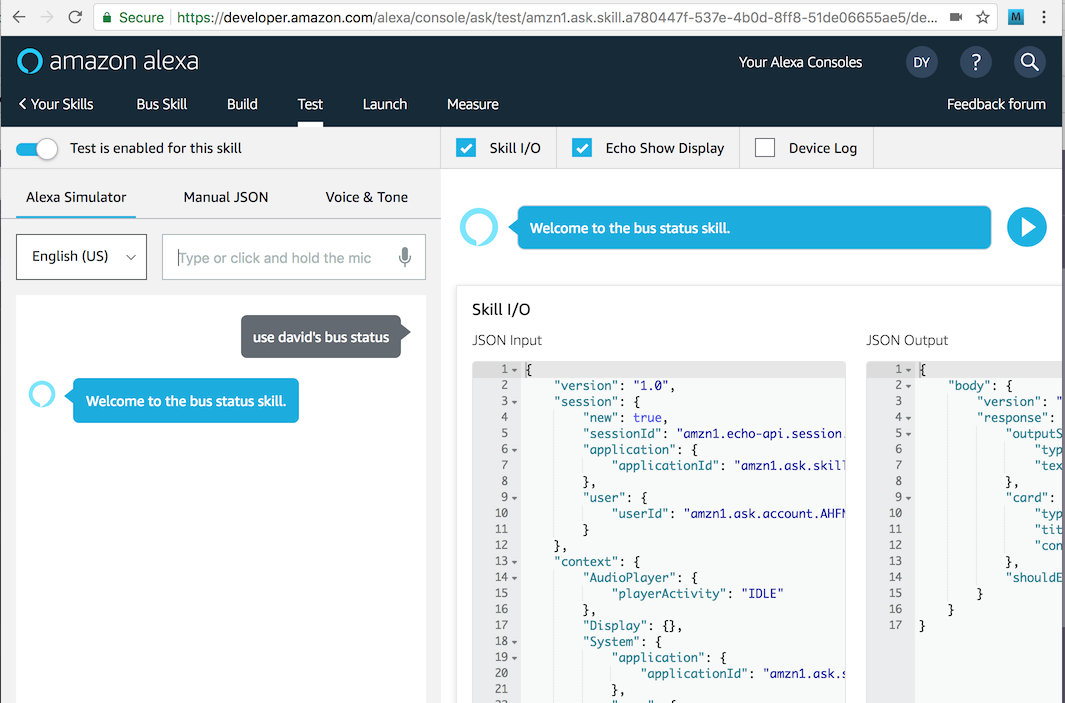
If you don’t see this, move on to the next section on debugging.
Debugging Alexa Skills
If you are lucky, your test in the previous section went as expected. But if you got one little thing wrong, you’re likely to have gotten the dreaded Alexa response, “There was a problem with the requested skill’s response”. What does that mean? Unfortunately, it can mean almost anything.
Like in many types of programming, the easiest thing to check is the log. But with an Alexa skill, where is the log? By default, all log lines in your lambda program go to an AWS Cloudwatch. You can bring up the cloudwatch console in AWS by navigating from the main AWS menu, or going to this URL: https://console.aws.amazon.com/cloudwatch
In the left menu, choose Logs, and when you do you’ll see a list of the “Log Groups”, one of which should be “/aws/lambda/BusStatusProcessor”. If you don’t see this, then this means that nothing was logged, likely meaning your lambda was never even invoked. Go back and check all the settings to make sure your skill and your lambda are linked together properly.
If you do see the desired, log group, click on it, and you’ll be shown a number of log files you can view. Usually you’ll want to look at the one with the newest timestamp. Click on that, and you’ll see lines like this:
22:09:47 START RequestId: 8976ac26-44e7-11e8-a73d-f5771e6e3049 Version: $LATEST
22:09:49 2018-04-20 22:09:49 <8976ac26-44e7-11e8-a73d-f5771e6e3049> INFO BusStatusSpeechlet:24 - onSessionStarted requestId=amzn1.echo-api.request.fb4ea6cd-206c-450c-a565-8c7e263807a5, sessionId=amzn1.echo-api.session.be934956-7328-443f-9f4c-4accc76ec7f3
22:09:49 2018-04-20 22:09:49 <8976ac26-44e7-11e8-a73d-f5771e6e3049> INFO BusStatusSpeechlet:30 - onLaunch requestId=amzn1.echo-api.request.fb4ea6cd-206c-450c-a565-8c7e263807a5, sessionId=amzn1.echo-api.session.be934956-7328-443f-9f4c-4accc76ec7f3
22:09:50 Unresolved compilation problem: Syntax error, insert ";" to complete ReturnStatement : java.lang.Error java.lang.Error: Unresolved compilation problem: Syntax error, insert ";" to complete ReturnStatement at com.davidgyoungtech.alexa.busstatus.BusStatusSpeechlet.getTallResponse(BusStatusSpeechlet.java:76) at com.davidgyoungtech.alexa.busstatus.BusStatusSpeechlet.onLaunch(BusStatusSpeechlet.
22:09:51 END RequestId: 8976ac26-44e7-11e8-a73d-f5771e6e3049
22:09:51 REPORT RequestId: 8976ac26-44e7-11e8-a73d-f5771e6e3049	Duration: 3770.78 ms	Billed Duration: 3800 ms Memory Size: 512 MB	Max Memory Used: 82 MB
22:09:52 START RequestId: 8c7c23f9-44e7-11e8-9dcf-dffb5b20a0ab Version: $LATEST
22:09:52 2018-04-20 22:09:52 <8c7c23f9-44e7-11e8-9dcf-dffb5b20a0ab> INFO BusStatusSpeechlet:53 - onSessionEnded requestId=amzn1.echo-api.request.97a66671-7460-42a0-9ece-3201946b7b20, sessionId=amzn1.echo-api.session.be934956-7328-443f-9f4c-4accc76ec7f3
22:09:52 END RequestId: 8c7c23f9-44e7-11e8-9dcf-dffb5b20a0ab
22:09:52 REPORT RequestId: 8c7c23f9-44e7-11e8-9dcf-dffb5b20a0ab	Duration: 203.23 ms	Billed Duration: 300 ms Memory Size: 512 MB	Max Memory Used: 85 MB
In my case, I have an “unresolved compilation problem”, something that is easy to fix. Whatever problem you have, you’ll have to think hard and look for clues like any programmer must do when debugging with log files. Once again, Google is your friend.
Understanding the Skill Lifecycle
Before we go further, let’s take a look at the lambda template, so we can understand how lambdas work with Alexa skills. Again, don’t worry if you are not a Java programmer, the conscepts we will describe are universal to programming Alexa lambdas with all languages.
Here’s what our boilerplate lambda looks like:
public class BusStatusSpeechlet implements SpeechletV2 {
    private static final Logger log = LoggerFactory.getLogger(BusStatusSpeechlet.class);

    @Override
    public void onSessionStarted(SpeechletRequestEnvelope<SessionStartedRequest> requestEnvelope) {
        log.info("onSessionStarted requestId={}, sessionId={}", requestEnvelope.getRequest().getRequestId(),
                requestEnvelope.getSession().getSessionId());
    }

    @Override
    public SpeechletResponse onLaunch(SpeechletRequestEnvelope<LaunchRequest> requestEnvelope) {
        log.info("onLaunch requestId={}, sessionId={}", requestEnvelope.getRequest().getRequestId(),
                requestEnvelope.getSession().getSessionId());
        return getTallResponse("Welcome to the bus status skill.");
    }

    @Override
    public SpeechletResponse onIntent(SpeechletRequestEnvelope<IntentRequest> requestEnvelope) {
        IntentRequest request = requestEnvelope.getRequest();
        Session session = requestEnvelope.getSession();
        log.info("onIntent requestId={}, sessionId={}", request.getRequestId(),
                session.getSessionId());

        Intent intent = request.getIntent();
        if ("BusStatusIntent".equals(intent.getName())) {
            return getAskResponse("You have triggered the bus status intent.  I have no answer for you yet.");
        }
        else {
            throw new IllegalArgumentException("Unrecognized intent: " + intent.getName());
        }
    }

    @Override
    public void onSessionEnded(SpeechletRequestEnvelope<SessionEndedRequest> requestEnvelope) {
        log.info("onSessionEnded requestId={}, sessionId={}", requestEnvelope.getRequest().getRequestId(),
                requestEnvelope.getSession().getSessionId());
    }
There are four methods here, each of which corresponds to an event in the Alexa lifecycle:
- OnLaunch - this is called when we activate our skill: “Use David’s Bus Status”
- OnIntent - this is called when a user asks a question. “When is the next bus?”
- OnSessionStarted - this is called when a user’s conversation begins. It is typically right before OnLaunch or OnIntent.
- OnSessionEnded - this is called when a user session times out or is ended programmatically. It basically means that saved state is lost.
Note that these lifecycle events can be triggered one after the other, automatically. If we type into our skill tester, “use david’s bus status to find the next bus to bwi”, two events fire in order: OnSesisonStarted and OnIntent. Based on the code above, the system responds with “You have triggered the bus status intent. I have no answer for you yet.”
By far the most important event above is onIntent. This is where you’ll do most of your work in answering questions. These same event handlers apply to buildling Alexa skills with any language. So if you are going to build in with JavaScript/Node, Go, or Python, the same concepts apply.
Adding Logic
So far Alexa skill does not do much besides acknowledge it has been invoked. How do we make it tell us when the next bus is? Since this isn’t a tutorial on Java or web services programming, we’ll keep things very simple so as not to distract from the core subject of building Alexa Skills. A robust bus schedule app would probably call out to a web service to get the next bus arrival time for a particular bus stop. Open standards like GTFS let you access transit schedules from many municipalities. Here’s the page to access GTFS feeds for Washington, DC: https://transitfeeds.com/p/wmata/75
So the code is easily understandable, we’ll simply store our bus schedule in an array, and search through it for a match when the skill is invoked.
    String[][] dailyBusSchedule  = new String[][] {
    		{ "BWI Airport", "07:30" },
    		{ "BWI Airport", "08:30" },
    		{ "BWI Airport", "12:30" },
    		{ "BWI Airport", "15:30" },
    		{ "BWI Airport", "20:45" },
    		{ "Washington Union Station", "07:10" },
    		{ "Washington Union Station", "08:40" },
    		{ "Washington Union Station", "09:10" },
    		{ "Washington Union Station", "10:40" },
    		{ "Washington Union Station", "11:10" },
    		{ "Washington Union Station", "12:40" },
    		{ "Washington Union Station", "13:10" }
    };
As you can see from the above, this is a two dimensional array where each row is a schedule entry and the columns are the destination and the departure time. Everything is stored as a string. Clearly we could make a much fancier data structure (or even a database), but we’re keeping things really, really simple.
Accessing Slots from Intents
Remember that “intent” is fancy Alexa lingo for a question, so we’ll be putting our code inside the OnIntent method. Remember when we defined our questions before? The place holders for the values in the questions are called Slots. In our case, the slot we care about is the bus destination, and when we defined it we gave it the slot identifier of Destination.
We can get access to the slot from the intent object, which is passed in to the OnIntent method:
Slot slot = intent.getSlots().get("Destination");
If our slot is null, then that means it was not provided in the question. If it is not null, we can get the value of the slot with
String destination = slot.getValue();
Coding OnIntent
Now that we have the destination, we can iterate through our table to find the closest match. The logic is pretty straightforward, but for those of you unfamiliar with Java, here are two explanations:
- The lines below are a way to get the current time as a String in hours and minutes. We do this in 24 hour time format so we can do string comparisons of the times and have the > and < operations work on a string just as if it were a number. Note that I am explicitly setting the time zone to eastern time, otherwise Alexa would give answers as if the time were UTC. You may wish to change this for your time zone, or add fancy logic to adjust for the user’s time zone.
SimpleDateFormat timeFormatter = new SimpleDateFormat("HH:mm"); timeFormatter.setTimeZone(TimeZone.getTimeZone("US/Eastern")); String now = timeFormatter.format(new Date()); - The line below compares the scheduedDepartureTime string to the now time string and returns a positive value if the scheduledDepartureTime string comes after the now string. A value > 0 basically tells us the time is in the future.
scheduleDepartureTime.compareTo(now) > 0
With those items in mind, here is the simple algorithm I put together:
    public SpeechletResponse onIntent(SpeechletRequestEnvelope<IntentRequest> requestEnvelope) {
        IntentRequest request = requestEnvelope.getRequest();
        Session session = requestEnvelope.getSession();
        log.info("onIntent requestId={}, sessionId={}", request.getRequestId(),
                session.getSessionId());

        Intent intent = request.getIntent();
        if ("BusStatusIntent".equals(intent.getName())) {
        		Slot slot = intent.getSlots().get("Destination");
        		String firstDailyDepartureTime = null;
        		String nextDepartureTime = null;
        		SimpleDateFormat timeFormatter = new SimpleDateFormat("HH:mm");
        		timeFormatter.setTimeZone(TimeZone.getTimeZone("US/Eastern"));
        		String now = timeFormatter.format(new Date());
        		if (slot != null) {
            		String destination = slot.getValue();
            		for (String[] scheduleItem : dailyBusSchedule) {
            			String scheduleDestination = scheduleItem[0];
            			String scheduleDepartureTime = scheduleItem[1];
            			if (scheduleDestination.equalsIgnoreCase(destination)) {
            				if (firstDailyDepartureTime == null) {
            					firstDailyDepartureTime = scheduleDepartureTime;
            				}
            				// If nextDepartureTime is not yet set and the
            				// scheduleDeparture time is in the future use it is
            				// the nextDepartureTime
            				if (nextDepartureTime == null &&
            					scheduleDepartureTime.compareTo(now) > 0) {
            					nextDepartureTime = scheduleDepartureTime;
            				}
            			}
            		}
            		if (firstDailyDepartureTime == null) {
            			return getAskResponse("I don't know about departures to "+destination+".  Try a different destination.");
            		}
            		else if (nextDepartureTime == null) {
            			return getAskResponse("The next bus for "+destination+" is tomorrow at "+firstDailyDepartureTime);
            		}
            		else {
            			return getAskResponse("The next bus for "+destination+" is today at "+nextDepartureTime);
            		}

        		}
    			return getAskResponse("Please specify a destination.");
        }
        else {
            throw new IllegalArgumentException("Unrecognized intent: " + intent.getName());
        }
    }
In the code above, two values are calculated: nextDepartureTime and firstDailyDepartureTime. If there is no nextDepartureTime for a destination, then that means there are no more busses today for that destination. If there is no firstDailyDepartureTime, then that means there aren’t any busses at all for the requested destination.
The three combinations of these two variables being populated or not give us our three possible text responses shown with getAskResponse calls. And as you’ve probably figured out, Alexa will automatically convert our text responses to speech f for us!
Running the Final Test
If you’ve made the above changes, you’ll need to recompile your code and upload it to the lambda in the AWS console like we did before so it will execute. If you do that, you can return to the Skill Tester and type in questions:
Q: ask david’s bus status when is the next bus to bwi airport
A: The next bus for bwi airport is today at 20:45
Q: ask david’s bus status when is the next bus to washington union station
A: The next bus for Washington union station is tomorrow at 07:10
Your answers will vary depending on the time of day you ask and what time zone you are in. Remember, the code assumes you are in US Eastern Time.
Going Forward
This tutorial has shown you how to get a basic Alexa skill running. From this basic template, you can rework what you have for your own use case.
After lots of testing, you’ll certainly want to share it with your colleagues for them to try, too. Amazon lets you set up a beta test where you can invite people to use the skill on real Amazon Echo devices. Once you are happy with your product, you’ll need to submit your skill to Amazon for review, much like an iOS app get reviewed by Apple before it is allowed in the Apple App Store.
Before you get there, you’re sure to find plenty of idiosyncracies with the Alexa toolkit, and unfortunately, it’s still a bit too niche of a technology to find easy help. If you’re stuck, search questions on StackOverflow.com, or post there or on Amazon’s Alexa Skills Kit developer forum here: https://forums.developer.amazon.com/topics/alexa+skills+kit.html
If you have issues with this tutorial, please create an issue in the sample skill’s Github repo here.
If you get totally stuck, tell your boss to hire me to help. I may not know the answer to your problem right away, but I’m always eager to get the job done.